1978 XS400-2E Intro and Build

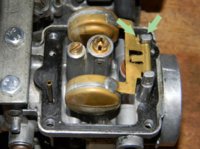
As you can see in this photo, which is not mine, the tab is not touching the "tower"/"perch" or whatever, but it should be. This limits the movement of the float and allows it to pivot properly on the pin. In the resting position as shown in the photo it should just be touching the perch. When the tab is not touching the perch there is a lot of slop and play in the float and it is very difficult to adjust the height using the tang in the middle that rests on the needle.

I am guessing this happens a lot when you bend the center tang by pushing against the float while it is resting on a flat surface; you end up squashing this tab. It bends back easily with pliers.
 

Attachments

  • bs34_tab_bent.jpg
    bs34_tab_bent.jpg
    110.1 KB · Views: 436
I thought I would post a few interesting things I have come across while rebuilding my bike.

All balls steering stem bearings:

I managed to install these without any special tools. I literally used the stock steering stem races, triple tree, and a block of wood. The following instructions might be a little hard to follow, however!

I used a block of wood to pound in the new top race. For the new bottom race I stacked two of the stock races together as shown in the photo and taped them in place with masking tape; simply whack away with a rubber mallet. To drive the new lower taper bearing on to the lower triple tree I used the stock lower race from the lower triple tree; remove the stock lower race from the lower triple tree, slide on the new taper bearing, flip over the stock lower race and slide it over the new taper bearing, take the upper triple tree and insert a fork leg "loop" over the stock lower race and new taper bearing; whack the whole assembly with a rubber mallet.

Balancing wheels and tires:

I really didn't want to order bearings and I could not find anything local. I gambled on a patio roller replacement set and it just so happens that steel rods from the hardware store fit in these bearings perfectly. See the photos for how I set this up. A local dealer gave me wheel weights for free.
 

Attachments

  • build1.jpg
    build1.jpg
    168.7 KB · Views: 359
  • build2.jpg
    build2.jpg
    167 KB · Views: 348
  • build3.jpg
    build3.jpg
    172.3 KB · Views: 357
  • build4.jpg
    build4.jpg
    206.8 KB · Views: 361
I bought a 1996 Suzuki GSX-R shortly after "finishing" the XS400. When the gixxer is down for maintenance I ride the XS. I still have not had any problems with it since I drilled new threads for the spark plug even after about a thousand miles. Oh, and I also taught my mom how to ride on the XS :) She took the safety course after and has a Ninja 250 now.

As for plans I intent to pull the XS apart again this winter to clean it up further, paint the frame, and install a proper, reasonably comfortable seat. Other than that the XS has been rock solid and wheelies pretty good :)

Attached are some photos of the gixxer; before and after I painted it. The previous owner dropped it a few times, but getting rear-ended by a truck at a red light is what pushed me to tackle the job.
 

Attachments

  • gsxr2.jpg
    gsxr2.jpg
    231.7 KB · Views: 340
  • gsxr1.jpg
    gsxr1.jpg
    218.2 KB · Views: 315
  • gsxr750.jpg
    gsxr750.jpg
    228.3 KB · Views: 339
Right now I am finishing up all of my secondary applications. After I am done with these I wait and see if any of the schools want to interview me. If the interview(s) go well I am either accepted, wait-listed, or rejected. It is rare to be rejected outright after an interview as people are thoroughly screened before this stage.

So, this is where I am at right now. The entire process is grueling and very drawn out. I really can't wait to be done with the last of these applications! It doesn't help that they are very expensive too.
 
I started the winter rebuild. Tearing the bike down to the frame took one day.
 

Attachments

  • rb1.JPG
    rb1.JPG
    74.4 KB · Views: 349
This is the second "build" of the same motorcycle. I'm quite impatient, so the first time around I threw everything together quickly just to pass inspection and ride. This time around I am going much more slowly, but there is still going to be a lot of room for improvement in the future.

Here are more progress shots:
 

Attachments

  • rb6.JPG
    rb6.JPG
    72.1 KB · Views: 299
  • rb5.JPG
    rb5.JPG
    73.4 KB · Views: 314
  • rb4.JPG
    rb4.JPG
    72.5 KB · Views: 304
  • rb3.JPG
    rb3.JPG
    71 KB · Views: 301
  • rb2.JPG
    rb2.JPG
    73.7 KB · Views: 316
Daily update:

I spent hours trying to get a frozen bolt out, drilled it, broke an extractor in it, drilled the extractor out, broke a bigger extractor in it, currently drilling that out...
 

Attachments

  • rb8.jpg
    rb8.jpg
    220.3 KB · Views: 321
  • rb9.jpg
    rb9.jpg
    189.2 KB · Views: 344
She's a roller.

I tore down the top end yesterday. Closer inspection revealed a leaking head gasket and a lean right side. Gasket and oil seal kits are on the way.
 

Attachments

  • rb10.jpg
    rb10.jpg
    240.1 KB · Views: 339
I finally got the cylinder block off; it was stuck by the gasket. A propane torch did the trick. The lower gasket was completely soaked with oil. I don't think that is normal!

Does anyone know if typical gasket kits come with new o-rings/seals for the oil inlets in the head? Should I reuse them? I bought an athena gasket set and an oil seal kit so far, but they won't be here for a bit.
 

Attachments

  • rb11.jpg
    rb11.jpg
    210.5 KB · Views: 331
It should come with those o-rings. I would not reuse any gasket or o-ring, bad idea. Oh, I sent your cap out today should get it in a few days.
 
the Athena kit has everything except the main oil seals.

it has the red O rings which go under the barrels, O rings for the cam caps, o rings for the rocker retainers, valve seals and all the gaskets
 
I intend to clean this up a bit more, but I roughed up a brake light and license plate mount by bending 90-degree shelf brackets by hand with a hammer, vice grips, and bench vice.
 

Attachments

  • rb12.jpg
    rb12.jpg
    199.5 KB · Views: 317
Back
Top