Don't leave the key on for a long time as it will send power to the coils and if the the bike is not running they will over heat and burn out. No the condenser has nothing to do with your battery running down. It keep the points for wearing out by keeping the extra voltage a place to go. Google "what does a condenser do" and you will get the entire story.
-
Enjoy XS400.com? Consider making a donation to help support the site.
XS400.com receives a small share of sales from some links on this page, but direct donations have a much greater impact on keeping this site going.
You are using an out of date browser. It may not display this or other websites correctly.
You should upgrade or use an alternative browser.
You should upgrade or use an alternative browser.
Engine randomly dying
- Thread starter jonjkim12
- Start date
jonjkim12
'77 XS360 Owner
Ok got it.
ya i was turning the turn on and off everytime i wanted to check my timing at the F marks, but i may have done it too many times without running the bike. does that sounds possible?
otherwise, i messed up something else while doing my points (hope not).
ya i was turning the turn on and off everytime i wanted to check my timing at the F marks, but i may have done it too many times without running the bike. does that sounds possible?
otherwise, i messed up something else while doing my points (hope not).
jonjkim12
'77 XS360 Owner
i swear i follow all my manual instructions exactly and i only make my bike worse.
so i re did my timing. I got my bike started after charging the battery, but the timing sounded way off. so i figured i'd do it just one more time. got the timing marks EXACTLY (didn't think it was possible), but when i went to start the bike, it wouldn't start.
opened the timing cap up again and turned the engine with the timing light and it would NOT light up at any point in the turns. i cranked it around a dozen times, and the light didn't turn on once.
what's happening here? the battery was still full, lights and battery work. tested the light on the battery, it was fine.
Last edited:
I was going through the thread (briefly), sorry to see your troubles ...
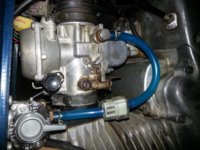
Your fuel line looks "under stress" with all the angles, you can loosen that bolt on the carb and turn the connector facing more down to make fuel line with filter into one curved line (attached pic of my setup).
Points (contacts) must be clean (tiny shaving of metal or grain of sand can get in between and screw timing big time), and they should contact each other with flat spot. I would not shy away from filing them a bit if needed.
To check timing (based on my experience with other bikes) you should be able to turn crankshaft few degrees back and forth of the mark and contacts should engage/disengage as mark passes. With ignition on and spark plug out and connected you should see the spark (do not put spark against the opening or it may ignite fuel mixture).
Also, the bike has mechanism to advance timing as rpm goes up (those springs with some weights behind the contact plate), they should be clean, oiled, and whole mechanism should work. It can get stuck in advanced position at high rpm and cause bike to die at lower rpms (if it does not return back).
Just some thoughts... hope it helps.
Attachments
Last edited:
jonjkim12
'77 XS360 Owner
Hey guys,
ya i've watched that vid a least a dozen times. im pretty confident i got the timing and gap correct. after setting the timing/gap last night, i tested it again withthe bolts tightened and it lit up exactly where it was supposed to. but once i put all the covers back on and tried to kick the bike, it wouldn't start.
that's when i opened it back up and realized it wouldn't light up the test light at all while rotating the motor. i'll play with it again tonight i guess, just wanted to mention it in case this was a common symptom.
thanks XS400NJ for reading through the thread, its kinda long now. I do plan on re doing the fuel line as well...once i can get this timing set. haha
Last edited:
This points system is very simple. You can see what contacts are doing and it should be easy to track why control lamp is not on. (If I remember correctly lamp should go "off" as you rotate crankshaft to pass mark, it is separation of contacts that causes spark).
Make sure eccentric (the metal thing in the middle that contacts slide on) is sitting tight (no wobbling) and it should be free to rotate forward and back for timing advancing as in this video:
or this
(well, both of these videos are examples of bad condition of advancing, yours should be clean and tight)
Make sure eccentric (the metal thing in the middle that contacts slide on) is sitting tight (no wobbling) and it should be free to rotate forward and back for timing advancing as in this video:
(well, both of these videos are examples of bad condition of advancing, yours should be clean and tight)
jonjkim12
'77 XS360 Owner
Thanks! i'll definitely check that later today.
the way i hooked up my timing light, it turns on when it hits the LF/RF mark (i have one clip to the point and grounded to the engine)
I don't remember it being wobbly, and it definitely worked 10 min before i ran into this problem, but I'll check anyways.
I did notice my orange wire was fraying (the wire wrapping, not the actual wire) hoping some electrical tape over it will prevent any problems there.
any other reasons why its not getting electricity there?
any other reasons why its not getting electricity there?
many... ignition off, kill switch, fuse, coil connector, coil... but is should be easy to trace.
sometimes the bikes likes a little attention. if the gounds haven't been touched in a while, They will though some funky electrical gremmlins at you. For instance my electric start didn't want to start, after I spent quality time with it, and spliced, and solderied on the new segment, it tried to start, once. Then after all that, it refused to work. I took the headlight apart, multi-metered the blue white wire from push button to the starter solenoid, I tested fine. I pulled the connector apart in the headlight housing, and put it all back together after shinny up the ground in the throttle area. Since yesterday (knock on wood) I have successfully started my motor every time with the electric start. Before yesterday, it was kick only for the last month and half. hope that helps.
I have successfully started my motor every time with the electric start. Before yesterday, it was kick only for the last month and half. hope that helps.jonjkim12
'77 XS360 Owner
thanks arfstrom, unfortunately i have even less experience with electrical work than motorcycle mechanics.
I just spend a good hour looking through the points again. Everything at the points looked fine. i can only assume this has something to do with wires. especially since i can't get my test light to light up on either side when rotating the engine around and around and around. If the timing were off, it should at least light at up some point, right? yesterday both sides lit up after setting my points.
it has to be something before the points that's not giving it any electricity. i'm going to take my tank off and check the wires that feed into the points. if i find anything that looks iffy, and i just clean it a bit and wrap it up with electrical tape, that should serve as a temporary solution, right?
Last edited:
It's not going to snow by you anytime soon... take your time ")
I am not 100% clear how you connect your test lamp, sounds like you connect it to "moving" contact and the ground. That means when contacts disconnect your test lamp is connected in series with primary coil. I guess it should give enough juice for lamp to light-up, but ignition must be "on". You can also contact lamp to battery "plus" and "moving" contact, this way lamp will light up went contacts are connected and you can work on setting timing with ignition "off" (I would do it this way).
I am not 100% clear how you connect your test lamp, sounds like you connect it to "moving" contact and the ground. That means when contacts disconnect your test lamp is connected in series with primary coil. I guess it should give enough juice for lamp to light-up, but ignition must be "on". You can also contact lamp to battery "plus" and "moving" contact, this way lamp will light up went contacts are connected and you can work on setting timing with ignition "off" (I would do it this way).
Its is hard to tell what test lamp your talking about. The manual says a strobe light, perfers Xenon. You should be able to use any frame bolt for the ground clamp or engine bolt. If your using some other test lamp. This has been on my to buy list for a year or two.
Then the only thing that moves is the sparkplug connector, from left side, to right side.
Then the only thing that moves is the sparkplug connector, from left side, to right side.
jonjkim12
'77 XS360 Owner
Hey guys,
update. I'm not sure which one of the following fixed my issue, but i'll explain so anyone with the same issue can give it a try.
opened it all up again, took the points off the plate and rotated the flat metal piece connected to the wires 90 degrees so that the metal part sticking out is facing the cover (so theres no short).
i regapped the points, and re did the timing. fully charged the battery immediately after.
then kicked the bike and it ran beautifully. I'll take a picture of how i set up my points in a little bit.
i then synced my carbs with a manometer, and it was perfectly synced, which surprised me. i ordered new pods and will re sync after installing them.
going to go for a test ride today to see if any of my issues from before have disappeared.
jonjkim12
'77 XS360 Owner
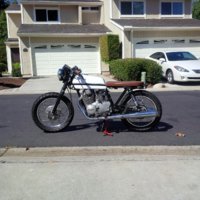
Did a long test drive yesterday.
everything seems to be good now. a little hesitation taking off but i think i just need to re set my mixture screws/idle speed.
ending this issue with a pic.
thanks for all your guys' help, this is a super helpful forum.
everything seems to be good now. a little hesitation taking off but i think i just need to re set my mixture screws/idle speed.
ending this issue with a pic.
thanks for all your guys' help, this is a super helpful forum.
Attachments
jonjkim12
'77 XS360 Owner
Hey guys, back to this.
I am about to install my Uni Filters (http://www.ebay.com/itm/331223465754?_trksid=p2059210.m2749.l2649&ssPageName=STRK:MEBIDX:IT), but when they came in they were way bigger than i thought they'd be.
Currently i have (https://www.denniskirk.com/304625.s...ZrbW01wtTPxRXq0IThZ-lE2xbgDmmDLoW_RoCiA_w_wcB)
Right now with the Emgo's i am at 2.75 turns out. Not sure how much more air the Unis allow, but based on the size it seems like i'd be a lot more (please correct me if i'm wrong). I feel like if it does allow more air, i'd need to turn out more possible 3.5 turns, which seems wrong.
do i need to changing my jetting? (never messed with jetting before).
xschris, i know you said before it may not be necessary, but i don't remember if i mentioned my mixture screw settings at the time.
thanks!
With a properly oiled uni filter you should not have to much with jetting. The uni filter won't allow a great deal more air in but the way it comes in will be smoother with less turbulence than the cheap emgo's. When I used a set of uni's ( different style than what you have) on one of my bikes I had to lean the bike a bit.
Last edited:
jonjkim12
'77 XS360 Owner
o wow,
that's great news. thanks again xschris, photos once i install them.
that's great news. thanks again xschris, photos once i install them.
Similar threads
- Replies
- 20
- Views
- 2K