My XS400 "restore"

Yes , but what screen does it have? If you have the later style with the metal band on it that needs to point in a specific direction. I don't think the plate really matters.
View attachment 33213 View attachment 33214 These are much better than the old ones with the weak rubber pegs on them.
Chris what makes that version of the screen better? Better keeping scrap residual items from recirculating? I too have old version with 4 rubber stub legs
 
I know the newer type hold tighter in the motor as the rubber stilt ones get weak over time. Yamaha must have felt this a better design than the old ones and you can't argue with that. I run them with all my bikes.
 
So despite everything I have tired for the starter clutch I was not successful in getting it working properly. It continued to slip. I bought new springs, new pins, and one new starter roller and I measured it and compared it to the other rollers.

I stumbled onto this thread (http://www.xs400.com/threads/starter-clutch-modification.13334/) about a starter clutch mod. I tried to get with the person that built the modified mode over on the other forum about purchasing a modified clutch. The person never responded but based on one of the comments in that other forum it appears that the xv250 starter clutch was a very close match to the xs400. I verified this with some measurements I got off an aliexpress listing for a xv250 starter clutch from China.

So I bought this xv250 starter clutch off of ebay and started the modifications.

I drilled out the threaded mounting holes on the new starter clutch bearing assembly with a 5/16 inch bit. Then I manually centered a 1/2 inch bit over each hole and slowly drilled down to drill out part inner circle part by the bearing. I then match drill, with the 5/16 inch bit, a starter divet with the assembly in place on top of the rotor just to mark a position for a new hole to tap. I then drilled that hole with a 17/64 drill bit and tapped it with m8-1.25 thread tap. I had to drill down the 1/2 inch bit lower into the new starter bearing assembly as you can see here:

20190505_143411.jpg

20190505_143352.jpg

20190505_152726.jpg


I have only tapped one new mounting hole into the rotor as I just wanted to test this to see if it fixed my problem. If I had to do it again I would probably find 3 new mounting holes and just tap them in between the existing holes on the new bearing assembly. Reusing the existing holes puts the screw right on the outer edge of the rotor making it a bit hard to get a real good tap on it threads for that hole. I will post pictures of what that looks like underneath once I get back from taking my kids to the park.

Here is a video before the mod:


Here is a video after the mod:

 
I wonder how it will work with the motor running and warmed up. Keep us posted.
 
Well getting it running was quite a bit easier once I got the starter working.


Main issue was that it would die when I turned off the choke but if I gave it some gas when I started it with the choke off it would be fine uh until I came off of the throttle. Turned out I just needed to set the idle screw. So far no issues with the starter modifications. But I will start it here in a few days and then pull the cover off and start it again and give it a few reves to just check the starter chain to make sure it doesn't move. I didn't notice it moving when I had the cover off and initially got it started so I think it will be fine though. Will let you know.

I have a fair amount of exhaust pressure coming out of cracks and holes in the exhaust. As well as up where the exhaust mounts to the engine. Anyone have a good source of exhaust gaskets to use for the fix up front and recommendations for something to patch up a hole on the side of exhaust in the rear?
 
Search OEM part numbers for the correct gaskets.

Well I figured this much but did not know if one place over another was best for purchasing them or if there were some non-oem replacements for these parts that worked well. Ordered two manifold gaskets and a crossover gasket from ebay. Now I just need to figure out how to close up the hole on the side of one of the mufflers and a crack where the muffler joins to the header pipe.
 
I would use the yamaha gaskets. They will fit and work better. Make sure to remove the old head pipe ones as most people tend to do. Some have found two or more packed into the head at one time. JB weld high temp works well for small cracks. If your cracks are large or you think the cross over is very rusty you may start looking for a replacement.
 
I would use the yamaha gaskets. They will fit and work better. Make sure to remove the old head pipe ones as most people tend to do. Some have found two or more packed into the head at one time. JB weld high temp works well for small cracks. If your cracks are large or you think the cross over is very rusty you may start looking for a replacement.

The ones I bought off ebay were legit parts.

For the exhaust, actually just bought a replacement right side exhaust off of eBay to go with the replacement left side exhaust I previously purchased. I only paid 60 bucks for it and I am sure it isnt great but for what it would cost for me to try to pay someone to weld this other crack that probably makes it not as expensive a replacement.

Thanks!
 
As long as it's crack/hole free and the baffles are good in it you should be fine.
 
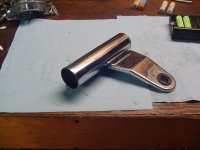
What is your opinion on this fork tube I have here?

20190528_203246.jpg
20190528_203113.jpg


What else should I check for that might be related to this?
 
What is your opinion on this fork tube I have here?

View attachment 33641 View attachment 33642

What else should I check for that might be related to this?

I think is grinder surgery where the head light bracket used to be attached. If that's right then it's just a sleeve over the actual fork. Hopefully the PO did not go too deep and the forks are just fine. I just removed the unmolested stock headlight brackets from my bike so I'd sell them to you if you want to go back to stock head light mounts. Send PM if interested.
 
Thanks sandmanred. Hopefully that is the case. I am a bit unsure. I bought two of those from you already xschris so we shall see. It really looked like to me it was the tube but maybe not. I need to put new seals on the forks and I want to polish then up anyways so they will have to come off.
 
It's hard to keep track to who and what I have sold.:) But if you pull off the top yoke those ears or what's left of them will slide off the fork tubes.
 
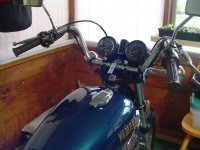
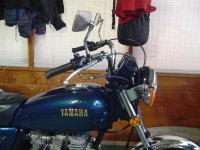
So I rode the bike for a few minutes tonight. I know that short run isnt recommended but it's not quite ready for a real ride. The headlamp, turn signals, and stop lights need to be put on as well as it needs new rubber front and back and have the cables lubed. Probably wouldnt hurt to change the oil again to flush out some junk in there. The bike felt a little squishy when moving side to side. I attributed that to low air in the tires. But if anyone has some other suggestion I would love to hear it. I am intending to perform the front fork maintenance which I thought might help with that as well. Any thoughts?

Also the engine sounds a little bit clicky. I haven't set the valves yet. So that's on the todo list as well. There is a bit of oil on the engine on the front near and under where the exhaust mounts. I do have a set of seals so maybe I need to replace some seals in that area. Any good recommendations of how to easily clean the oil off the engine in order to try to determine exactly where its leaking?

Thanks!
 
Back
Top