Idle speed vs idle mixture screw

Eduard

XS400 Member
Messages
11
Reaction score
0
Points
1
Location
Prague
Hello everyone,

I already posted some novice questions, but let me introduce myself again:

my name is Eduard and I have bought my Yamaha XS400 2A2 79 last year just before winter. I took it out last week and had few rides around the town ( I live in Prague, Czech Republic ).
As it is my first bike please pardon me for the obviously beginner questions ( and my imperfect English aswell ).

I have an issue with the Idle RPM - when I start the bike on full choke it goes to around 5000-6000 RPM
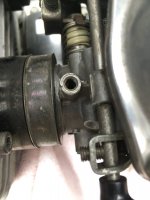
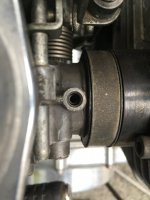
( I searched the forums and found that it should be around 3k? ), then on half choke it goes to around 3000-3500 RPM, without choke the RPM is too low and it would eventually die ( if I won't turn the throttle a bit ). So I found out about this throttle stop screw and with it I adjust the RPM ( by rotating clockwise) so it is just right ( 1200 - 1500 RPM ). However if I ride a little bit ( about 10 minutes ) and the engine warms up, causing the idle RPM to jump to about 3000. So I have to adjust the Throttle stop screw back to get the RPM normal again. Is this normal? How long should I leave the bike on full - choke and half - choke to warm it up? Could I ride for few minutes on half - choke until it gets warmed up?

I searched the forums and found what looks like a similar problem here: http://www.xs400.com/threads/tips-on-setting-idle-screw-correctly.11048/#post-114664 but the images posted by Hough aren't there anymore.
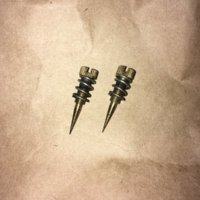
If I understand it correctly I should do what is said about Idle mixture screws? ( Please could someone confirm that this copper head screw at the picture is Idle mix screw? And is it symmetrical on both carburetors? )

I also found a lot of mentions about Idle speed screw, which I can't find in the manual. Is it just a different terminology for Throttle stop screw? If not please where can I find it?

Thank you very much and have a nice evening.

Ed
 

Attachments

  • 2862EB38-8D0A-455D-94D7-473C3FFCCD48.jpeg
    2862EB38-8D0A-455D-94D7-473C3FFCCD48.jpeg
    127.8 KB · Views: 686
You should really only be making your final adjustments when the bike is fully warmed up, like after 30 minutes of casual and some hard riding.

A general rule that I keep in mind is that if I can smell a gassy exhaust its too rich. The smell will be there but it should be very faint to non-existent, from my experience with my own.

The brass screws control fuel mixture at idle. General starting point is 2-3 turns off of a light seat. The bike should stall when you screw them in, if not, pilot jet is too big.

When the engine is cold you should almost always need to use the choke/enricher circuit. During the warm up cycle the idle will eventually rise and may hold around 3000 rpm for a moment and then it might just stay until you release the choke. You should set the idle and go for a ride and youll eventually get the idle where it needs to be after the 30 minute ride. Then you should be done with the carbs exterior settings for now.

Riding with the choke on is fine. If I need to go now, I will begin riding and release the choke after a minute or so of riding. Its more helpful when the weather is cold. My bike gets a little harder to start in the cold. Engines need more fuel with colder air. Sometimes it needs a few minutes of warming up while parked

Idle speed/throttle stop are the same thing. There are some terminology differences between America and European/English. Mudguards are fenders and a selector is a shift lever, wrist pins are gudgeon pins etc.. Tick-over is another word for idle.

If a high idle persists or hangs and suddenly drops off or is erratic then you most likely have an air leak which is fairly common with old carb boots and vacuum line for the petcock.

It is necessary to make sure that the engine is timed properly and the valves need to be set to the same specs on both cylinders.
 
Something to keep in mind and watch out for it those type of pilot mix screws you have. They tend to have the tips break off into the carb bodies very easily. People then will drill them out with much larger drill bits destroying the carbs. If yours do get broken a set of micro drills can be used to get them out but it still can be tricky as you need to step the sizes in order to get a tapered hole for the screw to sit into. Have you synced the carbs with a manometer yet? It's very important to do this also.
 
Hello guys and thank you both for the answers!

I haven't done anything with the bike so far except for the oil change and tire inflation.

So you advise me to do the following:
1. Time the engine
2. Set valves
3. Sync Carbs with the manometer
4. Adjust the idle speed

So adjusting the idle speed with the those brass screws should be done only after the engine is warm and also when the engine is running? I screw them in ( both at the same time, or one by one? ) and engine will stop, then after turning them counter clockwise 3 turns I start the engine again to see the rpm, correct?

Xchris, is there a way how to prevent those tips from braking please?

For those other issues I will search the forums to see what I have to do.

Thank you!
Ed
 
I would check the tips of the pilot mix screws first. Post pics of them. You may also want to check the hole and or post pics of them. The 77-79 carbs are the worst of the xs400 carbs I think as the mix screws are very fine at the end and after they wear a bit they are so very easy to break off.
 
Hello and thank you for the reply!
So just to be sure - Could I unscrew the pilot mix screw without doing anything else? No liquid will come out? :umm:
I will post the pics asap.
Have a nice day
Ed
 
No gas will come out at these are on the top of the carbs. Don't run the bike with them out.
 
Good morning!
Are those pointy enough please?

The tricky part will be to get the right one back inside as there is not much space. Perhaps I will try with tweezers.

By the way the balancing screw to synchronize the carburators is the one between those pilot screws, correct? Is there a way how reach him without dismantling the gas tank?

Thank you very much for the help!
Ed
 

Attachments

  • IMG_1812.JPG
    IMG_1812.JPG
    324.7 KB · Views: 226
Needles look good. I would check the holes to see if they look like they have been drilled out. They should be very small. Yes you need to remove the tank to adjust the pilot screws and sync one. A external fuel tank is used for this and make it easier.
 
Hello XChris,
pardon me for taking so long to reply, but I hadn't have time to do anything with the bike since taking the screws out.
Today I finally prepared the bottle style manometer as described in other post. I will take the pictures of the holes and post them here (I pray to motogods they are OK).

I will also try to synch the carbs and adjust the pilots and I'll report later.

Regards
Ed
 
Hi, here are pics of the holes.
I suppose that this is probable not very small by your definition.
It seems that there is some kind of small black ring inside both of the holes.
Do you think that the proper owner drilled the holes and inserted something to make for extra space?

However I turned out the pilot screws 3 times of the light seat and also did the synchronization with a manometer as you proposed.
Then I took her for a little ride and I must say that RPM is was finaly stable. I will do more testing in coming days and keep you updated.

thank you
With regards
Ed
 

Attachments

  • 8A7207DB-8F9B-41CA-B096-FFA42A5DEB73.jpeg
    8A7207DB-8F9B-41CA-B096-FFA42A5DEB73.jpeg
    130.5 KB · Views: 290
  • 36D44341-D87D-4BD8-AE37-2F49941CCBD7.jpeg
    36D44341-D87D-4BD8-AE37-2F49941CCBD7.jpeg
    141.2 KB · Views: 256
Looks like there is a spring in there. Should be an open hole with a very tiny one at the bottom. But hey if the bike runs well I would just leave it for now.
 
Last edited:
Hi, here are pics of the holes.
I suppose that this is probable not very small by your definition.
It seems that there is some kind of small black ring inside both of the holes.
Do you think that the proper owner drilled the holes and inserted something to make for extra space?

However I turned out the pilot screws 3 times of the light seat and also did the synchronization with a manometer as you proposed.
Then I took her for a little ride and I must say that RPM is was finaly stable. I will do more testing in coming days and keep you updated.

thank you
With regards
Ed
Looks like the O ring seal
 
The early 77-79 mark 2 carbs didn't use o-rings. Just the mix screw and the larger spring. A poor design as a worn or even good screw could be easily over tightened and the tip broken off in the body. A problem the 80-82 mark 3 carbs didn't have as those used a better setup/design.
 
Back
Top