Another xs400 bobber.

Jared salsano

XS400 Enthusiast
Messages
34
Reaction score
10
Points
8
Location
New Jersey
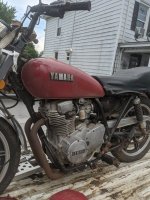
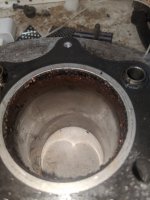
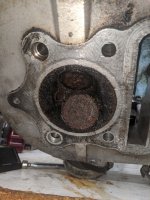
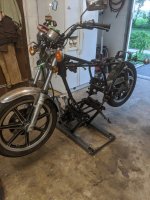
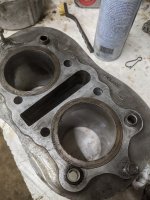
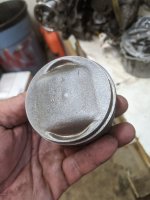
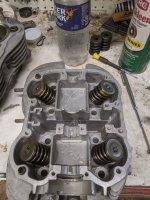
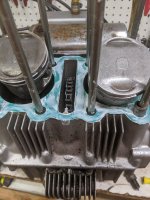
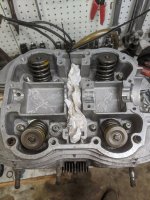
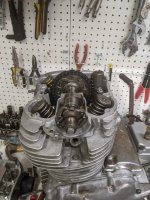
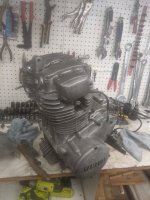
So Im new to the xs world, but not new to Japanese bike world. I was looking for a 650 but hard to find one that isn't already butchered, so went with a 400. I'm sure I'll have some questions along the way which I'm hoping to have answered here :). So far I've stripped it down most of the way, found that the right piston was basically rusted to the cylinder wall. Parts ordered for the motor and hardtail from voodoo vintage on the way.
 

Attachments

  • IMG_20220716_162307.jpg
    IMG_20220716_162307.jpg
    234.3 KB · Views: 171
  • IMG_20220719_202043.jpg
    IMG_20220719_202043.jpg
    138.5 KB · Views: 175
  • IMG_20220719_210508.jpg
    IMG_20220719_210508.jpg
    221.6 KB · Views: 170
  • IMG_20220721_194634.jpg
    IMG_20220721_194634.jpg
    219.2 KB · Views: 166
Welcome to the forum!

Keep us posted on your progress as it is always fun to see bikes get brought back to life. That right cylinder sort of looks like what I had in my engine. I think you will find it cleans up really nicely.
 
Welcome to the forum!

Keep us posted on your progress as it is always fun to see bikes get brought back to life. That right cylinder sort of looks like what I had in my engine. I think you will find it cleans up really nicely.
Yeah I'm gonna hit it with a bronze wire wheel and see how it goes
 
Worked on my cylinders today, ran a hone through them. Also cleaned up one of the pistons that I'm using. Waiting for the other to come in the mail.
 

Attachments

  • IMG_20220725_193821.jpg
    IMG_20220725_193821.jpg
    204 KB · Views: 143
  • IMG_20220725_193815.jpg
    IMG_20220725_193815.jpg
    173.4 KB · Views: 145
That looks more like it. If you are not aware already, make sure you get the correct piston. There are A and B pistons. You need one that matches the stamp on the cylinder block.
 
Mine was stamped on the cylinder skirts. The tops of the pistons also had a corresponding stamp.
Cylinder 4.JPG


I don't know off-hand about the differences between A and B.
 
Mine was stamped on the cylinder skirts. The tops of the pistons also had a corresponding stamp.
View attachment 37728

I don't know off-hand about the differences between A and B.
I didn't see anything like that on mine, I looked them over very well. I think that might mean that the cylinders were oversized/bored. I was looking at a diagram from Yamaha and they a chart for cylinder diameters, A being standard and B being .025" over. Or something like that
 
I did now look at the factory manual with the stated sizes for the A versus B cylinders. Only about 0.010mm of a difference between the two, but enough to effect the spec for piston to cylinder clearance of 0.030 - 0.040mm. My guess is that the different sizes are to account for manufacturing variations, but that is only speculation.

My pistons were also marked on the crowns (looks like a slight etching).
Cylinder assembly 4.JPG


It probably wouldn't take much to scrub the markings off if abrasives were used for cleaning. If you are anal like me, you can always measure the bores and the pistons, subtract the two numbers and divide by 2 to get the piston clearance. If it is within range you are good to go. Or just go with what you got.
 
Mine was stamped on the cylinder skirts. The tops of the pistons also had a corresponding stamp.
View attachment 37728

I don't know off-hand about the differences between A and B.
Well I'm dumb, I looked over the cylinders again and found that stamp, it's not as clear but looks like a B. I also got a piston in the mail and they have some different letters but look identical and both fit the same in the cylinders, I checked with a feeler gauge.
 
I did now look at the factory manual with the stated sizes for the A versus B cylinders. Only about 0.010mm of a difference between the two, but enough to effect the spec for piston to cylinder clearance of 0.030 - 0.040mm. My guess is that the different sizes are to account for manufacturing variations, but that is only speculation.

My pistons were also marked on the crowns (looks like a slight etching).
View attachment 37729

It probably wouldn't take much to scrub the markings off if abrasives were used for cleaning. If you are anal like me, you can always measure the bores and the pistons, subtract the two numbers and divide by 2 to get the piston clearance. If it is within range you are good to go. Or just go with what you got.

Thanks, I'm guessing that the markings were scrubbed off the pistons, only thing visible is an arrow. I'll have to get a micrometer from someone and measure them
 
Try a looking for a loaner from your local auto parts store. The larger chain stores usually have a program for free loaners. I plan do the same when I need a timing light in the future.
 
Try a looking for a loaner from your local auto parts store. The larger chain stores usually have a program for free loaners. I plan do the same when I need a timing light in the future.
That's a good idea. I think my step dad should have one at his shop, if not I'll hit one the chains
 
So tonight is the night, I have everything I need to get the engine back together. I swapped the valves out of my head into the new one I got off eBay. I made sure to lap them and install new valve seals. Got my new piston rings on, new wrist pins, and then... Where are those new wrist pin clips I got in the mail yesterday? I've searched high and low and the only thing I can figure is they ended up in the trash when i cleaning up last night. how dumb can one man be?
 

Attachments

  • IMG_20220728_173208.jpg
    IMG_20220728_173208.jpg
    222.2 KB · Views: 134
So tonight is the night, I have everything I need to get the engine back together. I swapped the valves out of my head into the new one I got off eBay. I made sure to lap them and install new valve seals. Got my new piston rings on, new wrist pins, and then... Where are those new wrist pin clips I got in the mail yesterday? I've searched high and low and the only thing I can figure is they ended up in the trash when i cleaning up last night. how dumb can one man be?
Not dumb. Excited lolol
 

Attachments

  • IMG_20220729_165903.jpg
    IMG_20220729_165903.jpg
    196.6 KB · Views: 127
  • IMG_20220729_171314.jpg
    IMG_20220729_171314.jpg
    202 KB · Views: 121
  • IMG_20220730_100147.jpg
    IMG_20220730_100147.jpg
    202.1 KB · Views: 123
  • IMG_20220730_140716.jpg
    IMG_20220730_140716.jpg
    163.4 KB · Views: 135
I'm working on my wire harness while waiting for parts and trying to figure out the two plugs that are on the list side of the motor. One comes from the alternator and the other from the neutral switch and oil temp sensor or low level sensor? Trying to look for it in the manuals but can't figure it out. Does this plug just go to the indicator lights on the handle bars? Any help is appreciated
 
Clarification - are you wanting to know where to find the corresponding plugs that these connect to in the OEM harness, or are you wanting to know where the individual wires ultimately end up?
 
Clarification - are you wanting to know where to find the corresponding plugs that these connect to in the OEM harness, or are you wanting to know where the individual wires ultimately end up?
I'm trying to figure out where the individual wires go to. I know the alternator wires go to the battery and the regulator. The other one I've traced to the indicator lights and I think a relay maybe?
 
Got it.

The three White wires go to the rectifier, which wire were is not critical as long as they are on the three inputs.
The Black and Green wires go to the voltage regulator for field control.
The Yellow wire goes to the low oil pressure warning indicator.
The Blue wire goes to the neutral indicator and to the safety circuit (if you are going to have one).
 
Back
Top