Hey guys I'm new to here. I need some help. I'm wondering if you can hardtail an xs400 the same way you can hardtail and xs 650. I'm trying o build a bobber but it's too hard to find a decent price on an xs 650. If you guys can give me any help that would be great. Thanks.
-
Enjoy XS400.com? Consider making a donation to help support the site.
XS400.com receives a small share of sales from some links on this page, but direct donations have a much greater impact on keeping this site going.
You are using an out of date browser. It may not display this or other websites correctly.
You should upgrade or use an alternative browser.
You should upgrade or use an alternative browser.
rotwasser
XS400 New Member
Yes, you can hardtail it. There is also a company in Perry, Ohio called PSW Customs who are offering custom builds around XS400's.
Teebs
King of the Ass-Hats
PSW is selling a kit for a reasonable price, but the 400 has a funky triple backbone that makes tank fitment a little more complicated. An unmodified tank won't cover the side tubes on the backbone and will look like hell. Something to think about when considering tanks and overall look.
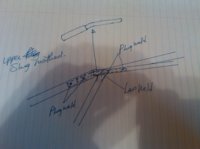
hardtail77's pics on his hardtail reveal the most. the angle of the bends, how its mounted to the backbone and other such things. 01ps, you have a very nice hardtail. any during the build pics of how you hardtailed it?
hardtailed77
Never Finished
I have a few pics but I'm afraid I don't have the patience or foresight to document my life. I am a bit of a mad scientist when it comes to these types of things.
Here's what I did, I hope it is understandable.
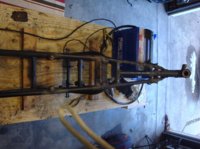
I mounted the bike to a 2x12 and secured it.
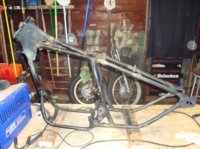
I then cut off the rear half of the frame behind the OE down tubes, leaving the tubes, footpeg mounts, brake pedal pivot and swingarm pivot in tact, like 77hardtail did.
I then built a jig out of the old swingarm uisng 1" square tubing, extended 5". I made sure it was nice and square and used a piece of heavy threaded rod and 4 nuts to hold the OE axle plates in place. The jig pivoted on the original swingarm pivot, which allowed me to adjust the hight of the alxe plates, plus it was a solid, square spot on the OE fromat to work off of. I would not use the OE axle plates if I did this again. A lot of extra work and they are not right for the job.
I measured everything again to make sure it was as square as I could get it.
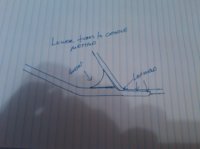
I'd like to say I had a blueprint and exact measurements to give you for the hardtail tubes, but the truth of the matter it was done by eye. Single bends in the tubes are not hard to fit though. A double bent tube would ahve to be more accurate. With the single bends you can twist the tubes a bit to change the angle. I just made sure I had a piece of DOM long enough for the job and estimated the bend angle to start. I did one side first, making small bends and placing the pieces as close to where they were going to be as I could get them until they were proper. When I was satisfied, I laid the pieces on a scrap piece of plywood and traced them and built the other side to match. I happen to have access to an exhaust bender, which is not ideal but it worked fine for the slight bends I needed.
I fit the bottom tubes first, and notched them so that the OE frame cradle tube sat inside of the notched lower hardtail tubes. For these notches I basically cut the tube in 1/2 for about 5". With 1-1/8" DOM the cradle tubes seem to fit snugly, but will need to be heated and adjusted for a snug fit as you weld. This method allows you to do a lap weld instead of a butt weld, and you don't have to modify the OE frame. You will probably have to cut the kickstand off and move it forward also. I also had to make sure the new sections fit inside the slots where the OE swingarm tubes fit the axle plates. Again, DON'T use the OE axle plates. It is a PITA.
I then found some round shaft that fit snugly inside of the smaller backbone tubes to use as slugs. I bent them to the proper angle and found a small piece of tubing that fit snugly inside of the new hardtail tubes and that the plug would fit inside of. I welded these pieces together and drilled holes in the OE frame and the new upper hardtail sections for plug welds. I cut and notched these sections so they fit the axle plates and the slugs, and to fit cleanly with the OE frame. I built triange gussets to fit at where lower hardtail and frame meet.
After another million measurements to make sure everything was square, I tacked everything in place with a little 120V wire feed welder. I installed the wheels, etc to make sure everything fit I then took the frame to a friends and welded it up with his 220v MIG. I also welded in a cross tube ahead of the rear wheel top and bottom
With this method most of the front half of the frame left intact. Only the 2 smaller backbone tubes are cut, and of course the rear seat and frame section. But none of these cuts will affect the strength of the OE frame.
For the footpegs, I used the lower footpeg bolt as the upper and built a new lower footpeg mount. This allowed the peg to move down and forward a bit.
I cut off the upper peg mount and plugged and welded the swingarm pivot holes. On the left side I welded a pivot for the foot clutch. On the right side I wanted to use the OE brake lever and assembly so I built an extension that relocated it lower and forward a bit.
Here's what I did, I hope it is understandable.
I mounted the bike to a 2x12 and secured it.
I then cut off the rear half of the frame behind the OE down tubes, leaving the tubes, footpeg mounts, brake pedal pivot and swingarm pivot in tact, like 77hardtail did.
I then built a jig out of the old swingarm uisng 1" square tubing, extended 5". I made sure it was nice and square and used a piece of heavy threaded rod and 4 nuts to hold the OE axle plates in place. The jig pivoted on the original swingarm pivot, which allowed me to adjust the hight of the alxe plates, plus it was a solid, square spot on the OE fromat to work off of. I would not use the OE axle plates if I did this again. A lot of extra work and they are not right for the job.
I measured everything again to make sure it was as square as I could get it.
I'd like to say I had a blueprint and exact measurements to give you for the hardtail tubes, but the truth of the matter it was done by eye. Single bends in the tubes are not hard to fit though. A double bent tube would ahve to be more accurate. With the single bends you can twist the tubes a bit to change the angle. I just made sure I had a piece of DOM long enough for the job and estimated the bend angle to start. I did one side first, making small bends and placing the pieces as close to where they were going to be as I could get them until they were proper. When I was satisfied, I laid the pieces on a scrap piece of plywood and traced them and built the other side to match. I happen to have access to an exhaust bender, which is not ideal but it worked fine for the slight bends I needed.
I fit the bottom tubes first, and notched them so that the OE frame cradle tube sat inside of the notched lower hardtail tubes. For these notches I basically cut the tube in 1/2 for about 5". With 1-1/8" DOM the cradle tubes seem to fit snugly, but will need to be heated and adjusted for a snug fit as you weld. This method allows you to do a lap weld instead of a butt weld, and you don't have to modify the OE frame. You will probably have to cut the kickstand off and move it forward also. I also had to make sure the new sections fit inside the slots where the OE swingarm tubes fit the axle plates. Again, DON'T use the OE axle plates. It is a PITA.
I then found some round shaft that fit snugly inside of the smaller backbone tubes to use as slugs. I bent them to the proper angle and found a small piece of tubing that fit snugly inside of the new hardtail tubes and that the plug would fit inside of. I welded these pieces together and drilled holes in the OE frame and the new upper hardtail sections for plug welds. I cut and notched these sections so they fit the axle plates and the slugs, and to fit cleanly with the OE frame. I built triange gussets to fit at where lower hardtail and frame meet.
After another million measurements to make sure everything was square, I tacked everything in place with a little 120V wire feed welder. I installed the wheels, etc to make sure everything fit I then took the frame to a friends and welded it up with his 220v MIG. I also welded in a cross tube ahead of the rear wheel top and bottom
With this method most of the front half of the frame left intact. Only the 2 smaller backbone tubes are cut, and of course the rear seat and frame section. But none of these cuts will affect the strength of the OE frame.
For the footpegs, I used the lower footpeg bolt as the upper and built a new lower footpeg mount. This allowed the peg to move down and forward a bit.
I cut off the upper peg mount and plugged and welded the swingarm pivot holes. On the left side I welded a pivot for the foot clutch. On the right side I wanted to use the OE brake lever and assembly so I built an extension that relocated it lower and forward a bit.
Attachments

Last edited:
hardtailed77
Never Finished
Hey 01ps...can I get a few closer shots of the hardtail? In particular where it comes together with the stock frame cradle. I like the lap weld you did on the bottom rails, and may try to duplicate that if it's alright with you. I will take pics of anything you can get....doing a little more research before cutting my bike in half again, so I can do it RIGHT this time. lol Thanks for any help man!
Also how much stretch is that? How many links are in your chain now?
Also how much stretch is that? How many links are in your chain now?
Campbell45
Penny Pincher
The best way to make a hardtail is to make a jig first to have eveything lined up correctly. If the back wheel is not perfectly in line you have serious issues with clearences, driving straight, and lots of wear. I like steel tables so you can tack everything down to make sure it is perfect. Also you must trust your welds when building the frame or else you may lose some skin going down the road someday.
hardtailed77
Never Finished
Yeah, I'm doing the hardtail on my bike over again because a buddy I had do it the last time really screwed it up. My thread shows all the details on that mess! lol I will be using a jig, and tacking the tubes in myself...then I will take the frame up the road to a guy in town that TIG welds really well and have him burn it all in the rest of the way.The best way to make a hardtail is to make a jig first to have eveything lined up correctly. If the back wheel is not perfectly in line you have serious issues with clearences, driving straight, and lots of wear. I like steel tables so you can tack everything down to make sure it is perfect. Also you must trust your welds when building the frame or else you may lose some skin going down the road someday.
I road the bike all of last summer with crooked axle plates, gas pipe for tubing, kinked bends in the lower rails, and no slugs whatsoever...kinda scary, huh? lol That's why it's getting cut back apart, and started from scratch. I won't get back on the bike until it's done the RIGHT WAY!
Campbell45
Penny Pincher
Phew! Talk about living life on the edge! Ya that's good it's getting redone. Hope it
goes well! Make sure to take lots of pics!
goes well! Make sure to take lots of pics!
hardtailed77
Never Finished
Will do!Phew! Talk about living life on the edge! Ya that's good it's getting redone. Hope it
goes well! Make sure to take lots of pics!
2eightcustoms
XS400 Enthusiast
i did mine i have a pic on here "xs400build"
skillzman1
XS400 Junkie
Let me ask a question here...when joining the new hardtail tubes to the existing bike frame..would it not be best to sleeve the tubes and drill holes in the outer tubes to plug weld the frame together as well?
or is that the process you already use and I'm just re-inventing the wheel in my head?
or is that the process you already use and I'm just re-inventing the wheel in my head?
2eightcustoms
XS400 Enthusiast
the safest way would be to put slugs in and plugweld it
skillzman1
XS400 Junkie
OK ...so that is the process of sliding a smaller diameter tube inside the frame tubing and drilling/welding thru the drilled holes in the outer tube as well as the butt joint weld correct?
I'm not familiar with the terminology just trying to make sure I am on the right track.
I'm not familiar with the terminology just trying to make sure I am on the right track.
slugging is a SOLID piece of metal smaller in OD than the ID of the tubing being welded.
Also how much stretch is that? How many links are in your chain now?
He said that he extended the swingarm 5"
Similar threads
- Replies
- 0
- Views
- 156