1978 XS400-2E Intro and Build

bcware

Well-read
Top Contributor
Messages
2,920
Reaction score
21
Points
38
Location
Epsom, NH
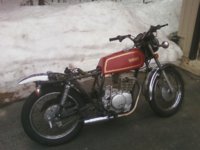
Hello, my name is Will and I just bought my first motorcycle (78 XS400-2E) about a week ago. I'm 26 and I live in NH. I have some mechanical inclination and experience working on cars. I'm currently applying to medical school to be a doctor and I love driving in general.

The bike should be delivered on Monday and the condition as inspected by a mechanic is as follows:

10,545 miles

"Not test-ridden. This bike does not pass New Hampshire State Inspection due to the rusted mufflers, the worn out rear tire, the steering bearings are notched and the fork seals are leaking. We installed battery tender leads for easy battery charger hook-up. The battery is very weak, the fork tubes are heavily pitted and there are cracks in the intake boots. The bike will start on the first kick but will not idle off of choke. The seat has been re-covered as well."

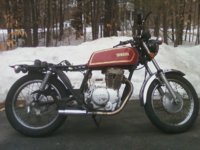
So, the plan is to get the bike running and to pass inspection. I'll be signing up for a local rider training course very soon. I will try and document as much as I can along the way. More photos can be found in my album.
 

Attachments

  • xs400_2.jpg
    xs400_2.jpg
    79.9 KB · Views: 681
  • xs400_6.jpg
    xs400_6.jpg
    76.2 KB · Views: 942
Welcome! Looks like a decent starting point. The idling issue may just mean there are dirty carbs. The carbs are pretty simple, but clean means really, really clean when it comes to getting these things to run right. The intake boots may not be a problem if none of the cracks go all of the way through. Some people clean them well and give a good coat of silicone. i replaced mine with a nice set from eBay- cost about $40. I got a battery from WalMart- $50. Works fine, but I do keep it on a battery tender. The steering head has individual ball bearing (19 up and 19 down, I believe)- they are 1/4 inch. Usually, the races are notched and the balls are fine. there are 3 ways to deal with that. You can replace the races and ball bearings with taper bearings- about $40. You can replace the races and the balls as needed- don't know the price. I did the third and cheapest. I took them apart, saved the ball bearing (magnet- seriously, use a magnet) and I used a Dremel to carefully smooth the indentations out of the races. It worked fine, but took some care. In my case, only the upper races were indented. My forks and seals were fine, so I can't offer anything there.

Good luck!
 
Thanks for the advice. I am definitely going to give the steering head a look and see if I can refurbish it before I buy a new set of bearings. I am pretty excited to get my hands on this thing.

I have heard of good results with pitted/rusted forks and jbweld. I will probably give this a whirl, but I am also pricing replacement forks too. Initially I just want to get an inspection sticker on the bike, but I plan to restore and upgrade in the future.
 
I actually used a "metal mender" epoxy (not JB Weld brand, but probably similar) for a couple of small pits on my brake pistons. I would never use it in a structural position, but to just fill in pits, it should be fine. I just cleaned the piston really well to make sure there was no contamination, then mixed a bit of filler and dabbed it in the pit. After it fully cured, I sanded it down and finished with something like 2000 grit wet sandpaper and it seemed (and still seems) to work well- no caliper leaks, which I had before I did this, but I also replaced the seal.

...and we don't have such inspections where I live, so life is simple.
 
Man I wish I could have gotten my hands on one that was even near that clean when I got mine... but oh well! Good luck getting it running right, it sounds like it shouldn't be that difficult though!
 
What is cool is that the photo I posted is before they detailed it. One of the perks of buying this from a dealer was the free inspection and detail.
 
good find and welcome to the site.

you should be able to get the stantions hard rechromed if you can't find/afford new. theer's a couple of vendors in the UK that do it, but I'm sure any hydraulic ram refurb companies can offer that service.

I'd get new carb intakes anyway as that takes out any questions as to their condish, don't forget they are probaby original and 33 years old!!
 
Excellent lead on the hard rechroming Drewpy. I have a SR250 that needs this done and I was dreading finding new stantions. Now where is my yellow pages ...
 
Many of the parts I ordered have come in, so I have started work. This is what the bike looks like right now. Oh, and I now have a helmet, jacket, and gloves; still shopping around for boots.

Before disassembly the bike would only run on choke and upon revving did not seem too happy. The brake light is always lit (brake light switch?). The fuel petcock has a slow leak only when "open." The original mufflers were riddled with rust holes. The carb boots have some decent cracking on the carb side. The blinkers have a second or two delay before they actually start blinking or they simply stay on.

So far I chopped and rotated rear fender (mocked up right now and may lower it more), carbs removed and quickly cleaned, new handlebars and grips installed, attempted sealing a slow leak on the fuel petcock (have not tested yet), and the new mufflers are mocked up.

I have new, bigger tires, much shorter, black mirrors, emgo pod filters, a new smaller battery with intelligent charger, seat foam and marine vinyl, and fiber glassing material for a cowl/pan.

I am waiting on tire tubes, rim strip tape, float bowl gaskets, haynes manual, oil filter, all balls steering stem bearings, fork seals, and thread adapters for the new mirrors to work (didn't know yamaha put left hand threads on the throttle side...).

That's about everything for now.
 

Attachments

  • xs400_build1.jpg
    xs400_build1.jpg
    213.6 KB · Views: 610
  • xs400_build2.jpg
    xs400_build2.jpg
    175.8 KB · Views: 626
I have not put the carbs back on to test anything out yet; I am waiting on a new float bowl gasket before I can do anything.

Just ran to the hardware store and found a somewhat permanent connection for my rear fender using existing holes in the frame :)

Does anyone know if I need a gasket on this new muffler? Do people typically just clamp them on really tight? They fit fairly well for being universal, but I just wanted to be sure I am not going to get an exhaust leak.
 
It slides over and is a close fit. If a gasket were to fit between the two it would need to be very thin. Has anyone ever tried high temperature silicone gasket maker for something like this?
 
I believe there are some thin metal "gasket shims" that belong in there. You could probably use a cut apart beer can, I wouldn't use the silicon personally, just sounds messy and inefective to me.
 
There is an oem part, but they cost 12 - 20 dollars each :( Researching home made solutions isn't turning up much. The part number is 35893-001 on bikebandit and it seems to apply to dozens of different models.

I figure aluminum would melt too easily to be used as a gasket. Does the muffler get hot enough to melt aluminum? 1200 degrees? Hm, maybe aluminum would work.
 
I collected some useful information, but cannot proceed any further.

I pulled out an oem copper gasket and it cannot be used with this emgo shorty because the id is the same as the muffler's id. The oem clamps are too large and those crappy band clamps from the hardware store are not strong enough. It looks like I just need a really strong exhaust clamp because the muffler's metal is fairly thick.
 
don't worry too much about leaks, my nos exhausts don't have any gasket between the header and the muffler and seals fine, bit of carbon in there from combustion and it'll seal up tight anyway!
 
Back
Top