charging system defunct.. Help please.

Mike did you solve this issue or were you able to move it forward?

unsolved still. i tested the field coil as shown here at the 3 white wires junction: http://www.xs400.com/forum/picture.php?albumid=249&pictureid=2010 and i didnt get anything. so this result would mean its the wires between the point i tested and the alternator? Drewcifer, I saw the picture in your album, the one with the caption "kinky" and i really hope that it isnt what mine look like.. what do i gotta do to be able to look at my wires as shown in your photo?
 
Last edited:
So there's two tests you want to do.
1. Power the brown/green or green/black wires with a battery. Just connect jumpers to one end, and then power the two wires coming out of the field coil. only add power to the green/black or brown/black pair. There are two others, not related, coming up that group to a connector block. ignore them, they're an oil sensor circuit (yellow) and a neutral switch wire, (blue).

if you add power to those two wires you'll magnetize the coil. It will then keep a single edge razor blade to the side of the case. (this is true even if you bike is off, too, when you put the key in and switch the ignition to run, the field coil is magnetized.)

test two, the one you did already, is to use probes to check ohm resistance from white wire to white wire. You got 7, not zero, so your stator is probably intact. If all of the wires compared to each other are 7, you are good. Also, attach one probe to a white wire like you did and make sure you get no continuity, or 0 when the other probe touches the engine or any "ground" (negative carrying metal)

The way this works is your bike is producing electricity in AC.(google it) it has to be isolated from the engine and it's case or it will zap the DC in the bikes system.

So the coils and the stator when you test them should never have continuity to any part of the bike. Electrically speaking, they should be isolated and independent. Continuity should only show from wire to wire. never from wire to bike engine. If it does, there's a bad short in one of those pieces.

Now if you can get magnetism in your coil, you should be able to charge your battery. I still can't tell if you did the first magnetism test, so do it and get back to us.

good luck.

after that, if you want to strip down the charging system to see the wires, it's in my stator rewire write up.

Drewcifer
 
Alright. the magnetism test was a success. the razor blade stuck.. so that is good. now also it seems you have mistaken the picture that i linked you to as mine. i only linked that photo because it showed the method of test i used, but there was no mistaking my multimeter reading. it was fruitless.. whats next? sorry for the delayed response, i was in NC visiting family.. also i got to ride my moms harley along the carolina coast! it was amazing!!! if theres any interest, check out the video i made while riding..
 
Magnetism test determines that the field coil is working. Me, and Drew's (Drewicifer/Drewpy and most of us have all gone though these steps, cause of bad wires. So I am going by your photo, that your bike looks like mine. some where you can set up a signature, that will tell people that you bike is, I think its a 81 400sh. I just posted #5 in this postings, but the extra info that I forgot to cover is added. check it out. http://www.xs400.com/forum/showthread.php?t=9480

So from Drewcifers post,
Step 1, Magnetism Check, (Done Working)
Step 2, White wire check, To Xpound on that topic, there is two connectors for the white wires. The thing with the resistance check is that the numbers should be the same, no matter what pair of white wires tested. I remember marking on the connector 1,2,3. and then notating those numbers for each pair (1&2, 1&3, 2&3, with the resistances. Then to make sure that the jumper wires were not bad, I did it from the connector to the rectifier. Check for incidental grounding. you should not get a reading of continuity or resistance (ohms) from any of the white wires to a ground. If that's grounding out, that is bad.
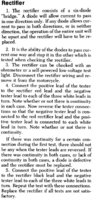
Step 3 Rectifier, from the manual Attached. New or old, the test didn't change. I am not going to re-write it, just print it out, it cut out of the on-line manual, and its easy enough. same for VR.
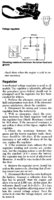
Step 4, since your here, Voltage regulator. (mine was shot, my second one was a combo, that didn't work either, I must of tested something inappropriately, so when Drewpy says don't do that it could ruin something, yea, use the manual. (attached)
Step 5. Visually check the wire. (so if you got everything working to this point, then the visual check should be fine. Your bike should be charging. The visual check, Touchy feely part. by now you have been checking the wires out, you know how they should feel for being a 30 year old bike. So as you feel the wires, if you feel any fray, or the wire gets stiffer, than the previous segment, you have a problem. That is how I discovered my problem. a segment of wire, was really stiff, and as I tested (tugged and pulled) the worse the 3 white wire test got. That is the same spot for all of us. references the photo from Drewcifer/or Drewpys rewire project. There is enough photos of shot wires, Those two where the 2 references for me when I did my project.

So just so everyone knows, no covers were removed in my suggestion, yet. no bolts removed, We are still probing with the multimeter, and feeling with our hands *(my next step would be to pull the chain sprocket cover off, and order some parts (gaskets...) Next step, if the rectifier/voltage regulator are shot, and the replacement fixes it, we are done. In my new link I put in here today, goes a link I put in on how I replaced my voltage regulator. also in my photo albums. Only thing I dont think we covered, Voltage reg is the connector with 3 wires, and the rectifer has 5 wires. just in case. Take care Tobie good luck
 

Attachments

  • x400oldRecifier.jpg
    x400oldRecifier.jpg
    116.9 KB · Views: 229
  • x400oldVoltageRegulator.jpg
    x400oldVoltageRegulator.jpg
    181.7 KB · Views: 229
Back
Top