1981 XS400 Engine Build: A Story of Pictures, Videos, Beers & Tears

Out of curiosity – does anyone know if 400cc engines have any known INCOMPATIBILITIES between engines? Mounting locations, sizes of bolts, clutch plates, valve springs, Engine covers, etc.
My busted engine is a "4R5" while my backup engine starts with "1W4." Can't find info on the 14W on any of the "serial number"-type posts on the forum. Maybe @drewpy knows?

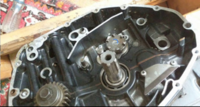
Would like to know because I intend to split the busted engine tomorrow, and need to assess which parts I have and which parts I will need. Thanks!
 
Circular gear change thing? Right side? The clutch plate assembly?

I meant this thing with the blue semicircle on top of it. The screw in the center is stripped, as are two screws in the supporting plate.

I'd use the complete spare motor. Invest in a manual impact driver to help bust out screws. Some seafoam deep creep will help loosen them up.
They look like regular philips, but I guess they're JIS? I called around, no JIS available in the large stores near me :(
I have an electric impact driver – Would you consider using an electric rather than manual?
 

Attachments

  • Screen Shot 2017-05-26 at 12.58.45 AM.png
    Screen Shot 2017-05-26 at 12.58.45 AM.png
    980.6 KB · Views: 472
The lower end off the blown motor will be junk after the rod snapped. If the spare motors lower rear mounting hole is the same your good.
 
The 14W is a Canadian 1982 XS400SJ.
It'll be the same as the one you're replacing.

They are JIS screws. I really should buy a couple JIS drivers....
The manual impact drivers are driven down with a hammer blow. For loosening stripped or siezed screws they're much better than electric impact drivers.
THanks! just wondering where you ended up finding that info… I looked and hit CMD+F on all the serial number pages i could find, but didn't see it mentioned
 
There are a few posts in the History of the XS400 thread that mention the 14W VIN.
http://www.xs400.com/threads/history-of-the-yamaha-xs400.4458/page-2#post-84408
It's an oddball for sure. Manufactured between the usual 81 and 82 production runs. My 82 is a 14W. Going to put the motor back in this summer and hopefully get it running again.

Just bought the JIS set from gofast. Thanks Tate.
 
Last edited:
Hey guys, just about cleaned every part and thinking of reassembling in 2 days' time. Just want to make sure everything is ready to go before I put it back together!

Couple questions though about special parts, applying solvents, etc.
  1. How many of those metal half-circle things are there supposed to be? I'm talking about the ones that fit in the grooves of the lower/upper crankcase where the main axle is, etc. In the manual (see the pics), they are referred to as "Half Circle retainers." This is the only place the manual mentions, and it doesn't say exactly how many there are or mention them again. In pic #2, the manual mentions "Axle circlips." Are these things ('half circle retainers' and 'axle circlips') the same thing, just different name?
    • It would make sense to me that there be a half circle for the bottom crankcase, and half for the top of the crankcase. So I checked Partzilla…
    • However, on Partzilla diagrams they are referred to as "Circlips." Check out parts #16, #28, and #31. On Partzilla there are only 3 of the half circle/circlips shown. So do I need 3, or 6 (3 for bottom, 3 for top) in total?
    • Another forum post guy mentioned he had 6 on his bike before reassembling, but he was also unsure…I'm curious because when i disassembled, I found a couple on my shop floor. Just want to triple-check that I didn't lose any. There's so many grooves, it feels like I lost a couple…
  2. The manual says to replace oil seals after every rebuild… but I didn't order any news ones. Mine have no obvious damage, but then again it's hard to tell with rubber sometimes. If there any way to check if they're gonna be OK? Pretty much same question for all the blind plugs, and ANY rubber parts on the bottom end. Hints, tips, anyone?
    1. My plan is to use some citrus degreaser on the parts, then a lil' motor oil when i reinstall.
    • Also, for the RED cylinder O-Rings… do you lube 'em up with oil before install? Wouldn't this make gasket adherence between cylinder jugs and crankcase more difficult?
  3. I know there are already many posts on liquid gaskets, etc. Wellseal, Yamabond, Permatex, are all recommended. I just wanted to know what you guys are using/have used for the crankcase liquid RTV gasket (without a fiberpaper gasket) and what you're using for the jugs/cylinder head gaskets where there IS as paper gasket.
 
    • Also, for the RED cylinder O-Rings… do you lube 'em up with oil before install? Wouldn't this make gasket adherence between cylinder jugs and crankcase more difficult
When I did mine, I did put some oil in to the spark plug hole,(after placing back onto the frame0 to hopefully keep flash rust down, and to lube the cylinder previous to allowing the engine to start dry, as it will take a few RPM moments to get get oil up into the head, and start coating the cylinder per normal operations.

There is always something you miss, so look around you as you drive to work for a Yamaha shop, Boat, cycle type shops. They will have stuff, and or be able to order it fairly quickly, as it is getting harder to find things for our 35 year old bikes.
 
When I did mine, I did put some oil in to the spark plug hole,(after placing back onto the frame0 to hopefully keep flash rust down, and to lube the cylinder previous to allowing the engine to start dry, as it will take a few RPM moments to get get oil up into the head, and start coating the cylinder per normal operations.

Hey @arfstrom, thanks for the reply. But I think we're talking about different things.... I was wondering about the O-Rings that fit on the bottom face of the cylinder jugs - in the small space between the outside of the steel cylinder itself, and the aluminum cylinder head (there's a deep groove). When installed, the o-ring would be between the steel cylinder, the bottom face of the cylinder head and the top half of the crankcase.

Oil through the spark plug hole wouldn't get to that area.
 
I know there are already many posts on liquid gaskets, etc. Wellseal, Yamabond, Permatex, are all recommended. I just wanted to know what you guys are using/have used for the crankcase liquid RTV gasket (without a fiberpaper gasket) and what you're using for the jugs/cylinder head gaskets where there IS as paper gaske

There's a guy in BC that sells a complete gasket and oil set for these bikes.

I used permatex Grey I bought from canadian tire on my valve cover.
 
Yeah I actually bought the gasket set from the BC guy! Only took a few days to ship. I'm currently writing this from Canadian tire as I peruse the massive selection of greases, lines and gaskets...

Permatex grey specifically says "not for head gasket use" because it's in contact with Gasoline. Thoughts?
 
The oil seal that leaked on my bike after I rebuilt it was the push rod seal for the clutch. This thing was practically gushing oil. Id recommend getting this seal and smoothing out the pushrod with a scotch brite before putting it back.

I used Permatex black sealant for the case halves. I put a very thin coating on and made sure not to get it too close to the inside border of the mating halves so it wouldn't squeeze inside. I lightly oiled the sleeves and slid the cylinder O-rings on. I didnt use any sealant for head gasket or base gasket. You shouldnt ever have to as long as its clean and flat with a new head gasket.
 
.
I used Permatex black sealant for the case halves. I put a very thin coating on

Cool, I just bought Permatex too. It's a grey squeeze tube "motorseal Powersport gasket maker." Specifically says 'gasoline resistant.'

.
I didnt use any sealant for head gasket or base gasket. You shouldnt ever have to as long as its clean and flat with a new head gasket.

Ahhh, yes. That's what I've read, but the pproblem is I've made a few small gouges on the top half of the crankcase, which touches the cylinder head. Won't be a perfect seal and I'm worried the torque won't squeeze the paper gasket into the crevices. I figured I'd make sure of a good seal by using both physical gasket AND permatex liquid gasket.

Anyone have thoughts on this?
 
Cool, I just bought Permatex too. It's a grey squeeze tube "motorseal Powersport gasket maker." Specifically says 'gasoline resistant.'


Ahhh, yes. That's what I've read, but the pproblem is I've made a few small gouges on the top half of the crankcase, which touches the cylinder head. Won't be a perfect seal and I'm worried the torque won't squeeze the paper gasket into the crevices. I figured I'd make sure of a good seal by using both physical gasket AND permatex liquid gasket.

Anyone have thoughts on this?
You should have a head gasket in that set you got.

I used it for the valve cover.
 
Hey Tyler.

Yup, the set has all the gaskets i need, plus a bunch of O-rings.

Just want to clarify…To what are you referring? Are you saying you used Permatex + Liquid Gasket for the valve cover?
Permatex grey is a gasket maker. It's all you need to seal the valve cover.
 
Circlips....On only one of the halves of the crankcase, they do not seal anything, they just keep the different shafts in their spot
 
I used permatex black on both engines and it works great
If you bought the gasket set from BC it has the valve cover gasket...DO NOT stick it in permatex as you may have to open the valve cover again for timing/valve clearances or anything else (shit happens)and it would ruin the gasket.
 
Back
Top