And remember...you can use gasket maker on the immobile part of an oil seal, but assembly lube whenever a rotating part or moving part touches the seal...if not you run the risk of burning the seal and then you get an oil leak...
-
Enjoy XS400.com? Consider making a donation to help support the site.
XS400.com receives a small share of sales from some links on this page, but direct donations have a much greater impact on keeping this site going.
You are using an out of date browser. It may not display this or other websites correctly.
You should upgrade or use an alternative browser.
You should upgrade or use an alternative browser.
1981 XS400 Engine Build: A Story of Pictures, Videos, Beers & Tears
- Thread starter burr
- Start date
Yes thats right because there is no gasket for the valve cover. The headgasket has crush rings around the cyliners. I wouldnt use any sealer where the manual says its not needed.
burr
XS400 Enthusiast
I used permatex black on both engines and it works great
If you bought the gasket set from BC it has the valve cover gasket...DO NOT stick it in permatex as you may have to open the valve cover again for timing/valve clearances or anything else (shit happens)and it would ruin the gasket.
Gotcha. So in general: either Permatex OR gasket. But not together.
For the valve cover: Permatex gasket.
Whatchu think for the head gasket between Jugs and engine case? Take into consideration that the top half of my engine case has some gouges. And hopefully i won't be removing/adjusting it for a long while once I put it together.
Well...depends on the gouges in question..
I would give it a go gasket only...and see what happens.
I would worry that adding permatex(or other) there would disrupt the right fitment/ torque settings and rather cause a leak than avoid one...
Just an opinion
I would give it a go gasket only...and see what happens.
I would worry that adding permatex(or other) there would disrupt the right fitment/ torque settings and rather cause a leak than avoid one...
Just an opinion
burr
XS400 Enthusiast
Thanks for all the help guys. So I've got the engine almost completely assembled, but running into an issue doing compression testing. What I've done so far, and how I did it:
Oil was applied to pistons and rings and cylinder jugs before assembly. I also put a bit of oil into the sparkplug hole to make sure nothing would get scratched.
So… How do i test compressions before I reinstall it in the case?
Video of the issue is here, if you wanna see what i mean about 'can't rotate the crank all the way around'
- Engine together, gearbox and con rods in.
- Cylinders in, head gasket on. Pistons and rings in.
- Cylinder head on, metal-rimmed gasket on.
- Valves installed, 8 interior bolts Torqued up to spec (using 10w40 oil for lube on the heads, as per manual spec). Valve springs and collets installed using a car valve compressor (holy shit, this was WAY better than using a C-Clamp!!)
- valve cover on, Rockers installed. Permatex Black Gasket for sealing valve cover-->cylinder head. Valve cover bolts tightened to spec. Cam+Chain +chain guides done.
- Valve Clearance DONE. This was pretty easy. Set them to: 0.10mm for intake, 0.18mm for exhaust (middle of the manual's range of 0.08mm–0.12mm, and 0.16–0.20mm, respectively).
- Right side engine cover is NOT on, but it is ready to be installed( Clutch basket cleaned, reinstalled. Oil Pump installed. Gear changer assembly installed).
- Left side cover is on installed items are: Stator, field wire, stator cover. Paper gasket for the stator cover-->engine case is on.
Oil was applied to pistons and rings and cylinder jugs before assembly. I also put a bit of oil into the sparkplug hole to make sure nothing would get scratched.
So… How do i test compressions before I reinstall it in the case?
Video of the issue is here, if you wanna see what i mean about 'can't rotate the crank all the way around'
Timing....valves hitting pistons...don't ask how I know
burr
XS400 Enthusiast
@Jeff0133 So how do i fix that?
When I connected the timing chain to the Cam sprocket, is there some special timing step I missed?
So, can you walk me through how the valves could be hitting the pistons? As I turn the 17mm stator bolt, I'm rotating the crankshaft, which spins the chain, which spins the camshaft, which pushes the rockers, which pushed down on the valves.
Where is the step that messes up the valve depression length?
If your timing is off (which was my case) the valves (whichever ones...) are opened when they should be closing and they are contacting the piston when it is up in the cylinder.
I has misaligned the timing marks,but even when aligned...just putting the cam chain tensionner would put it off a tad so I had to inch my way towards perfect timing.
But then again I have a DOHC so that make for two cams to time at once...
Whatever you do...DO NOT try to strong-arm it into moving....you could ruin valves...
Take the valve cover off...try and rotate the crank and have a look at the timing marks.
How did you line up the timing in the first place?
Face
XS400 Member
If your timing is off (which was my case) the valves (whichever ones...) are opened when they should be closing and they are contacting the piston when it is up in the cylinder.
I has misaligned the timing marks,but even when aligned...just putting the cam chain tensionner would put it off a tad so I had to inch my way towards perfect timing.
But then again I have a DOHC so that make for two cams to time at once...
Whatever you do...DO NOT try to strong-arm it into moving....you could ruin valves...
Take the valve cover off...try and rotate the crank and have a look at the timing marks.
was putting my engine back together the other day and ran into the same issue... this looks to be very helpful, and i will try it next week when i get back to my bike. thank you for this, and thank you Burr for this thread, i will be following this
burr
XS400 Enthusiast
Now that I think back on my procedural steps, I'm not 100% sure I lined up the horizontal timing marks on the cam sprocket. I guess today I will be removing the valve cover to check.How did you line up the timing in the first place?
I have the electronic TCI ignition thing, so at least I don't need to do any fancy breaker-points timing with the lights (from what I've read).
burr
XS400 Enthusiast
@xschris
What kind of adjustments will i have to do? I thought the makeshift timing light-trick was only needed for the Points-type ignition…?
I cannot seem to find a manual that specifies how to do the SOHC electronic/TCI ignition. I've checked and rechecked – all the manuals I've looked through seem to only discuss Points-type.
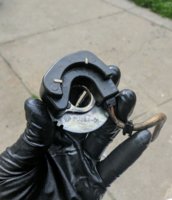
Don't i just have to align the points nubs on the Pickup Coil Governor with the mark on the cylinder head? (The pointed nubs beside my thumb in this picture)
What kind of adjustments will i have to do? I thought the makeshift timing light-trick was only needed for the Points-type ignition…?
I cannot seem to find a manual that specifies how to do the SOHC electronic/TCI ignition. I've checked and rechecked – all the manuals I've looked through seem to only discuss Points-type.
Don't i just have to align the points nubs on the Pickup Coil Governor with the mark on the cylinder head? (The pointed nubs beside my thumb in this picture)
Attachments
burr
XS400 Enthusiast
@xschris If I've missed something, would you be able to point me in the right direction of an old thread, or a specific manual that covers TCI install/adjustment how-to for SOHC bikes?
For what it's worth, the engine is a 14W-series '82. All other parts, from the pickup coil to frame, are a 4R5-series '81.
For what it's worth, the engine is a 14W-series '82. All other parts, from the pickup coil to frame, are a 4R5-series '81.
burr
XS400 Enthusiast
PSA to anyone following this thread. Here's a link to the complete Haynes Manual for XS400, XS360, XS250 between 1978-1985. It's in high quality and text-searchable. It's not listed with the other manuals in the "Tech" section of this forum. I wish I had seen this weeks ago…
https://www.dropbox.com/s/r0i632nh8gdhq8q/Yamaha 1975-1984 XS250-360-400 Haynes Manual.pdf?dl=0
https://www.dropbox.com/s/r0i632nh8gdhq8q/Yamaha 1975-1984 XS250-360-400 Haynes Manual.pdf?dl=0
burr
XS400 Enthusiast
Short update, some successes  and some failures…
So, good news first: Fixed the camshaft timing. I realized I had not lined up the horizontal cam sprocket marks with the plane of the valve cover. I did this while the stator was at the " | " mark beside "LT." Was a little tricky, but not too bad. Just had to replace the liquid gasket at the cylinder head/valve cover interface. Tested multiple full turns from the 17mm stator bolt – IT WORKED.
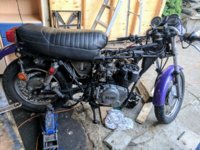
And… I GOT THE ENGINE BACK IN. I was very happy about this. A big win mentally, and it also meant my workspace is getting cleaner. Installed the clutch cable inside the left cover section. It was straight forward, but a couple parts don't seem to appear in the "Parts Catalogue." Out of curiosity, has anyone seen that small metal guidepiece that sits outside the clutch cover but supports the clutch cable? I also have a small metal cylinder, I guess it was previously used as a tenion spacer. From what i saw, those two parts are not specifically mentioned either in the manuals or in the catalogue. Anyway, on to more important things…
Carbs installed, oil filter (no gasket used for this), left and right covers on (paper gaskets both sides).
Put in just under 2 litres/bottles of Castrol Grand Prix Four Stroke Oil, 20w50 grade. Also dropped a wee bit into the sparkplug holes.
The Bad news: Tried to kickstart it to get the oil moving. First kickstart makes me feel like a seasoned mechanic, and I can feel the parts whirring and spinning. So I try to kick again… NOPE. Just doesn't wanna go. . I try to shift into neutral but it seems it doesn't wanna click through the gears. When i try to tap down on the gear shifter, there is some motion; when i try to pull up on the gear shifter there's barely any clicking movement. Hmmm…
Can anyone think why my kicktstart doesn't wanna do it twice? I had to turn the stator the other way to get it to kickstart again.
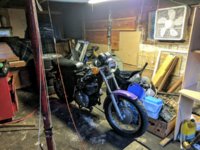
It was the end of my day and I was getting tired, so I think I'll try again tomorrow. 1 more pic She's all tucked in ready for bed
and some failures…So, good news first: Fixed the camshaft timing. I realized I had not lined up the horizontal cam sprocket marks with the plane of the valve cover. I did this while the stator was at the " | " mark beside "LT." Was a little tricky, but not too bad. Just had to replace the liquid gasket at the cylinder head/valve cover interface. Tested multiple full turns from the 17mm stator bolt – IT WORKED.
And… I GOT THE ENGINE BACK IN. I was very happy about this. A big win mentally, and it also meant my workspace is getting cleaner. Installed the clutch cable inside the left cover section. It was straight forward, but a couple parts don't seem to appear in the "Parts Catalogue." Out of curiosity, has anyone seen that small metal guidepiece that sits outside the clutch cover but supports the clutch cable? I also have a small metal cylinder, I guess it was previously used as a tenion spacer. From what i saw, those two parts are not specifically mentioned either in the manuals or in the catalogue. Anyway, on to more important things…
Carbs installed, oil filter (no gasket used for this), left and right covers on (paper gaskets both sides).
Put in just under 2 litres/bottles of Castrol Grand Prix Four Stroke Oil, 20w50 grade. Also dropped a wee bit into the sparkplug holes.
The Bad news: Tried to kickstart it to get the oil moving. First kickstart makes me feel like a seasoned mechanic, and I can feel the parts whirring and spinning. So I try to kick again… NOPE. Just doesn't wanna go.
. I try to shift into neutral but it seems it doesn't wanna click through the gears. When i try to tap down on the gear shifter, there is some motion; when i try to pull up on the gear shifter there's barely any clicking movement. Hmmm…Can anyone think why my kicktstart doesn't wanna do it twice? I had to turn the stator the other way to get it to kickstart again.
It was the end of my day and I was getting tired, so I think I'll try again tomorrow. 1 more pic
She's all tucked in ready for bedAttachments

Last edited:
burr
XS400 Enthusiast
Made a little stop-motion style video of the engine mounting, if you guys are into that sorta thing. I have more assembly vids which I might post as well.
Similar threads
- Replies
- 52
- Views
- 24K