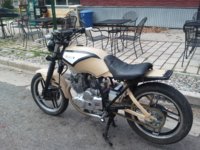
1982 seca xs400 build (New thread)

If you don't want to wait I'd go down to Wright's. They were only $3.50 each I believe, and they were really helpful in what sizes to use. They looked up my stock sizes (mine had too much crud on them to read one of them), and recommended a great starting point. Haven't got to test them yet, but I felt confident and happy with my experience there.
 
For my wiring I got rid off most of the relays. The kickstand relay can be bypassed by unhooking the black/white wire from your ignition. The clutch/neutral safety loop can be bypassed by running the red/white power wire directly to the starter solenoid. I bought a cheap LED blinker relay at auto zone. I should have used a fuse block but instead I just used in line fuse holders. 20a main 10a on the rest of the fuses. All the connections are uninsulated bullet connectors that were shrink wrapped. I used more shrink wrap than I thought it would take.

What else do you want to know?


I'm trying to understand the wiring diagram you posted on I think page 4 but I'm having trouble. A greatly simplified diagram would be most helpful :D I'd like to take out all the non needed stuff, like the kick stand switch, nuetral switch, etc. I just need the basic requirements to get it passed smog here in Cali, which is a headlight, brakelight, and blinkers.

something like,

"the 6 wires coming out of the right hand control go to this and the 4 wires coming out of the this go to that. Make sure you splice in a fuse between here and here."

I know I'm asking too much but you've done such a great job so far. I know the bike runs, I had it running once. But now I'm facing an electrical problem and I'd rather just rewire the bike and make it more simplified. I thought about buying one of those "chopper wiring harnesses" being sold on ebay, but frankly I'd dont know what they do exactly. I'm more mechanical then electrical and I'm used to working on motors, not running wires.
 
The best wiring diagram to use is the stock one that is in the manual.

The six wires coming from the right hand control are for the kill switch the start button and a power to the head unit. The wires that power the head unit dont even have to go to the right side control because they are just conected in the assembly no switch controls them. I had this wrong in an earlier post. The starter button wires are blue/white and a black. The starter button connects those wires when pushed. BL/wh goes to the starter solenoid and the black is a ground. The red/white wires are for your on/off switch. One comes from the ignition fuse and the other supplies the coils as well as the ignition.
 
If you ask specific questions I might be able to help, but I dont want to write out every detail. It isnt to difficult once you figure out how the wiring comes together. I recomend studying the stock harness as much as possible. Look at every component. Where do the wires go and where are they coming from? Once you have that down it is much simpler. I think I drew like ten diagrams but they are all less useful than the stock one.

Ill answer any question as best I can.
 
Took her for a quick spin to the caffee shop.
Icoffe shop.jpg
 
Know the diagram thoroughly before you start that, but it helps to physically see how everything is connected
 
Did you line the battery box with anything to keep vibrations down on the battery? I have some old cut up bike tubes that i'm going to use. Wonder if it's necessary or not. And i'm assuming it's just attached with a couple bolts through that larger channel cut out in the bottom of the swingarm?
 
Did you line the battery box with anything to keep vibrations down on the battery? I have some old cut up bike tubes that i'm going to use. Wonder if it's necessary or not. And i'm assuming it's just attached with a couple bolts through that larger channel cut out in the bottom of the swingarm?

Right now I just have some rags underneath and on the sides. The box is temporary. My buddy is welding a stainless on for me.
 
The only thing I don't like about your bike is the loose fitting seat cover. It looks really good save for that seat cover. Are you going to leave it like that?
 
The only thing I don't like about your bike is the loose fitting seat cover. It looks really good save for that seat cover. Are you going to leave it like that?

No ill change it eventually. The seat also doesnt sit very flush to the frame in the back, and it looks pretty ugly. Ill make a seat pan and new seat at some point, but Im with you the seat needs to be changed.
 
Changed my jets today to 132.5 mains. There is still a slight crackle when I let off the throttle (guessing its going to be really hard to eliminate the crackle completely with my exhaust setup). It doesn't pop or backfire real loud but there is a slight crackle for sure. I bought 135 mains as well. My plugs definitely looked as if the bike was lean but, I only rode it for a couple of miles with the new jets. Is that long enough to change the appearance of the plug if they were already a bit burned looking. I plan on getting new plugs, but I dont really want to "white a set out" after I buy them.

So my big question is should I bump up to the 135? has anyone changed there jets to that size? has any one changed them to a 132.5? outcomes?
stock sizes were 117.5 and 127.5 fyi.

As for power. I have plenty through all the rpms, it feels really solid. Its very responsive, and I have found this bike likes to run at high revs more, but it still picks up pretty good in low range. I really dont think I need to change my pilot but I bought a couple of sizes to tinker with. I also will try moving the needle up to see how it reacts. Any suggestions?

stock sizes were 117.5 and 127.5 fyi.


SO
 
I have run up to 152.5, but I wouldn't recommend it.

The cracking on decel is probably from a lean pilot.

What size pilot are you running? What is stock for you? I would try bumping that.
 
I have run up to 152.5, but I wouldn't recommend it.

The cracking on decel is probably from a lean pilot.

What size pilot are you running? What is stock for you? I would try bumping that.

so one thing I notice about my pilot is that it only has one hole at the top. The ones I saw at the shop and the ones I have been looking at on mikesxs have vent holes on the side as well as the top hole. Are they interchangeable?
 
Can you post a photo of your pilot jets? That is very strange indeed.

Oh wait; it may be different because you have a Seca. I don't really know much about the difference in the Seca carbs.
 
Ya ill post a pic of the pilots next time I pull them out. Do your pilots have the vent holes on the side?

It might be a couple of weeks though. The bike is running good enough for now and I dont plan on riding to much over the next couple of weeks. I am getting really busy with finals plus I just bought an rd350 for $200, so all of my spare time is going to get that running. Once finals are over I plan on doing a day of carb tuning. My buddy is an intern with a shop down here that has a dyno so I might get to do some runs on the cheap. We will see. I might even throw on some stock pipes and the old air box to see if I got any power gains going to pods and a free flow.

More than likely it will be to expensive and ill just have to do it by feel, but I can always dream.
 
I have a '78. We both have BS34 carbs, but there are some difference for sure. Yes, my pilot jets have the vent holes. This doesn't mean yours are wrong or anything; there definitely where plenty of changes made to the internal parts of the carbs. Someone who has the same setup can help confirm.
 
Bentwrench what do your pilots look like? Iknow you have a dohc motor. Also I am curious if your stock jets are the same size as my stock jets. I noticed at the shop that some dohc models have different size jets stock.

So what do youthink bc? I cant find any with a single hole all of the pilots I keep finding have the side vents. Think they will work for me? I know ill probably just end up buying them and trying them out but more input is always appreciated. Thanks
 
Back
Top