'79 xs400 rough>reliable>cafe 'Scarlett'

jthiessen

XS400 Addict
Messages
419
Reaction score
0
Points
16
Location
British Columbia, Canada
Hello all! I have met some of you and you have already been such a huge help in the past. Now this is a thread dedicated to the journey of my 'new' bike affectionately dubbed Scarlett.

I picked this bike up in Oct 2013, the PO was moving so he needed to unload it. When it got it, it was running - but quite rough.

My goals with this bike are two stage:
1. To do whatever it takes to make the bike run rock-solid reliable. It will be a main means of transportation during the drivable months.
2. To give it a customized look and feel. Right now I am leaning towards a cafe.

My knowledge of motorcycles is very limited, but I have access to a few really great friends at home and this community online. So I am feeling pretty confident!
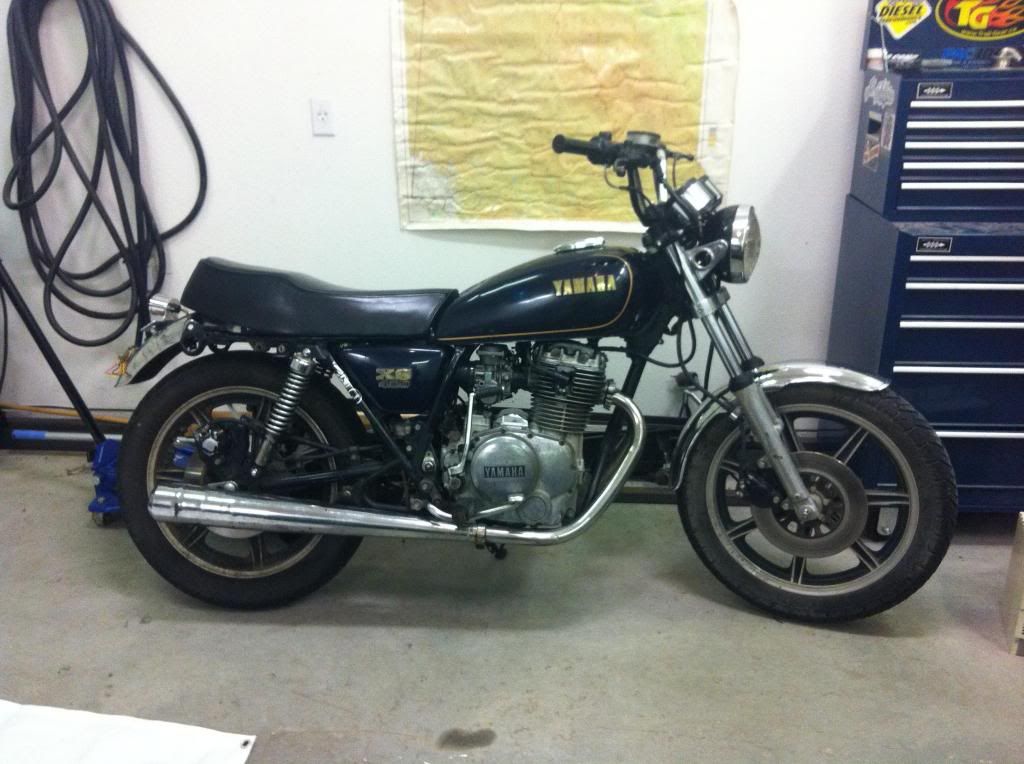
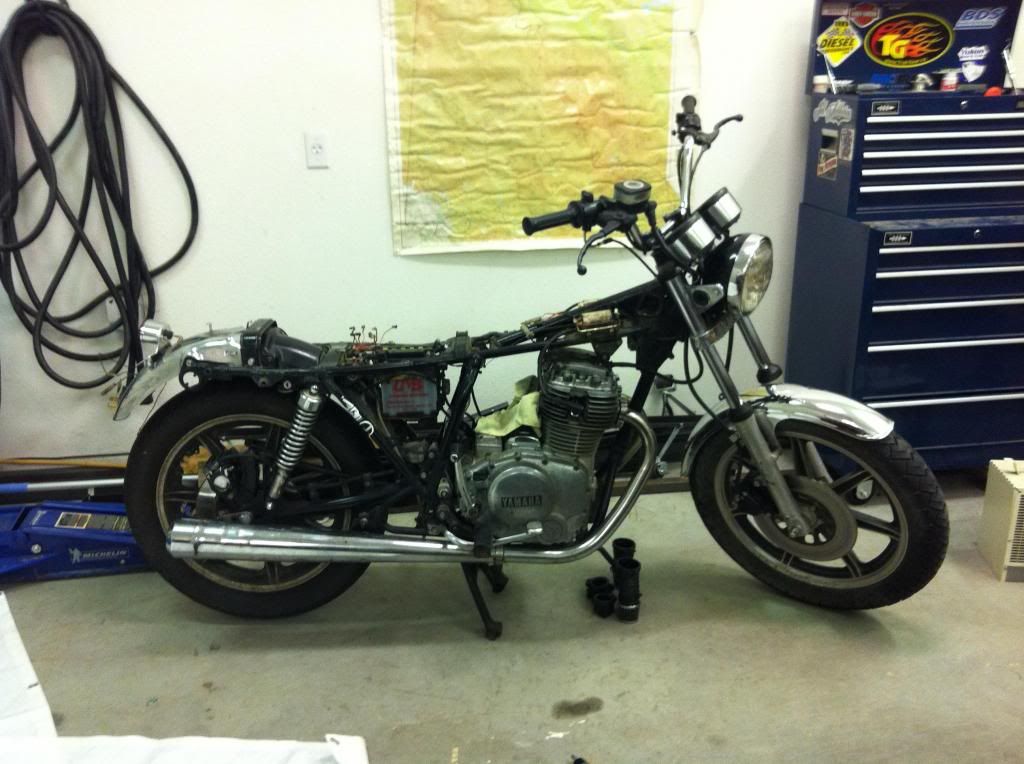
Scarlett Currently:
photo_zps3vhiatgs.jpg
 
Last edited:
Once I got the bike into the in-laws garage :)doh:) I proceeded with the entry level introduction posted by Willem.

photo1_zps3228838a.jpg

photo2_zpse788adbd.jpg


Aside from standard fluid changes etc, I found a few surprises and a few not-so surprises:

1. There are pod filters installed! One tick off my list.

2. The PO left me a few free screw driver bits in the fusebox! Score!
photo2_zps531b5f19.jpg

One thing added to my list: Install Blade Fusebox. I hope that there are no electrical ghosts in this thing and a new fusebox will fix all.

3. I see that the Petcock was leaking.

4. As well the top end gaskets look like they need to be replaced. This is probably going to be the most intense piece so far. Does the entire engine need to come out?

5. The tank was pretty dented up, I want to give it a nice paint job but that is more of a stage 2 priority.

6. I pulled the carbs off intending to clean them, but they look really clean as is. Curiosity will probably get the best of me and I will pull them apart to check the gaskets, float level etc. The carb boots are also cracked up. I also read that it isn't imperative to re-jet the carbs due only to having pods. Thoughts?

7. Spark plug caps and wires look toast. Might replace the ignition coils as well. Would part #17-6805 from Mikes XS be the right one? What would the best plugs/wires be?

Thats about as far as I've gotten. I have been so busy with work I haven't had a lot of time to tinker, but boy is my mind consumed!

Any thoughts, comments, words of wisdom are appreciated!
 
1. do check if they are the ones with the inner lip (do a little google search here on the forum) cause those will block one of the air passages in the carb and make your bike run like crap

2. still gives me the creeps this picture

3. petcock rebuild kit will be in order then. I don't recommend getting a replacement petcock since they're usually just as old and leaky.

4. Depending on what you classify as 'top end gasket', but probably not. You can take the valve cover off no problem. To take the cylinders off you might have to take the engine out, but I have the DOHC frame with no tubes in the way so I wouldn't know

5. Smart to keep cosmetics for later. Getting it running right is a good first priority with any build.

6. You should check your diaphragms for wear either way, and set your float height. So you might as well take the carbs apart and clean them again, they can never be clean enough. But if you're confident they're pretty clean, I wouldn't go as far as boil them. The carb boots will have to be replaced obviously, cracks cause air leaks. The re-jetting depends also on your exhaust, but maybe you'll be able to adjust for the extra air flow by setting the idle mixture. Your spark plugs will tell you once the bike's running, but I expect you'll probably have to go up a jet size to get it running just right in the end.

7. Check your manual for the type of plugs you need, and buy an extra pair. It's always nice to have some lying around. There are some people who prefer iridium plugs, but I don't think it makes that big a difference on these old bikes and they are a bit more expensive. I think the wires are a pretty standard type, and the caps also shouldn't be a problem to find. I got them at my local dealer, but they're specialized in older bikes.

keep up the good work :thumbsup:
 
Got my first (of many to come) ever order of parts today. Very excited to get tinkering again this weekend!

Have been looking around a lot for things like signals. I know I said I want it to run reliably before I do too much atheistic work on it, however I don't have the rubber bushings needed for the rear signals. So I was thinking I would just get the signals I want in the end rather than spend money on stock signals in the meantime. Is there a specific type of signal I should be looking for? A good brand? I like the bullet style.

Also have been taking kindly to the cool brats out there. What are the main differences between Cafe bikes and Brat bikes other than the seat? Ideally I would love a two seater cafe, but that probably doesn't exist...
 
Last edited:
Finally got around to doing some work yesterday.

Getting things done having the bike an hour away has been a lot harder than I suspected. I wish I had a garage! It's so painful to have all this great inspiration on the forum and around, but be making such slow progress. But this is my first bike so I need to cut myself some slack!

Anyways, work done:
-Cleaned up the Fuse disaster
photo1copy_zpsc8da8096.jpg

-Cleaned up the Carbs w/ new boots
-Rebuilt Petcock

Hopefully next:
1. Drag Bars
2. New Mirrors
3. DCC Seat Hoop (Has anyone used on of them? I'm assuming it would be the Large CC hoop?)
4. New Signals
5. And I really want to take the girl to the car wash and get her cleaned up! There is still a lot of gunk that is hard to get to while the engine is still in the frame.
6. Also would love to get a smaller battery to clean up the gap, but still maintain Electric Start.

The list goes on and keeps getting longer!
 
Nice post, decent shape on the bike (though the screw head fuse box scares the shit out of me). I like your re-use of the fusebox, very xs400 nerdy cool (compliment!)

Have you done a compression test? I think of this as fundamental to a bike project.
Checked valve clearances? Good idea to just get this out of the way while you have bike this far apart, and will make sure than anything you do to the intake or exhaust will be "properly framed" when you start tuning.

Have you tried running the bike after your carb rebuild? If you've put in fresh oil (and the two items above this), it's not a bad idea, and can tell you a lot about what you may have to look forward to as far as work (good time to check for vacuum leaks, state of charging system, checking on the choke settings, etc.)


Go to the manual and work yourself through the electrical/charging diagnostics. Seems like there is a flip of the coin that will determine. whether you need to rebuild/rewire your charging system, most of us have.

Pour out old gas, perhaps clean tank, and get yourself an inline fuel filter. Can be gotten cheap from your auto parts store. Buy yourself some ethanol resistant fuel hose while you are at it, as you will probably need to replace this line when you install the fuel filter (it's a pretty short distance and awkward angle from the tank to the left carb, mine had to be set in an "arc" to fit the filter into space. Also, when I got my bike, there was fuel dripping between the two carbs. (my bike) uses fuel line to connect the two carbs, which had become brittle and loose fitting. Replaced with new when I did my carb rebuild.

Cheers, and welcome to the forum!
 
Tried my hand at setting the Valve Clearances and Points gaps. Quite a bit trickier than I was expecting. Firstly the points gap was so tight I couldn't get my feeler in at all, yet they didn't look burnt or anything. A bit suspicious. I set them to .012 . . . Hopefully when I start her up in the spring everything will be fancy.

Next the Valves. The set of 45 Feeler gauges didn't want to go in, so I tried to make a 45 into a 90 and broke the angle. I will be going to try to find a set of feeler gauges with a 90 built in.

But I need a recap on the process as I don't know if I understand it 100%. Let me know if I go wrong somewhere.

1. Rotate engine counter-clockwise until the Left Intake cylinder closes.
2. Continue to rotate until the Piston comes up, at this point you could be at the LT mark.
3. Set your Left Intake Clearance.
4. (This step i am not certain about. Do you hold your engine at the same LT mark to set your Left Exhaust Clearance?)

Repeat steps for the Right side using the RT mark.

!!Thank you for your wisdom!!
 
This is all pretty much right on. I do it like this:

Remove plugs, remove timing cover.
17mm wrench, rotate motor as arrow indicates
I put my thumb over the spark plug hole on the side I'm working on, and get a small hydraulic jack ready to hold my wrench.
When I feel the pressure climb, I know that piston is on its compression stroke.
I keep forward momentum and watch for the LT mark. When I am close to hitting it, I carefully hold wrench in place, and jack up jack with a block of wood until it is about to catch the wrench. I continue forward until the mark is lined up, then I adjust jack until it will support the wrench. Now adjust BOTH The exhaust and the intake on that side.

Repeat for right side. Then you are done.

Make sure you never let the wrench go the other direction, not even a tiny bit. This takes pressure of the cam chain and will throw your adjustments off. That is why the jack is important.

Cheers!
 
Also pulled out these bad boys:
Sparkplugs_zps0d263b1c.jpg

What are your opinions on them?

They are BPR-8ES, the manual says BP-7ES (which translates to the modern day BPR-7ES apparently.) What differences should I be expecting by switching back to the BPR-7ES spark plugs?
 
Right is rich. Left is a little ambiguous, better pic with more visual of insulator would be good.

I believe the "8" spark plug has a more vigorous spark (hotter). I've heard people suggest against it, but I'm not sure why, or why someone would suggest them either. I just run with the stock plugs which seem to work fine.
 
If you run resistor plugs you need to run NON-resistor caps. The right is lean and the left if a bit rich. Have you synced them with a manometer yet? What pilot jets do you have and what are the mix screws set at?
 
If you run resistor plugs you need to run NON-resistor caps. The right is lean and the left if a bit rich. Have you synced them with a manometer yet? What pilot jets do you have and what are the mix screws set at?


I haven't synced or set anything yet. Those plugs are from the PO. I haven't run the bike since buying it since it is very winter here! Just doing maintenance.

This will probably result in a lot of trouble shooting come spring, but I am trying to do everything to spec to hopefully have a fresh palette.
 
Back
Top