Aussie XS Cafe Build

Pork Chop

XS400 Junkie
Messages
825
Reaction score
5
Points
18
Location
Sydney Australia
Update on tires... I went for a ride down to Bondi the other evening and on the way home the bike felt a bit sloppy. I thought I might have eaten too much for dinner but the next day I discovered that the front tyre had a screw sticking out of it and had gone completely flat...

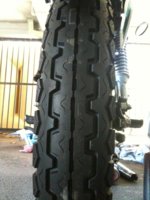
Seemed like now was a good time to replace the tires - I ended up getting some Dunlop TT100GP. 3.00x18 on the front and 4.00x18 on the rear. According to Dunlop "The TT100GP is ideally suited to classic bikes whose owners wish to retain period looks .Also perfect for classic racing or for that valuable road classic that needs the added insurance of extra grip". The tread looks a bit chunky in the pics but is more subdued in real life. Will update on what they feel like when I get the bike back on the road as my registration ran out 2 days after the flat tire.

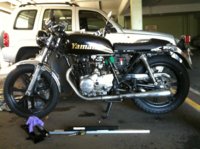
The rear axle needed some persuading to remove but it only took about 1 hour to remove front and rear wheels. The chain was a bit more difficult to break than a bmx chain so I left it on and just wiggled the rear wheel around it. I slightly buggered the rear axle thread hammering it back in but not too much.
 

Attachments

  • IMG_0019.jpg
    IMG_0019.jpg
    300 KB · Views: 373
  • IMG_0026.jpg
    IMG_0026.jpg
    302.4 KB · Views: 449
The seat is made for sr500 so I had to get creative to fit it on. I made some brackets for the back out or 3mm angle aluminium that also mount the rear indicators. These brackets are rough and ready but do the job. I used industrial velcro to secure the front or the seat to the frame.
P1030899-1.jpg
 
When I put the rear wheel back on I noticed that there was a bit of lateral play in the swing arm, not a lot but noticeable. Can anyone let me know if this is this normal or does it indicate worn bushes.?
 
Just to let everyone know that this is my first bike and first build so please bare with all my noob questions and thanks to all the guys who have helped so far. I have no workshop so I do all my work either in my apartment or down in the shared carpark.

My plan is to build the bike in 2 stages.
Stage 1 is to modify or replace parts as I still ride it. I am learning along the way I think this is a good approach to get a feel for the different components of a bike. I hope to finish this stage in a month or so.
Stage 2 is to strip, paint and re-assemble the bike.
I would like to convert it to a 400cc and will be interested in seeing how CadeXS goes with his conversion.

Cheers,

Pork Chop
 
I got the seat from Motorlanna. From memory, it cost $160 Aussie shipped and took about a week to be delivered from Chang Mai in Thailand. The mounting brackets aren't the best quality but I got ride of them as they don't fit the XS.
FYI - I saw a guy on gumtree parting out an XS400 in Brisbane so could be useful to you.
 
sideways play is not good. yamaha used plastic bushes in there, but you can buy phosphor bronze bushes on ebay. you may need to purchase a "collar" which is the other bearing surface. these bushes will normally need reaming out.

drewps
 
Thanks for the info Drewpy. I plan on replacing all bearings and bushes when i strip the frame.

Can anyone provide some advice on removing the oil filter bolt. I went to replace the oil filter but the bolt just rounded-off. The bolt head is as soft as butter.
 
yep, common that. Arc weld a large nut on the bugger and get it off that way.

replacement bolts have a larger hex on them (i wonder why?)
 
When I first took mine apart I got a load of those plastic containers you get Chinese food in (here in the UK anyway) and stored all the different parts for each component in these boxes and wrote on the lid with a sharpie.

This worked really well for a while, then I got lazy and got things mixed up, and it's all a jumbled mess now, lol :doh:
Yeah, I do the same thing with zip-lock style baggies...Works pretty well.
 
get yourself an impact driver, get food bags, label everything, take pictures, get boxes and store in modules so when each item is cleaned/fixed you'll know its been done.
allow for triple the amount of time you reckon it will take and do the same for the cost!
 
Thanks for all the advice. Luckily I do have quite a few old take away containers kicking around under the kitchen sink.

I am a bit embarrassed to ask this next question but is this the right sequence to disassemble. start with tank, seat, engine, then move onto the wheels, triple, swingarm, wiring harness, and then the rest of the bibs and bobs.?

Cheers.
 
that sounds about right!, no hard and fast rule and depends how far your taking it. store the tinware and plastics far away (but don't forget where you put them)

Make notes on what needs doing and what needs buying. there has been many a time when I just bagged a bargain only to find i've already got it:doh:

and don't forget pictures, we like pictures too!:D
 
Back
Top