-
Enjoy XS400.com? Consider making a donation to help support the site.
XS400.com receives a small share of sales from some links on this page, but direct donations have a much greater impact on keeping this site going.
You are using an out of date browser. It may not display this or other websites correctly.
You should upgrade or use an alternative browser.
You should upgrade or use an alternative browser.
Carb/Exhaust issues
- Thread starter rugbywarrior89
- Start date
rugbywarrior89
Need more time...
Looks like I will have to fix that a well. Do you know of a temp solution to those butterfly seals that I could get by for a few days while I waited for them to come in? Maybe some o-rings or something.
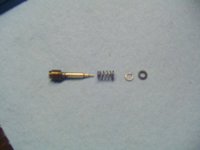
No. Install in the order shown in the picture from XSChris. Install the spring, then washer, then o-ring onto the pilot screws, then install into carb bodies. Make sure there isn't an old o-ring still stuck in the carb body or you will have a miserable time getting the idle mixture adjusted.
rugbywarrior89
Need more time...
Well, I'd like to thank everybody for their help (and parts) but my bike will be going into the garage for the winter. I will revisit the project in the spring. I'm just not going to be able to give it the time and money I need to get it running before winter. It's forcing me to cut corners and cause even more problems. I will just need save up and do it correctly. Thanks~

Edit: In case you were wondering why I decided to stop so abruptly. http://www.xs400.com/forum/showthread.php?t=8550&page=6 Post 110
Edit: In case you were wondering why I decided to stop so abruptly. http://www.xs400.com/forum/showthread.php?t=8550&page=6 Post 110
Last edited:
rugbywarrior89
Need more time...
Well, I'm back! I Have just bought all the parts I need to get the bike ready for spring. After my carburetor leak incedent, I did some pretty good damage to my bike so I decided to wait and really fix it correctly. I busted up the gas tank so I stripped it, bondo'ed it back up and painted it. Not bad for my first time http://www.xs400.com/forum/showthread.php?t=11871. I ordered a bunch of parts last week and they are slowly arriving (soooooo slowly). I had to get a whole new headlight, butterfly seals, some yamalube, a new tach cable, petcock gasket, mirrors w/ handlebar clamps and new switches.
Last night, I got my carbs back apart and ready for the dip. I could definately tell they were messed up. I had only run the bike twice since I cleaned them and they were filthy. A lot of you mentioned about my pod filters having that lip. For now, instead of new ones, I cut the lip off and just JB Welded the filter to the clamp. So far so good. I stripped the carb screw trying to get it out so I'm going to try to cut a notch and use a flathead (or maybe a screw extractor if harbor freight has them cheap). The headlight and swtches will require a lot of soldering. So far I'm not very good at it but I have a feeling I will be") .
.
I also bought a new coat and pants, all with ballistic armor. The coat is Amazing. From a smaller seller I found on Amazon called Dragon Rider. He helped me out a lot with sizing and the coats are unbelievably cool. I told him I would recommend him to friends so this is my shameless plug. www.dragonriderusa.com The attached pics are the coat I got. All leather.
I will keep you posted on my progress of my bike's revival. I'm sure I will have questions.
Last night, I got my carbs back apart and ready for the dip. I could definately tell they were messed up. I had only run the bike twice since I cleaned them and they were filthy. A lot of you mentioned about my pod filters having that lip. For now, instead of new ones, I cut the lip off and just JB Welded the filter to the clamp. So far so good. I stripped the carb screw trying to get it out so I'm going to try to cut a notch and use a flathead (or maybe a screw extractor if harbor freight has them cheap). The headlight and swtches will require a lot of soldering. So far I'm not very good at it but I have a feeling I will be
. I also bought a new coat and pants, all with ballistic armor. The coat is Amazing. From a smaller seller I found on Amazon called Dragon Rider. He helped me out a lot with sizing and the coats are unbelievably cool. I told him I would recommend him to friends so this is my shameless plug. www.dragonriderusa.com The attached pics are the coat I got. All leather.
I will keep you posted on my progress of my bike's revival. I'm sure I will have questions.
Attachments


Welcome back
Good to hear you're getting everything sorted out, and you got yourself some new riding gear. I like the jacket!
One tip on soldering: make sure you're flowing the solder, not smearing it on. You heat the wires you're soldering together first, and then use the heat in the wires to melt the solder. Basically sandwich the wire connection between the iron and the solder, without having the solder touch your iron. That way the solder will attach to the wire instead of fold around like a doughnut.
rugbywarrior89
Need more time...
Thanks for the tip. I think my biggest problem in the past has been that I couldn't hold the connections together. I didn't have enough hands.lol One thing I was wondering was whether I should use flux or not. If so, do I just dip the ends of my wires in the flux before I solder?
rugbywarrior89
Need more time...
Thanks. I have seen that video before (of course watching it again never hurts). I am just wondering why the heck my new solder iron came with flux. The only time I have seen flux used is with plumbing. I didn't know if it's optional to make the project easier for you or if it is something that is only used in special circumstances.

Make sure the flux is NOT an acid. The acid will remain in the wiring and corrode it. I use a flux core solder intended for electronics and wiring, not plumbing.
I don't think flux ever hurts and to the extent it removes oxidation on the wires just before the solder hits it might make a slightly stronger bond.
And the hot pen takes the flux off ...
And the hot pen takes the flux off ...
rugbywarrior89
Need more time...
I see. I think I will go ahead and skip it then. It doesn't seem overly imortant. My wires are clean enough. thanks
Tombo
XS400 Addict
Flux creates a much stronger connection by drawing the solder where the flux is. I work on brass and wood winds from time to time, and if you don't use flux with the silver solder that connects joints, it'll break right off with light pressure. The same job with flux is enough to hang something as big as a baritone sax from a 1/2" soldered pice brass to brass.
In electronics, it just ensures that the solder will be drawn INTO the wires that are being bonded, instead of just coating the outside. If you don't use a flux core solder (which most solder available seems to be flux core at your corner electronics store) then most certainly use some flux with your soldering. You can get away without it, but if someone was working on my electronics without flux core or flux, then I wouldn't pay them (because they are not professional)
In electronics, it just ensures that the solder will be drawn INTO the wires that are being bonded, instead of just coating the outside. If you don't use a flux core solder (which most solder available seems to be flux core at your corner electronics store) then most certainly use some flux with your soldering. You can get away without it, but if someone was working on my electronics without flux core or flux, then I wouldn't pay them (because they are not professional)
Tombo, my limited amateur experience supports that, but it's interesting to know that there's more to it than cleaning.
I must confess though, the main reason for my comment might have been just so I could write "flux off" ...
I must confess though, the main reason for my comment might have been just so I could write "flux off" ...
Tombo
XS400 Addict
Haha, Lou. It's a simple process. Heat up your iron, Flux on, flux off.
That is all fine and dandy, till your Flux capacitor gets turnned on at 88 miles per hour.. Then we will see things fly!
 For the Flux time!
For the Flux time!rugbywarrior89
Need more time...
Soldered all the wires together but things still aren't working. I don' know what the flux wrong! I got a horn and a headlight. My starter button and turn signals got nothin. Haven't had time to look though, got it all together at 1:30 am, didn't work so I went to bed. I will look at it tonight I think. With any luck I bumped a wire and blew a fuse or something... if only it were going to be that easy.
Tombo
XS400 Addict
Check the fuse box of course. Have you alreadyswitch to blade type? Check the connections on the switches. If the bike ran in the rain, these terminals can get corroded and or filthy.button on my xj (same typof button) was just dirty. Gave it a cleaning, rubbed with 000 steel wool, and put bulb grease on it, which solved my issue.
We'll get to the fluxing bottom of this.
We'll get to the fluxing bottom of this.
Last edited:
rugbywarrior89
Need more time...
The PO switched to blade type. He was also apparently a veteran because the wiring looks like a war zone. The turn signals were giving me grief so I took them apart and a wire was broken from the solder on the switch so I deftly tried soldering it back, not as easy as two wires together. Still didn't work right so I decided to buy new switches all around since the switches were 30+ yrs old and faded and my headlight was already busted. I went with a cheap set on ebay shipped from C***a. http://www.ebay.com/itm/Universal-7...Parts_Accessories&hash=item4acbf1cdfc&vxp=mtr
I think my problem with the turn signals is there is an extra wire that was on the old switch that was not on the new switch. Assuming its the original wiring, it was yellow w/ a red strip I believe. it was soldered to a flat copper piece with a prong on each side that the switch bumped into. I believe that is something about a shut-off feature or something that came on the 82 specials. I'm not sure though. The 3 wires on the switch block are wired correctly (I'm reasonably sure anyways). The switch looks exactly like the old one except that copper piece. As far as the starter button, I either didn't put the switch back together correctly or I didn't ground it properly I think. Everything inside the headlight bucket was grounded to a single ground wire but I'm wondering if that was a mistake now. I'm not exactly Einstein when it comes to electricity. The ground apparently works though because the headlight and horn are also on the same ground. At the moment I'm at a loss.
I think my problem with the turn signals is there is an extra wire that was on the old switch that was not on the new switch. Assuming its the original wiring, it was yellow w/ a red strip I believe. it was soldered to a flat copper piece with a prong on each side that the switch bumped into. I believe that is something about a shut-off feature or something that came on the 82 specials. I'm not sure though. The 3 wires on the switch block are wired correctly (I'm reasonably sure anyways). The switch looks exactly like the old one except that copper piece. As far as the starter button, I either didn't put the switch back together correctly or I didn't ground it properly I think. Everything inside the headlight bucket was grounded to a single ground wire but I'm wondering if that was a mistake now. I'm not exactly Einstein when it comes to electricity. The ground apparently works though because the headlight and horn are also on the same ground. At the moment I'm at a loss.