Charging issues HELP!!!

Tombo

XS400 Addict
Messages
308
Reaction score
2
Points
18
Location
San Francisco CA
Hey everyone

First - sorry, this is long.

I have 1980 xs400 special ii that I picked up about a week ago. I had got it to run decently, but then noted that I was having a charging issue (not charging, very low increase in voltage when at 2-3k+rpms)

I followed the manual through the various steps:
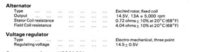
1) Checked alternator - the two green wires (one really looks black to me, both are fiber wrap) read at 4.6 ohms
2) Checked the 3 white wires - 1.1 ohms across each.

Lets stop right here - are these readings "bad"? They are a bit out of the given spec - but I went ahead and checked the rectifier, which read within spec.

Having no conclusions from my diagnostics, I decided to go ahead and change the voltage regulator, as had been described as a successful "fix" and a potential "upgrade". I figured if it changed nothing, at least I would have a more solid regulator BEFORE it failed. In retrospect, it seems like it caused more problems.... But perhaps I did something wrong.:doh:

Heres what I did:
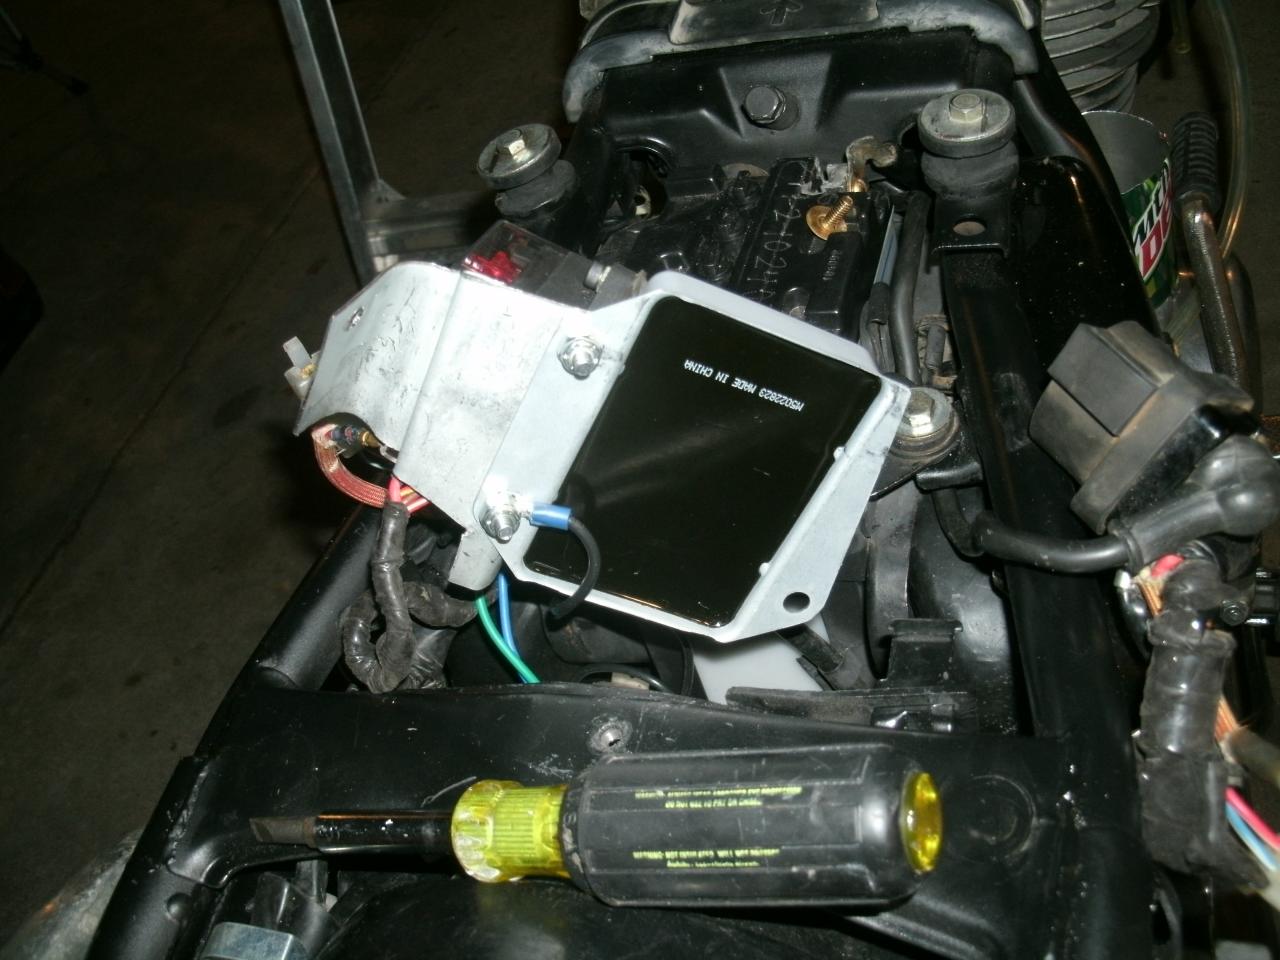
Located the regulator, cut the black, green, and brown wire off of it, then grafted on a bullet connectors to attach to my new R296 unit from O'reilly. The green wire is attach to the upper left, the brown to the lower middle (there are only two) I put a ring connector on the remaining black wire from the stock harness (noting in wiring diagram that it ran to the negative battery terminal), and grounded it to the body of the new R296.

Now the bike runs like total shit. Difficulty starting, then once it's started it backfires into the left side air box intermittently. And Alas - NO charge! None (I had a LITTLE before this).

So I tried one more time to ground the body of the new unit by adding a new ring to ring piece of short wire, and grounded it with the other black ground ring to the left of the battery box and to the body of the unit. No change.

What I'm confused about, is how the bike seems to run so much worse now that I've made the change. Perhaps I did something wrong!?:banghead:

I'm out of ideas short of diving into the stator and alternator. Your help, please!
 
I'm out of ideas short of diving into the stator and alternator. Your help, please!
LOL
haha, umm funny you should bring that up. Hope you picked up the PT173 to make it easy to connect everything. I did do that upgrade, I think I have some really good photos of that upgrade. Now to qwell the laughter. The problem with all these old bikes seems to be the same. usaually the Voltage reg is good till you destroy it trying to troubleshoot the problem. I think we all have done this. There are 3 re-wire threads, The one I followed was Drewpies. its found on the websites front page, down about 4 items or so. Are you sitting down???

Its your Stator.
.
.
.
Okay take a deep breath, pull off the Drive sprocket cover, and if its dirty in there, feel the wires that come from the far Left side. 2 bundles. they are okay at that point. follow them to under the clutch rod. from here it drops though a hole and coming up the rear of the engine. so the bad spot is typically just at the hole. The wire is hard, and crackling. very stiff. every time you touch it, it cracks, and gets worse if you were to re-test the stator. The re-wire article is listed under the Tech section up on top of this screen. other users that have wrote up something, Drewifcier, and sponboni. (spelling) Drewpy list everything to worry about, then backs it on everywhere else. Just do the stator part of the re-wire. provided your Voltage reg is connected right, your system is going to be just fine!

Good luck
Tobie

http://www.xs400.com/media/albums/342/
http://www.xs400.com/tech.php
http://www.xs400.com/forum/showthread.php?t=7430 (pic of my worn out wire) and thread I started, and ended in one post from drewpy
 
So.... How did you do your connection? I know you used the pigtail - but was it green up top, brown on bottom? What did you do with the black wire part of original harness and/or how did you ground the regulator?
 
Oh - and PS - I saw your photos - but it wasn't clear where the black wire you put to the bottom of the regulator came from/where it grounded.

If you didn't just attach it to the stock black wire, what did you do with said wire?
 
I can see my bike tomorrow evening. I believe I was able to use an existing line that was a ground. I was able to tie it in rather swiftly to a connector, or somehting like that.
full

That photo shows the wires going into an connector. I did replace the connectors, but I didnt change anything. so a 2 connector or a 3 connector is still similiar to the diagram. I seem to remember that the new regulator might have had a spare ground that didn't wasnt connected, so I was able to connect to that.

full

This photo shows the ground attached to the screw on the bottom of the R296.
 
So.... How did you do your connection? I know you used the pigtail - but was it green up top, brown on bottom? What did you do with the black wire part of original harness and/or how did you ground the regulator?
Looks like blue on the center pin.
full

If you zoom in, you can look at my connector, and look at yours and compare. The green wire is going opisite of the blue wire. and I think the blue wire is next to the ground, (I think, I ended leaving it blank)
 
Hey everyone -

I have installed new regulator, rewired stator, and when testing I get 14.5 volts at like 4-5k rpm, but ONLY after holding 4-5k for about 10 seconds. Is this normal? It doesn't seem normal. Also, I idle at below 12 volts (like 11.8)

What would do this? The only thing I haven't done is rewired the magneto, and replaced the rectifier.

My daily commute is like 10 minutes of city driving - and with kickstarting and doing maybe one longish ride (40 minutes to an hour) per week, I'm down to 12.17 volts. It seems like at this rate, I'll be needing to run the battery tender once a week or every other week.
 
http://www.xs400.com/forum/showthread.php?t=7759

Okay, so your getting the Volts, its just taking longer? Was the battery fully charged prior to your test? I am kinda wondering if the is needing more charge prior to stepping up. I am also wondering, the pasted thread on top, was all about testing rectifier/regulator. skim though there.

What would do this? The only thing I haven't done is rewired the magneto, and replaced the rectifier.

Does that mean the previous 5 wires that came out from the regulator, you only did the 3 white ones? I did all of them.

Do some of the test that Drewcifer commented about, the jump electricity to the green wire, and see if the magnet action kicks on, and the attraction action happens. check out some other advice that D. comment said, and see if that helps. Perhaps one more check of continutiey will help you locate a bad wire, bad ground or something.
Tobie
 

Attachments

  • Manual_Electric_volts.jpg
    Manual_Electric_volts.jpg
    23 KB · Views: 218
That is correct - I only re-wired the three white ones - and actually, you were the one who suggested it (scroll up)! (however to be clear, I chose not to re-wire it because the resistance was correct).

I get the magnetic action while idling, no jump needed. I didn't PURCHASE the battery myself - though it seems new, and the po said it was new, and does charge up and hold a charge above 12.8 over night (which 12.8 seems to be accepted standard for these batteries).

I am considering buying a new battery from mike's xs - a better battery than what I've got, and it'd be one I know the history on. It seems to me that this is the only other part of the system I haven't truly addressed - and at the very least, it would take out one of the variables.
 
Yep, No body, (especially me) wants to recommend to do more, but when you have the case open, Its hard not to just do the other two lines. I think when I was at that point, All 5 of the wires where very brittle just next to each other. You might be able to splice just outside the stator housing, that will save some $$ as far as new gasket, or box of wheaties. If your battery is good, I would do more checks on the Charging sys wording here, and on google. the 650 sister site, and the yamahaclub both have additional detailed issues/solutions. Some people on our site have went as far as created thier own ammeter, and Voltage meter just so that you have the immediate knowledge of how your charging system is working. Since you have the pregnant pause, The question seems to be is it the field coil? or is it going to be a poor/corrorsion ground point somewhere? Its my thought that the bottom of the case gets soo "frickin Hot" that the heat actually turned the wire super brittle. I could be mistaken, and the brittle part is under the drive sprocket, so if you were to splice in, and I used a vinyl tape similuar to "Tommy Tape" handles heat up to 500 degees, less than 4 bucks for 10 feet at menards here, (generic) with heat shrink tubing to protect the wires. http://www.lmgtfy.com/?q=tommy+tape

I did replace the connector with new blades/plastic piece from mikesxs. Sorry, when I did this, I was shopping with Drewpies shoping list, trying to get simular items, (americanized) I was able to find most everything at Menards.

Good luck, Sorry for not just suggesting to do it all. since your inthere.
Tobie
 
Sorry for digging this one out of the grave - But I do have an update regarding my charging which may be helpful for new users (or old ones running into these problems!)

About a week after my last post on this thread, I isolated my testing of the charging system by taking the main wire going to the fuse box and grounding to negative on the battery and found that I was actually only getting about 13.9 from my alternator. I also noted that my battery itself would not come anywhere close to that, and fluctuated radically, even if I was charged all the way up. I measured sulfides, which were low even when charged and showing 12.6+ volts - which means not very much amperage or CCA as a result.

I continued to ride the bike, charging it if I was doing city riding, or "getting away with it" if I was going on a highway ride. My limping battery lasted until....

About 3 months ago, My oil pump stopped working.:banghead: At which point, I decided to put the bike to rest for a while to make me work more on my other project bike (which is in pieces.... STILL!). After 3 months of slow progress on my big project bike, I couldn't bare it - My girlfriend has a rebel which I could use in a pinch.... But..... I think I can leave that unsaid and you all get it.

Anyways, I bought the complete gasket kit along with a used oil pump from ebay, and on my 30th birthday (last sunday) I pulled it all together. I decided since I had a new gasket for the left side, I would replace the cereal box I had in there (which seeped VERY slowly out, just enough to piss me off, and require I clean the case every time I wash the bike. Also, the first time I was in there Re-wiring the stator, I didn't use any gasket maker on the grommets, so I got some seepage into the sprocket area.

While I had the covers off, I cleaned them thoroughly in the sink, and used red scotch brite pads to brighten the somewhat corroded/tarnished covers. After all that work, and with how easy and quick the oil pump install was, I decided to finally re-wire the magneto (For you, arfstrom:thumbsup:)

The conclusion: Success. 14.5 volts (and no more) if I drew from the main wire to the fuse box and (-) terminal. I was so excited with the results, I finally treated myself to a new battery to collect the VOLTS I got, and what's this? It's a higher quality Interstate battery I got from my LBS. More CCA by about half, better amperage, etc.

The Lesson: If you are going to rewire your stator.... ABSOLUTELY rewire your magneto while you are there. You are going to be covered in oil working in this area, embrace it, be calm, and do the right thing.

Nice to finally put that one to bed, after almost a year of just dealing with it, cheers everybody. :bike: (oh and PS, the oil pump works just fine now.)
 
I thought I said it, perhaps I just figured if you are going to do all that work, you could at least go the full mile, and do all 5 of them. Its a not a really good reason not to, but then you have all the extra stress going on after the fact, and during the fact. I remember when I did mine, it hadn't run yet, (2003 to 2010 garaged) and I wasn't licensed so I literally had all the time in the world to figure it out. Now I have to see how badly I have damaged it this time ;) Since I don't know the full ramifications, I have spent up to $500 for everything so far. Ebay'ed CDI, Coils, Head done, Starter from here)So hopefully my repair job on that is good, and I just blow out all the starter stuff. Wish me luck, I am glad you got your bike running!
 
Ooh, I must have missed the thread, Arfstrom, what happened to your bike!?

I actually did all 7 (includes the oil light and the neutral light, since the magneto and these 2 other cables use the same shrink cover. All in all it was all pretty straight forward.

One other thing I would recommend is to mark the wires coming off the magneto for the TOP of the stator (to make sure your new wiring is going to pass the stator without incident. I got lucky with where my splicing ended up and it wasn't an issue, but when I was putting it all back together and remember how snugly everything fits together, I had a moment of concern.
 
I actually did all 7 (includes the oil light and the neutral light, since the magneto and these 2 other cables use the same shrink cover. All in all it was all pretty straight forward.

Yup,that's what I did too.

If you want to re-live my pain,
http://www.xs400.com/forum/showthread.php?t=11533

I have a heated garage, but now I am hitting the same issues as a lot of college students. With a full time job, and a family. I am getting old and I need sleep. The machinist suggested that I make sure that there no other broken fragments in the case, so open it up and look. If I do that, I might just spray paint every thing before assembling it. Then I hit the time Window. Thanks for letting me share.
 
Sounds like you are on the road to recovery, my friend. Not to add insult to injury, but one of my mentors left me with two sound pieces of advice:

1) the customer might not notice that the bike works perfectly, but they will notice whether it Is clean or not

2) nothing worse than a limp wristed mechanic

If you have it in pieces, shine that bitch up! And I'm sure you won't make the mistake again: use a torque wrench!

Cheers, and good luck to you sir
 
:-( apparently that's me. But you know my screw driver doesn't come with a torque meter, or the small wrench either for that matter. Frankly that did cross my mind when I did it, but then I reasoned it out that some engineer created that system to fail so that it tightens. Boy did I fail on that one. Right now I have picked up everything I need to get her running again. Once that happens I will get her a muffler, and go to zwork again!

That being the valve adjustment. A size 10 wrench, and a Phillips.
 
I hope you can find the time, energy and spirit! It was pretty awesome to Re-Phoenix the bike after my oil pump debacle - and to get it back running even more solid was a nice little plus. Cheers to you tobie!
 
Oh God Yea, I have everything, just as soon as I get some breathing time! Since the motor apart, have to look up Painting recommendations soon, anyways not to hijack your thread, when I start the phoenex project, It should be a quick 2 weeks to get it up and flying! or faster since I have everything !!!!
 
Yes sir. The field coil uses the same type of wire. If you are able to preserve the color pattern for the wire diagram it will make things easier to diagnose things in the future.
 
Back
Top