First off, I have a 1980 XS400G (That's what the PO told the other PO who relayed that to me when I bought the bike at least) but the VIN is 3F8, which the forum says is a XS400G Special 2 3F8 12/79 1980.
The PO posted on here for a bit (Hey Kyle), and it seemed as though there were some issues regarding the bike's ability to start and stay running. However, his last post seems to imply that it was running, and it ran long enough for him to take a trip from Seattle to Mt. Rainier (roughly 133 miles, and an elevation gain to 5400 ft.) as well as trips east of the mountains.
There were some pretty obvious maintenance issues to take care of first: I took of all the superficial parts, crankcase covers, gas tank, carbs, and set to work degreasing /cleaning and repeating (the drive chain cover and the sprocket had what looked like 100 years of grease and oil and pebbles and seeds [I think a squirrel must have hidden his stash up in there...])
I was happy to find that the sprockets for the drive chain looked to be in good condition, no uneven wear. Most of the electrical system is in decent condition except for the fuse box, which is fine because I intend to replace all the fuses for in-lines anyways, and there are a few wires with worn insulation which will need to be replaced.
At first my biggest concerns (apart from it not starting) were the general condition. The oil drain bolt has been rounded down (looks like somebody went at it with some vicegrips) the carb had many stripped screws. But I knew I was buying a 'project' bike.
My general plan is to take the bike down to it's components and replace/repair what I can. Anything that may require specialized tools or machining, I plan to take to a shop.
The biggest obstacle I face (and I think I will be able to fix this issue) is a misthreaded sparkplug. I think most people would say that that is the end of the bike, but I have seen thread repair how-to's and I think I can do it. Somebody please tell me if this is a fools errand. please.
With that cleared up...
About me: Never touched a motorcycle before last sunday. Don't know how to ride even. That I can learn.
As for repair, I am somewhat mechanically inclined... Motorcycles just kinda make sense in their (I am going to regret saying this) simplicity. After all, it is basically a bicycle with an engine attached and some wires and a complicated gear box.
The trickier parts of a motorcycle (i.e. the carbs and the deep inner workings of the alternator and ignition systems) still make sense in that they are mechanical (the crank turns, when the brass connector makes contact a signal is sent to the coil etc. etc. etc.)
Whatever I don't know, I can usually find information or how-to's on the interwebs...
But that is assuming I know what I am dealing with, and herein lies the problem: I am elbow deep in a set of carbs, and I don't know for sure what set of carbs I am dealing with...
I have looked at all (at least I think all) of the parts diagrams for all models of XS400 carbs, and none of the diagrams really look similar to the carbs on my bike. I can tell that one of the PO's did some DIY repairs to seal the carb boots, and someone went crazy with the sea foam... (that was a bitch to clean out...)
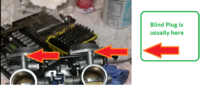
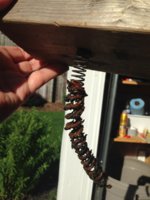
Anyways as I am reassembling the carbs, I have had to replace a number of stripped screws (Fuck you Yamaha/Mikuni.... Why Phillips head screws?!?!?!??) and in my haste, I lost the float plug drain screws.
This may be one of the hardest parts to find replacements for, but following some previous posts, I have found a few sites, plus ebay, that carry them. But before I spend 20 bucks for a float bowl drain plug screw, I want to make sure it is the right fit, and I am less than certain because I cannot for sure ID the carb...
Thanks for reading my novel. As a reward, Pictures!
http://imgur.com/a/U6pnG

The PO posted on here for a bit (Hey Kyle), and it seemed as though there were some issues regarding the bike's ability to start and stay running. However, his last post seems to imply that it was running, and it ran long enough for him to take a trip from Seattle to Mt. Rainier (roughly 133 miles, and an elevation gain to 5400 ft.) as well as trips east of the mountains.
There were some pretty obvious maintenance issues to take care of first: I took of all the superficial parts, crankcase covers, gas tank, carbs, and set to work degreasing /cleaning and repeating (the drive chain cover and the sprocket had what looked like 100 years of grease and oil and pebbles and seeds [I think a squirrel must have hidden his stash up in there...])
I was happy to find that the sprockets for the drive chain looked to be in good condition, no uneven wear. Most of the electrical system is in decent condition except for the fuse box, which is fine because I intend to replace all the fuses for in-lines anyways, and there are a few wires with worn insulation which will need to be replaced.
At first my biggest concerns (apart from it not starting) were the general condition. The oil drain bolt has been rounded down (looks like somebody went at it with some vicegrips) the carb had many stripped screws. But I knew I was buying a 'project' bike.
My general plan is to take the bike down to it's components and replace/repair what I can. Anything that may require specialized tools or machining, I plan to take to a shop.
The biggest obstacle I face (and I think I will be able to fix this issue) is a misthreaded sparkplug. I think most people would say that that is the end of the bike, but I have seen thread repair how-to's and I think I can do it. Somebody please tell me if this is a fools errand. please.
With that cleared up...
About me: Never touched a motorcycle before last sunday. Don't know how to ride even. That I can learn.
As for repair, I am somewhat mechanically inclined... Motorcycles just kinda make sense in their (I am going to regret saying this) simplicity. After all, it is basically a bicycle with an engine attached and some wires and a complicated gear box.
The trickier parts of a motorcycle (i.e. the carbs and the deep inner workings of the alternator and ignition systems) still make sense in that they are mechanical (the crank turns, when the brass connector makes contact a signal is sent to the coil etc. etc. etc.)
Whatever I don't know, I can usually find information or how-to's on the interwebs...
But that is assuming I know what I am dealing with, and herein lies the problem: I am elbow deep in a set of carbs, and I don't know for sure what set of carbs I am dealing with...
I have looked at all (at least I think all) of the parts diagrams for all models of XS400 carbs, and none of the diagrams really look similar to the carbs on my bike. I can tell that one of the PO's did some DIY repairs to seal the carb boots, and someone went crazy with the sea foam... (that was a bitch to clean out...)
Anyways as I am reassembling the carbs, I have had to replace a number of stripped screws (Fuck you Yamaha/Mikuni.... Why Phillips head screws?!?!?!??) and in my haste, I lost the float plug drain screws.
This may be one of the hardest parts to find replacements for, but following some previous posts, I have found a few sites, plus ebay, that carry them. But before I spend 20 bucks for a float bowl drain plug screw, I want to make sure it is the right fit, and I am less than certain because I cannot for sure ID the carb...
Thanks for reading my novel. As a reward, Pictures!
http://imgur.com/a/U6pnG