Thanks, I figured that is what was meant but I keep over-thinking things. I'll give it a try after I adjust the valves. Everyone-thanks!
-
Enjoy XS400.com? Consider making a donation to help support the site.
XS400.com receives a small share of sales from some links on this page, but direct donations have a much greater impact on keeping this site going.
You are using an out of date browser. It may not display this or other websites correctly.
You should upgrade or use an alternative browser.
You should upgrade or use an alternative browser.
Petew XS400 brat scrambler build
- Thread starter Petew
- Start date
I am at the stage where the easy fix would be nice but I may just go ahead and lap the valves and re-ring if necessary. I have the parts coming so I am prepared for that eventuality should it come.It couldn't hurt to do it anyway. I want this bike to be finished correctly when I am done. As someone on here said, the only time schedule you have is your own. I would like to be riding by the end of August...that is my goal. While i wait I am completing the task of making the wiring tidier and installing a new spade style fuse block instead of the bulky in-line fuses. There is always something to do on one bike or the other.

Thanks Chris, that is what I figured out.Time will tell. I believe I will pull it down and look at the valve seats and the rings. I imagine that is the most prudent course of action unless I open it and it's pristine inside. I want to do the job right and make a functional,reliable machine.
A rainy day in upstate has driven me inside for the day, stalling the removal of motor number 2. I am taking this time to go back through my carbs and make sure I did everything correctly. I am wishing I had an indoor space to accommodate 2 bikes but garage is overflowing from stuff left behind by children and in-law moves...maybe by summers end. I have established that I lost the outermost circlip from the shifter shaft somehow and will be replacing that. I am hoping that eliminates shifter issues.If I get a break in the weather I will attempt to remove the motor from number 1 to begin teardown in the basement. Parts ordered for when I am able to proceed. I want to finish this before the summer season passes!
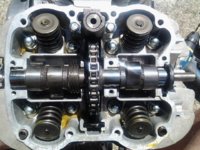
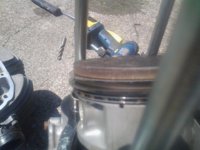
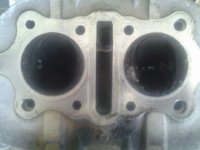
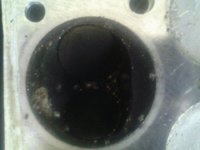
So, today I moved forward with the sunshine and finished removal of the motor from the orange bike. I disassembled it was extremely pleased at the condition and cleanliness inside. The pistons and walls look and spec perfectly, the rings are clear and clean. The upper engine shows very little wear at the cam and rockers. There is , however, heavy carbon in the combustion chamber that I will need to disassemble and correct. Loves like cleaning and valve inspection on the horizon
Attachments
I didn't have a big enough clamp, and the "universal"overhead valve spring compressor at Advance Auto was a joke, so I resorted to the old socket and hammer to remove the valve clips. I recovered all but one which went sailing. I had a foam pad under the valve so as not to make hard surface contact. I spun them all to ensure that they were not bent and gave them a bath.I soaked the head and valves in a solution of pine-sol and water and the carbon wiped right off, the valve surfaces are clean and even and I will lap them later today. I found the valve keeper clips at my local Yamaha dealer so that problem is solved now. I will be brushing down with my nylon bristle brush and rinsing all of the solvents off and will begin re-assembly today...maybe. I am going back through the carburetor and resetting everything, again. With any luck we are on the right track. Pictures to follow
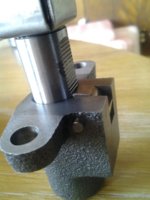
Today was an educational day. A job is always easier when you have a tool that works. I was instructed on valve lapping today, the surfaces clean up beautifully so I felt this job was merely a touch up. I used the hand spin with a section of fuel line option, feeling it was the easiest for me to master with the least chance of buggering something up! They came out very nice I was pleased with the results. Then came time for re-installation...I had a bitch of a time getting the springs off so I figured it was going to be just as tough going back on so I sectioned a piece if copper pipe and cut a door in each side.It seemed to work well until I found that the openings were not wide enough to accommodate easy access to install the keepers. I widened the opening and that was better until the copper piper collapsed and shot the valve springs and such flying across the room and the tool blasting against the glass door to my back deck....thank goodness "She that Rules" was not here to witness that! I found an old bathroom faucet wrench in the basement and cut and notched that, it fit the top of the spring keeper nicely and was stout enough to allow for nice big "doors", and after a long battle the head is together.
I also re-did my carb settings and found that both floats were off, 1 more than the other and fixed them. Reassembly for the rest of the top end will resume soon. I would love to have the bike running soon, the weather won't stay warm here in Upstate New York forever!
I also re-did my carb settings and found that both floats were off, 1 more than the other and fixed them. Reassembly for the rest of the top end will resume soon. I would love to have the bike running soon, the weather won't stay warm here in Upstate New York forever!
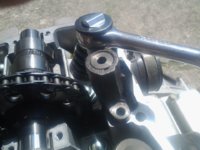
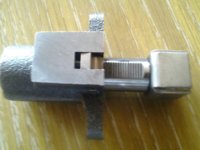
I haven't been doing much as of late, bad weather forced me indoors and my work area is quite small. Yesterday, though, I decided it was get it going day. I began reassembly. I installed the cylinders and heads, following the step outlined in the manual found here ( the rings can be a little tricky at first!). Everything was going back together beautifully until I got to this little guy. The manual said to depress it fully, lock it and then install. I tried for about a half an hour to figure it out with no luck....no matter how I tried it would not compress. I sat here at this forum and asked for help-and then I saw the levr that allow you to close it up! It was so simple that you used a small set of pliers and help the lever , the adjuster closed right up. The tensioner went back together and slid into place beautifully. The rest of the assembly was easy,I located the cam gear so that the indicator was at top dead center and reassembled the rest. Today is they day to ensure valve aare adjusted properly and finish putting the the rest together. With any luck we should be back together by weeks end!
Attachments
So I had my first go at setting valves today. The inlet valves on the left side was off on the higher side of the range and the outlet valve was so tight I couldn't get an .003" between them. Same on the right side. I did them 2 times to ensure they were right they are in spec now. I have completed reassembly of the motor now. I will attempt to get it in the frame in the next day or two. I am a performing musician and my schedule is hectic, I will be the first act on the bill next week before a Bon Jovi concert at the Dicks Sporting Goods Open which is held in my area. Hopefully though , I will be riding my bike to the show that night....fingers crossed!
tmatter
XS400 Enthusiast
Great job! The attention to detail in the motor is really going to pay off. My motor is getting a tune up but I have no planes of opening it up. How did things work out with "SHE WHO RULES" and the door? Can't wait to see it back together and hope you're able to ride to the concert.
What she doesn't know.....

Stpierre
XS400 Addict
Great job keep up the hard work. She's coming along very nicely.
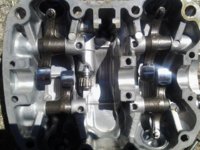
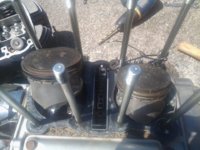
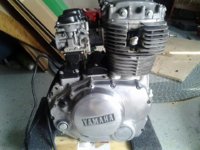
As an aside, I found the missing valve retainer clip, it was attached to the ignition coil magnet! Found it when reassembling the ignition.....Here she is ready to go back in. At least I know the condition of this motor, the top end is in great shape, rings and pistons/sleeve are both excellent and smooth as can be. The cam shows virtually no wear. It looks pretty, now if we can get it back in and running!
Attachments

Last edited:
As an aside, I found the missing valve retainer clip, it was attached to the ignition coil magnet! Found it when reassembling the ignition.....Here she is ready to go back in. At least I know the condition of this motor, the top end is in great shape, rings and pistons/sleeve are both excellent and smooth as can be. The cam shows virtually no wear. It looks pretty, now if we can get it back in and running!
Looks good!
I need to open up my spare and maybe do the same.
I have another that will get the same. Before I can I have to get 2 stripped Allen bolts.Looks good!
I need to open up my spare and maybe do the same.
I have another that will get the same. Before I can I have to get 2 stripped Allen bolts.
So what new parts exactly did you buy for them? You just cleaned up the valves and lapped them only?
This is my first engine build in a bike......I know they are a little simpler than a car but hell its been 30 years since I rebuilt an engine and that was a VW
