TimmyT
XS400 Addict
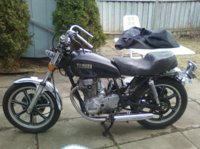
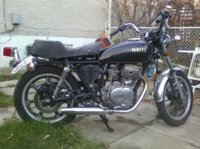
Just wanted to stop trolling and start report on my progress so I can add to the galaxy of xs400 info here and the legion of people dedicated to helping others get their bike running too. Maybe cheer me on, maybe scout for some anwsers here, or maybe help me anwser some questions I have scattered in my posts (and my brain). This bike is 6 years older than I am and still has some mass appeal. Yamaha must have done something right.
I have ridden a motorcycle but never owned or worked on one other than polishing my dads honda shadow in the spring when I was a kid. Fixing bicycles was my thing as I grew older I got into electronics repair; as a hobby anyway. Now I have the keys and title (that I think I got for a fair price) to a 1978 xs400 with a 2L0 serial number. I knew it would take a bit of


 before I would be
My friend had it jump started and it supposedly ran, but he told me It has had an electrical issue that should be right up my alley...(and the bike has no battery, haha)! I took the bait and here is what happened since .... forgive my ramblings. I dont need to hear the bike run to know that I'm gona fix it. The toughest part is the bike is stored at a friends, so I only get a few hours here and there ... but I kinda like my friends tools better anyway. Logistical issues asside.
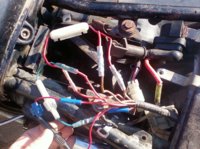
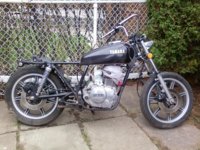
I removed the wiring harness and continuity tested the ENTIRE F'n thing. I went over wiring diagrams 1000 times (seariously as me what a wire colour is off hand). I tested what components that I could just to check any combination of issuss occouring off of multiple lists. I found some schematics that were very close but not perfect to my model.The mention of a headlight saftey relay was absent from most schematics. I mapped it all out and the only issues (in theory) that I could find was the messy fuse pannel with 2x15A fuses a 25A main and one 10 A fuse missing, with a bit of corrosion in the mix (battery hose is intact but probabally not used by PO). The next issue that I found was the Dark Green and Chocolate wires that went to the front signal lights were both broken and just twisted together, some heat shrink, proper solder, blade fuses and insulated weatherproof fuse holders seemed appropriate for the job. Those two issues seem pretty standard and logical on these type of motorcycle. The last thing that I dont get that may help me sort a future issue is that the hardware for the ignition switch was missing and I am assuming that is has to be grounded to neck for everything to function? I've sorted the electrical bugs for now, but also figured .. hey lets dig a little deeper and see what we can do.
V-reg to be checked, rectifier is good, every button, toggle, brake, and switch, contact are all functionioning properly and only made better contact with cleaning. I have cleaned up any corroded connectors and have a tube of dielectric grease to help weather seal, protect, and assist continuity within the clips of the wiring harness.
I ordered new clutch and throttle cables as both were stretched out too far for comfort...even after possible adjustments. Ordered Motion Pro cables which should do the trick.
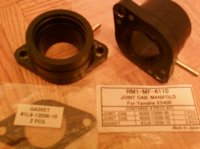
Ordered new Carb holder/manifold boots as the current ones were badly weathered. the rubber on the otherside of the carb attached to the air filters is in great condition though. I notices as I was working around the engine that there are little rubber dampers between the engine fins, can they be removed, or will the bike feel like riding a shocker? Will it get louder, or just less comfortable?
I have the carb off for cleaning, as well as the petcock. My friend had emptied the old gas for me for storage and when removing the petcock I the fuel filter looked like it was pretty clean...I rattled the tank and found another fuel filter inside that was about 1/3 the size of the one that attached to the petcock. The tank looks clean and rust free on the inside but I wonder what floated through while the first filter in the tank had floated off. Cleaning the carb seems mandatory now. I plan on switching to pods too, so I guess the jet sizes have to go up? and I am assuming that the pods can only be used with the "H" rubber adapter so that the vacume tube can be attached?
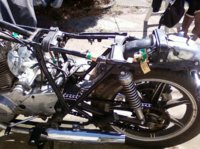
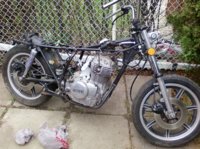
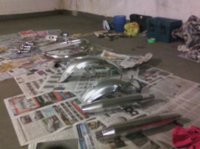
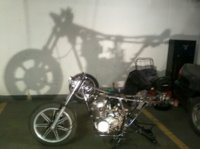
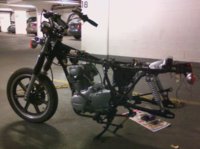
Removed the clutch lever, kickstart bar, footbrake pedal, chain guard, battery box, headlight, signal light mounts,main controll gauges, ignition, Ignition coils... and a goofy blue air horn that the PO added to substitute his missing horn. I plan on rust cleaning and polishing the chrome stuff, repainting the other appropriate items. It seems that This bike fought the rust off hard over the years, guessing it was stored outdoors for at least 1/3 of its life so far.
I have cleaned everything that has come off so far but only to the point of starting prepwork. Once I get some nasty rust out of the spedo and tach bucket I can start putting that back together.
Oil and filter change already done, with some new spark plugs properly gapped for the swapping.
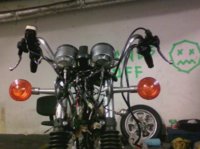
Changed every light except the headlight and I kept the spares on the side. 2x 1157 for brakes. 4x 1156 for signals. Lastly 8x 1893 for the controll lights. No LED's.
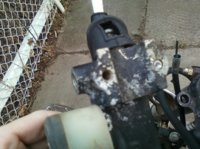
Lastly is the metric hardware dilema Im having. I want to replace hardware on the metal foot pedals because the old ones are actually slightly bent and also change the handlebar controll hardware to stiffen them all up a bit with some rust free nuts. I have also stripped the v-reg screws, broke a bolt on the brake handle, and had to fix an issue with the PO cutting off the bolt ends on the controll mount plate .... which was all one piece and now has 2 detachable mounting bolts. So when Im not trolling here I am spending hours with clerks at Home Depot, Home Hardware, Canadian Tire, and Fastenal. So that they can help me find about 20 pieces of hardware worth about $4. Almost everything with the right thread count will be the wrong length but as long as its too long and not too short you can grind them down as needed ... which i think Im gettin pretty good at myself.
So its gettin there, I plan on cleaning and painting as i strip it down and makin sure its put back together right. For now Im waiting on the cables and manifold/carb gasket to ship, cleaning the carb and petcock, and some light sanding/painting. planning on putting some finishing touches like carving up the seat, fenders, and some new dust covers. Might need a petcock kit for this still, maybe seals for the master brake cylinders, brake bleed,
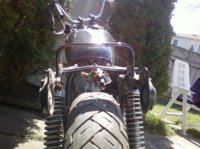
Pikkies on the way let me know if there is anything in particular you want a closeup of.
Oh yes and I will have a small array of parts up for grabs in a month or so when I get it running so keep an eye out.
STILL CONFIDENT almost $300 deeper and I dont even have a battery and trickle charger yet.
I have ridden a motorcycle but never owned or worked on one other than polishing my dads honda shadow in the spring when I was a kid. Fixing bicycles was my thing as I grew older I got into electronics repair; as a hobby anyway. Now I have the keys and title (that I think I got for a fair price) to a 1978 xs400 with a 2L0 serial number. I knew it would take a bit of
before I would be My friend had it jump started and it supposedly ran, but he told me It has had an electrical issue that should be right up my alley...(and the bike has no battery, haha)! I took the bait and here is what happened since .... forgive my ramblings. I dont need to hear the bike run to know that I'm gona fix it. The toughest part is the bike is stored at a friends, so I only get a few hours here and there ... but I kinda like my friends tools better anyway. Logistical issues asside.
I removed the wiring harness and continuity tested the ENTIRE F'n thing. I went over wiring diagrams 1000 times (seariously as me what a wire colour is off hand). I tested what components that I could just to check any combination of issuss occouring off of multiple lists. I found some schematics that were very close but not perfect to my model.The mention of a headlight saftey relay was absent from most schematics. I mapped it all out and the only issues (in theory) that I could find was the messy fuse pannel with 2x15A fuses a 25A main and one 10 A fuse missing, with a bit of corrosion in the mix (battery hose is intact but probabally not used by PO). The next issue that I found was the Dark Green and Chocolate wires that went to the front signal lights were both broken and just twisted together, some heat shrink, proper solder, blade fuses and insulated weatherproof fuse holders seemed appropriate for the job. Those two issues seem pretty standard and logical on these type of motorcycle. The last thing that I dont get that may help me sort a future issue is that the hardware for the ignition switch was missing and I am assuming that is has to be grounded to neck for everything to function? I've sorted the electrical bugs for now, but also figured .. hey lets dig a little deeper and see what we can do.
V-reg to be checked, rectifier is good, every button, toggle, brake, and switch, contact are all functionioning properly and only made better contact with cleaning. I have cleaned up any corroded connectors and have a tube of dielectric grease to help weather seal, protect, and assist continuity within the clips of the wiring harness.
I ordered new clutch and throttle cables as both were stretched out too far for comfort...even after possible adjustments. Ordered Motion Pro cables which should do the trick.
Ordered new Carb holder/manifold boots as the current ones were badly weathered. the rubber on the otherside of the carb attached to the air filters is in great condition though. I notices as I was working around the engine that there are little rubber dampers between the engine fins, can they be removed, or will the bike feel like riding a shocker? Will it get louder, or just less comfortable?
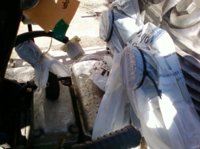
I have the carb off for cleaning, as well as the petcock. My friend had emptied the old gas for me for storage and when removing the petcock I the fuel filter looked like it was pretty clean...I rattled the tank and found another fuel filter inside that was about 1/3 the size of the one that attached to the petcock. The tank looks clean and rust free on the inside but I wonder what floated through while the first filter in the tank had floated off. Cleaning the carb seems mandatory now. I plan on switching to pods too, so I guess the jet sizes have to go up? and I am assuming that the pods can only be used with the "H" rubber adapter so that the vacume tube can be attached?
Removed the clutch lever, kickstart bar, footbrake pedal, chain guard, battery box, headlight, signal light mounts,main controll gauges, ignition, Ignition coils... and a goofy blue air horn that the PO added to substitute his missing horn. I plan on rust cleaning and polishing the chrome stuff, repainting the other appropriate items. It seems that This bike fought the rust off hard over the years, guessing it was stored outdoors for at least 1/3 of its life so far.
I have cleaned everything that has come off so far but only to the point of starting prepwork. Once I get some nasty rust out of the spedo and tach bucket I can start putting that back together.
Oil and filter change already done, with some new spark plugs properly gapped for the swapping.
Changed every light except the headlight and I kept the spares on the side. 2x 1157 for brakes. 4x 1156 for signals. Lastly 8x 1893 for the controll lights. No LED's.
Lastly is the metric hardware dilema Im having. I want to replace hardware on the metal foot pedals because the old ones are actually slightly bent and also change the handlebar controll hardware to stiffen them all up a bit with some rust free nuts. I have also stripped the v-reg screws, broke a bolt on the brake handle, and had to fix an issue with the PO cutting off the bolt ends on the controll mount plate .... which was all one piece and now has 2 detachable mounting bolts. So when Im not trolling here I am spending hours with clerks at Home Depot, Home Hardware, Canadian Tire, and Fastenal. So that they can help me find about 20 pieces of hardware worth about $4. Almost everything with the right thread count will be the wrong length but as long as its too long and not too short you can grind them down as needed ... which i think Im gettin pretty good at myself.
So its gettin there, I plan on cleaning and painting as i strip it down and makin sure its put back together right. For now Im waiting on the cables and manifold/carb gasket to ship, cleaning the carb and petcock, and some light sanding/painting. planning on putting some finishing touches like carving up the seat, fenders, and some new dust covers. Might need a petcock kit for this still, maybe seals for the master brake cylinders, brake bleed,
Pikkies on the way let me know if there is anything in particular you want a closeup of.
Oh yes and I will have a small array of parts up for grabs in a month or so when I get it running so keep an eye out.
STILL CONFIDENT
almost $300 deeper and I dont even have a battery and trickle charger yet.") Sounds like your on it, just check to see if you have spark and fuel happening and give her all you got!
Sounds like your on it, just check to see if you have spark and fuel happening and give her all you got!