Stuffing the exhausts and swingarm bearing

willem

XS400 Guru
Top Contributor
Messages
1,510
Reaction score
11
Points
38
Location
Netherlands
So yesterday I was working on my Seca and there are a few things left on my to do list. First off, it's quite a loud bike. I'm guessing the PO drilled some extra holes in the back of the stock mufflers since it has 5 holes in each. Can anyone verify the number of holes in the back of a Seca exhaust?

So I would like to quiet it down a little, just cause I think it's a little juvenile this way. I know loud pipes save lives, but my neighbors would appreciate it if it was a bit quieter as well. Does anyone know if you can take the mufflers apart in any way, so I can wrap the inner pipes with some new damping wool or something?

And I've been reading about stuffing stainless steel wool in the back, does that work?

Then another last thing, is there any way of checking the free play on the swingarm bearing without having to remove the rear wheel and monoshock (that's what the manual says)? My xs is just a little unsteady at higher speeds, and I'm suspecting the swingarm bearing as this is a weak point in the Seca model I heard.
 
Willem the only way to do what your wanting to do is take the mufflers completely off?
Are they slip ons or welded?Anyway if you use the heavy duty steel scrubbing pads Im think at least 3 per muffler.
 
Yea I was already afraid that I'd have to take off the mufflers, but I was hoping there is another way (stuffing some of those scrubbing pads down the hole at the end or something) or someone who has experience with these things. I don't know how to tell the difference between a welded and a slip on, but if a slip on also slips off, theyre not slip ons :p
 
I have taken a stock muffler apart to see how they are made.Theres 3 tubes that are about a half inch in diameter with larger tube in the middle.The only other way would be to cut the end of the muffler off then use your noise suspression material and stuff it around the tubes then weld the ends back on.I`ll get you a pic of the tubes sometime today so you can see what Im talking about.If it were me as I have learned it cost way less than trying to doctor up old mufflers is just replace them with new ones.
 
Thanks aaron :) thats some good info.

Since the PO drilled holes in the back, I'm gonna try stuffing some steel wool in there through the holes. you never know :shrug:
 
If you stuff the holes its more than likely the material will just blow out.I have seen fiber glass kits for open end mufflers that have a plate that goes inside the end.Then you have drill a hole on each side of the muffler about 3/8s inch back.Then theres pin that goes through the holes and hold the plate in place.
 
if I stuff a 3 inch wide ball of wool into a half inch hole it won't come out I think.. but I'll see what happens and report back :thumbsup: :)
 
With the rear tire off the ground, grab the tire and try to move it side to side. If you can feel more than a tiny wiggle, the bearings are probably shot.

Mine were so bad that the bushing in the pivot was also worn out. Finding a good used bushing was proving impossible, and a new one was ridiculously expensive. Hence my rear suspension conversion...
 
... I'm guessing the PO drilled some extra holes in the back of the stock mufflers since it has 5 holes in each. Can anyone verify the number of holes in the back of a Seca exhaust? ...
These 2 videos appear to both show stock 400 Secas. If so, then the original mufflers had a single hole in the centre. If that's the case, it might make more sense to try and restore that configuration rather risk a mistake with steel wool.

Perhaps you could get something like high temperature JB-Weld to adhere well enough to plug each of the drilled holes, leaving only the original centre hole open.
You could maybe use pieces of metal sheeting to give the JB-W extra strength - perhaps cutting oval shaped discs out of sheeting which are longer than the holes are wide, but which are just narrow enough to slip through them and be inserted behind each hole and positioned so they blocked 90% of the hole - stuck in place with JB-W (which also fills the remaining 10%) .
:shrug:
 
OK guys thanks for thinking along :) My swingarm isn't that bad, I had already tried tugging on the rear wheel with it off the ground. I'll leave that for now. Also, I have a good source for those bushings here in the Netherlands if anyone else is interested. They are apparently also used on some kind of boats :) If you cover expenses (purchase and shipping) I'll send them anywhere.

As for the exhaust, I'm not completely sure that those holes aren't supposed to be there. this guy (post 8 pic 3) also has 4 holes in each exhaust, exactly located on the same angle and diameter as mine.. So either we both have PO's that messed with the exhausts in the same way, or there is another SECA exhaust version which has holes in the back.

Anyways, of course I hadn't read Lou's advice on shutting the holes with JB (good one :) ) so I stuffed one scrub ball into one of the little holes this morning before work. Took about 20 minutes, and I'm guessing I need to stuff one ball in each of the holes. If it doesn't work out I can always still cut the end off and take them out, or perhaps even pull them back out with a hook or something.. Haven't tried firing it up yet, cause it was time to go to work and I was already late. Note to self: don't do maintenance in the morning before work anymore.
 
My swingarm isn't that bad, I had already tried tugging on the rear wheel with it off the ground. I'll leave that for now. Also, I have a good source for those bushings here in the Netherlands if anyone else is interested. They are apparently also used on some kind of boats :)

If you want to have bearings left by the time spring arrives, make the time to clean and grease them. I agree that the bearings are still available, and reasonably priced. It is the bushing that the bearings ride on, and the bolt goes through, that is difficult to get. If this bushing is worn or rusted, you will be cursing. I know I was! :(
 
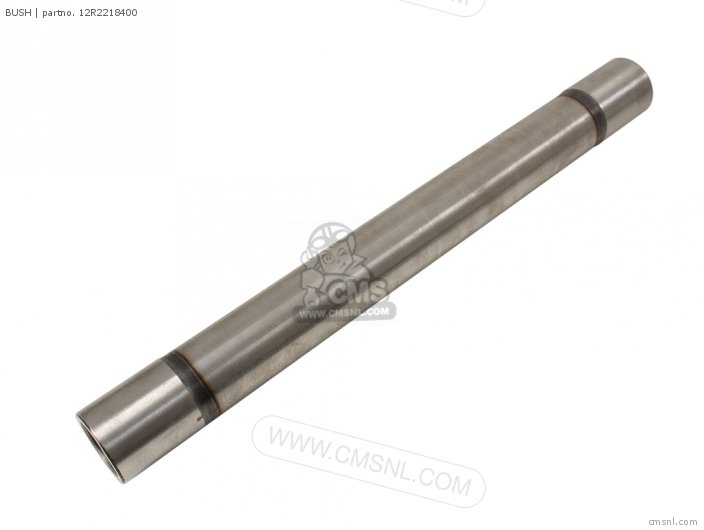
by the bushing do you mean these? These are usually the culprit I heard, and I have a source for them
_8B3bIB3_IzLYIr3_IDu5RvcmGZdWnYum2o2


Another question then, is it possible to take out the swingarm bearing without taking the rear wheel and monoshock off? I'd like to service it, grease it, clean it, just to prevent damage like you said, but it would save me some time if I can just pull it out without having to take half of the bike apart first

EDIT:

you probably mean this bushing right?
bush_medium12R2218400-01_00dd.jpg
 
On page 5-29 of the manual, the first thing is labelled the bearing. The second thing is pictured but not labelled or named.
On page 5-38 there is a cross-section diagram which labels it #3-bushing.

A question for Dave:
........................... When we met in the spring, you said something about avoiding Lithium grease, as Lithium attracts and holds salt.
Yet the manual (5-37) calls for a Lithium based bearing grease. Is this a bit of planned obsolescence which the Saki-puking engineers put in the manual on purpose, a mistake by a hung-over technical writer, or, is Lithium ok if it's in bearing grease?
If not, what grease would you/do you use here?
 
Right. I should read before I post :)

still, I'm guessing I would need to take off the shock absorber and rear wheel, right?

thanks Lou!
 
... you probably mean this bushing right? ...
As I recall, Dave's problem at the time was mainly with #2 on pg. 5-35 (the "swing arm pivot bolt") which appears to pass through the bushing.

Wish I could help with the technique though - I'm sorry not to have a clue.
To test it for sloppiness or to lube it? Maybe there would be a way to get grease in there without taking it all apart, but I don't know how else one could test it for looseness without it being free to move.
I have heard of people installing a grease fittings through the frame tube so they could periodically fill the cavity with grease.
 
So after putting in the second pot scrubber, I started the bike to check if it had any effect. No. Upon further inspection I found a hole in my H-pipe

:doh:

of course it's loud with that hole!!

I'll get going with some jb weld and a can of beer then... thanks for the help!
 
I'm going to try to answer all the questions in one post...

As Lou has already stated, the bushing is the long shaft with machined ends that the bearings ride on. It is hard to find in good condition.

I prefer to use synthetic grease, preferably with Moly, on bearings. Old specifications don't concern me, and Lithium grease does absorb road salt, so I stay away from it. It will work fine for those who don't live in the snow belt or near an ocean.

The swingarm has to be removed from the frame to service it's pivot. The chain, rear brake linkage, lower shock bolt, and swingarm pivot bolt have to be removed to get the swingarm out. The rear wheel can remain attached. The bearings have to be cleaned and greased in place as any attempt to remove them will destroy them. Be sure to put additional weight on the front wheel to avoid having the bike tip rearwards when wrestling with the swingarm...

My swingarm pivot bolt was rusted into the bushing and the bearings were nothing more than powdered rust. I had to drill the head and shank of the bolt off to remove the swingarm from my frame.

Don't worry about testing the play in the swingarm bearings. Clean and grease them, and test for correct movement when assembling. Also clean and inspect the spacer shims and grease seals. I'd wager that most have never been serviced since new, mine certainly hadn't... I considered drilling the swingarm and installing a grease fitting, but didn't have to once I did my suspension swap. Kawasaki used bearings with seals. ;)

Hope this helps!
 
Back
Top