Updated: 2/13/24
XS400 Hardtail Kit (Universal kit)

Hey guys! I’m now offering universal hardtail kits that can be used to hardtail your XS400. These are do-it-yourself kits giving you more flexibility with the final look of your bike. The kits I'm offering are different from the others you may see out there in many ways. The "legs" on the main tubes are longer allowing many more possibilities in your frame design. You can create almost any drop and up to a 6" stretch (or more depending on your design). Two of the tubes can be cut just after the bend to make it work with the XS400 triple backbone. My kits use DOM tubing which is stronger and more uniform than ERW tubing (also twice as expensive). Google DOM vs ERW if you are not familiar with the differences. You can also choose from a variety of axle plate styles instead of being limited to one style, and 17mm axle plates are available to match the rear XS400 axle diameter. These kits are the best value out there.
I've found that a lot of people want to build their own hardtail and have the skills and a welder, but don't have a proper tubing bender. This kit takes care of that and will also save you time in finding DOM tubing and axle plates.
Kits are available with 1" DOM, 1-1/8" DOM, and 1-1/4" tubing. All sizes are 1020 mild steel with a .120" wall thickness. Most people use 1" tubing for XS400s.
The kits include 4 pieces of bent tubing, 3 cross tubes, 2 sleeves (slugs), and a set of 3/8" laser-cut axle plates.
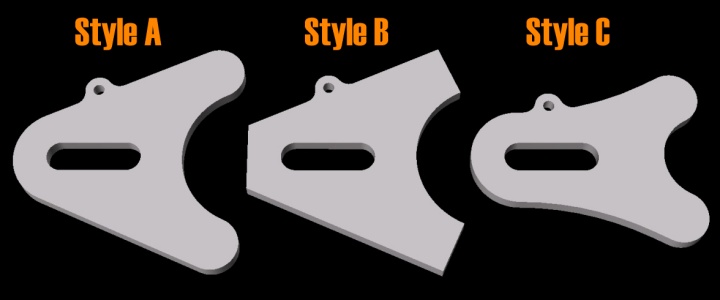
There are many different combinations of axle plates to choose from. The axle plates come in three main styles: A, B, and C.
See: Chopper Axle Plates (Hardtail Axle Plates) for all of the available combinations and options for your axles plates.
Pricing:
1" hardtail kit with your choice of axle plates - $139.95
1-1/8" hardtail kit with your choice of axle plates - $149.95
1-1/4" hardtail kit with your choice of axle plates - $149.95
Shipping:
Shipping to the lower 48 states is now free! For other locations, go to https://www.chopsource.com/hardtail-kits.html and add what you want to the shopping cart. Click checkout then enter your country and postal code to display shipping options.
The usual disclaimers apply:
Use at your own risk. Buyer is responsible for knowing their local laws and regulations on the legality of using this product. Trav, LLC cannot be held liable for any damages, injury, or death from the use of this product.
Also, no instructions are included! If you need instructions, lack the necessary fabrication skills and tools, or are not a competent welder, you probably shouldn't be hardtailing your own frame.
Email me at sales@chopsource.com with any questions.
Thanks!!
To order, go to www.chopsource.com.
XS400 Hardtail Kit (Universal kit)
Hey guys! I’m now offering universal hardtail kits that can be used to hardtail your XS400. These are do-it-yourself kits giving you more flexibility with the final look of your bike. The kits I'm offering are different from the others you may see out there in many ways. The "legs" on the main tubes are longer allowing many more possibilities in your frame design. You can create almost any drop and up to a 6" stretch (or more depending on your design). Two of the tubes can be cut just after the bend to make it work with the XS400 triple backbone. My kits use DOM tubing which is stronger and more uniform than ERW tubing (also twice as expensive). Google DOM vs ERW if you are not familiar with the differences. You can also choose from a variety of axle plate styles instead of being limited to one style, and 17mm axle plates are available to match the rear XS400 axle diameter. These kits are the best value out there.
I've found that a lot of people want to build their own hardtail and have the skills and a welder, but don't have a proper tubing bender. This kit takes care of that and will also save you time in finding DOM tubing and axle plates.
Kits are available with 1" DOM, 1-1/8" DOM, and 1-1/4" tubing. All sizes are 1020 mild steel with a .120" wall thickness. Most people use 1" tubing for XS400s.
The kits include 4 pieces of bent tubing, 3 cross tubes, 2 sleeves (slugs), and a set of 3/8" laser-cut axle plates.
There are many different combinations of axle plates to choose from. The axle plates come in three main styles: A, B, and C.
See: Chopper Axle Plates (Hardtail Axle Plates) for all of the available combinations and options for your axles plates.
Pricing:
1" hardtail kit with your choice of axle plates - $139.95
1-1/8" hardtail kit with your choice of axle plates - $149.95
1-1/4" hardtail kit with your choice of axle plates - $149.95
Shipping:
Shipping to the lower 48 states is now free! For other locations, go to https://www.chopsource.com/hardtail-kits.html and add what you want to the shopping cart. Click checkout then enter your country and postal code to display shipping options.
The usual disclaimers apply:
Use at your own risk. Buyer is responsible for knowing their local laws and regulations on the legality of using this product. Trav, LLC cannot be held liable for any damages, injury, or death from the use of this product.
Also, no instructions are included! If you need instructions, lack the necessary fabrication skills and tools, or are not a competent welder, you probably shouldn't be hardtailing your own frame.
Email me at sales@chopsource.com with any questions.
Thanks!!
To order, go to www.chopsource.com.
Last edited:
