XS400SJ - Slow Project

BBS360

XS400 Guru
Top Contributor
Messages
1,974
Reaction score
196
Points
63
Location
BC, Canada
So my wife came home today with this for me:
View attachment 19496

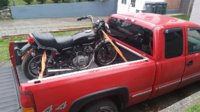
An early Christmas present. Has the weird 14W VIN prefix. Apparently an '82 SJ. Looks like everyone asking about the 14W VIN is in Canada. Canadian only VIN?

Looks pretty good from ten feet away but it was laid down on its right side before being stored for nobody knows how long. Have to double-check but I believe the odometer was around 13,000.
Front right flasher smashed, rear right flasher scraped and bent, tank dented, headlight bucket dented but ok, master cylinder reservoir shaved down, engine guard maybe bent a little, chain rusty as all hell, and the front brake caliper is seized.
Oh, and no keys.

Mufflers are rust-free on the outside but the frame has a surprising amount of rust. Thick in places but I don't think it's compromised.

I'm in school until January so there won't be much time to work on it.

Torn between trying to get it running for the summer without doing a complete teardown or taking it all the way down to the frame, removing and repairing the rust, sandblast the frame, walnut blast the engine while I'm at it, and start fresh.

General plans are:
- Get it running and ride for a while.
- Fabricate 2-1 exhaust. Hoping to sand bend the headers by hand with the help of my pipefitter wife.
- Custom handlebars with wife's help again.
- Stainless steel brake lines.
- Swap front forks from our XS360 that has left-side caliper mounts to allow eventual dual disk setup.
- Get rid of that 2-up seat.
- Get the upcoming Pamco ignition with electronic advancer.
- Redo the electronics. Smaller battery and possibly switch to custom PMA setup.

Long-term, future idea:
- Supercharge it. No promises on this but a fair bit of design work has already gone into it. Currently looking at a 200-250cc twin-lobe roots blower, functions kind of like a scaled-down Aisin AMR300 but with more efficient involute rotor profile.
 
Turns out it only has 11k on it. The motor is pretty grungy externally. Hopefully the insides are pretty good but after peeking through the spark plug holes I'm not so sure.

Looks like it was laid down pretty hard. The little welded nub on the frame to prevent the triple trees from hitting the tank was broken off.
Seems like it'd take a pretty good impact to knock off something welded directly to the frame.
Is there any possibility that there could be any damage to the frame that might not be obvious visually?

I've decided tearing it down to the frame will be the best choice. There's enough rust all over the frame and starting to eat through the fenders that trying to rescue the stock paintjob isn't going to happen.

Going to order a blasting gun to try soda blasting.
 

Attachments

  • 20151201_152401 (Medium).jpg
    20151201_152401 (Medium).jpg
    169.4 KB · Views: 988
Last edited:
When mine went down the steering stop failed, and it was a pretty soft lay down. From what I could see the stock weld didn't even penetrate into the stop or the frame, it just snapped clean off. Probably an area they didn't pay much attention to during assembly.
 
Cool, thanks. Sounds like isn't a big deal.
I'll get it tacked back on there after the tank dents get popped out and repainted, just to avoid chipping it by accident.
 
The PO or whoever laid my bike down did the same. Enough to snap the steer stop off, give my gas tank a really neat crease on both sides and bust off some turn signals, but not enough to bend anything important.

Mine also looked like a shallow weld.
 
I've been doing some digging into the model info since I still need to register it in my name and don't have any paperwork beyond the VIN.

According to the history thread it's either a 1982 SJ or a 1986 S-something.

It's definitely not a 1986-something, whatever that was supposed to be, but I'm not convinced that it's an SJ either.
The SJ models don't have front disks, despite every picture I've seen of the 14W bikes having them.

The sticker on the frame says 9/81. Like the SJ this would indicate a 1982 model year, but was introduced earlier than the "10/81" SJ was.

With the 14W VIN bikes being released before the SJs I'm thinking the 14W bikes were actually the very last bikes produced to the XS400SH designs.

Just speculating but if the 14W VIN really is Canada only, perhaps the 1981 model sold really well in Canada, or maybe all the 1981 SH models were prioritized for other markets and Canada was left high and dry (typical), warranting extra production of the XS400SH design with a unique VIN, incremented one letter above the already planned for SJ/14V.

Ultimately if I can't figure it out, the government here won't know any better.
I'm just going to call it a 1982 XS400, call it a Special, and refer to the XS400SH parts #s for ordering parts.
 
In canada the 82sj had the disc front brake and the mag wheels. The u.s. bikes had spoke wheels and drum brakes. The 82sj was the only xs400 to have the "blacked out" paint. With motor, forks, fenders, signals and carbs all black.
 
I liked my determination more. Less confusing. :(

For parts selection then, all wheel and brake part numbers should come from the 1981 SH parts lists but everything else from the SJ?

Which selection would be correct when parts-n-more lists one petcock repair kit for 78-81 and another for 82-83?
82-83 for DOHC models, meaning the 78-81 is probably correct for the 1982 SJ?
I'll email them before ordering....
 
Yes, use 80-81 parts as most aftermartket suppliers get confused by the two xs400s' for 82. If you go to a yamaha dealer they would know the difference. :wink2: Your front caliper is only on the 80-81 bikes and parts fron earlier bikes will not work.
 
Shitty, I was hoping it'd be the same brake caliper piston & seal kit as my 360.

Haven't gotten the rusty piston out yet but it looks like 40mm vs the 38mm other one.

Nothing on ebay for 1980/81 caliper pistons. Found one seal kit from the UK.

This website has a piston/seal kit for a pretty good price but doesn't ship outsite europe: http://www.motorcycleproducts.co.uk/brake-caliper-piston-yamaha-xs400-1980-1981-p-243873.html
I'll email them but won't hold my breath.

Did a quick search and didn't see many old posts on the forum.
Any ideas?

Edit: AHA! Took the seal off and it's more like 43mm. Without rust and it would have been 42.8mm, like this one: http://www.hvccycle.net/yamaha-xs400-xs650-brake-caliper-piston-hvc200106f/
Probably won't get that exact one. With the XS650 cross compatibility there should be many more options.
Crisis averted. :)

For future reference, rust always adds .2 mm. :wink2:
 
Derp. Excitement gone. Their listing says XS650 in a few places but it's really for the XJ650.

On the up-side, Yambits has a repro 1980-1981 XS400 piston for less then the HVCycle piston: http://yambits.co.uk/xs400se-brake-caliper-piston-front-p-32642.html

Gives me an excuse to order other stuff from Yambits. Couldn't justify the shipping cost for just a few of their repro plastic bits for the '360 but they were optional. Brakes are not.

Edit: Seems funny that Yambits has a 80/81 XS400 piston AND a 80-82 XJ650 piston with different part numbers and very different appearances, yet the HVCycle one fits both.... Something to ask yambits before ordering.
 
Last edited:
In the process of looking for other stuff I found someone selling CNC milled billet aluminum brake fluid reservoir caps:
http://www.ebay.com/itm/191327285107
MasterCylinderCvrTunSlv1_zps22d391ff.jpg

I was going to need a new cap anyways.... Might just be ordering one once I get my repro cast reservoirs working.

Could even tint the cast reservoir semi-transparent red and strip the MC down to bare metal to go perfectly with the red/black/metal colour scheme I'm thinking of.

Yes, it is way too much thought and effort for a brake fluid reservoir....

Will probably ditch the angled heritage special master cylinder. Planning to put different bars on without the crazy stock angles.
I have spare straight 14mm MC from my XS360 so it'll be a straight swap.
 
Last edited:
Since the reservoir sits very prominently above and in front of the bars I don't think that's to much thought and effort at all. I really like the look of that cover. Makes me almost wish I had disk brakes lol.
 
Yeah, I think I definitely need to get one of them.
The casting of the repro reservoirs keeps getting put off as I don't have a vacuum chamber to properly degas the mixture. Might work ok without the degassing.

I just put the stainless one from HVC cycle on my 81 and it works great. The stainless is worth the money:wink2: This is the seal kit I used. http://www.ebay.com/itm/311380456654?_trksid=p2060353.m2749.l2649&ssPageName=STRK:MEBIDX:IT
Missed your reply earlier.
That's good to hear. The Yambits one is stainless too. I'll try them first as they have a bunch of other stuff and I'd rather combine shipping.
With the USD conversion it works out cheaper to get the piston and seal kit from Yambits than to get the piston alone from HVCycle anways.
 
2 Updates:
Received the viton butterfly shaft seals from LiteTek. A much better fit than the MikesXS seals bought for the XS360 which were very loose.
(Don't mind the dirty carbs. Disassembled them but haven't cleaned yet.)
20160220_133437.jpg


Gross pistons:
20160220_161033.jpg


And lastly, is this damage on the crankshaft counterweights? Wear of some kind or normal?
20160220_160925.jpg

20160220_161006.jpg


Just waiting on Eastwood to restock their soda blasting intro kit. Planning to use the soda blaster to clean the pistons and cylinder head. Will try to strip the paint off the carbs and engine too.
 
Got a camp stove? If so, go to a second hand store and buy a large stainless steel pot. Then stop at an auto parts or home improvement store and get some Castrol Super Clean. Dilute the Super Clean 1:1 with water in the pot. Bring to a simmer or better with camp stove - outside as the fumes are strong! If your camp stove is tiny or flimsy, you should build a frame to support the pot as it will get heavy and can crush lesser camp stoves.

Wearing protective gear like a face shield and gauntlet style rubber gloves, submerge the parts in the pot and let them simmer for 30 minutes. A light brushing with a brass brush or an old tooth brush may be required to remove any remaining carbon or gasket material. Do not use a stainless steel brush on soft metals like aluminum! Once cleaned to your satisfaction, immediately rinse the parts well with clean water, dry, and spray with WD40 to prevent corrosion.

This technique will work on lots of parts, but one MUST rinse well and apply an oil of some sort to prevent flash rust or corrosion. WD40 works well as it can be easily removed when it is time to paint parts. This solution is strong, despite being diluted, and made more effective by the heat. Paint will be damaged or removed, polished surfaces will be ruined, rubber will be dried out, your skin will be damaged and will peel off in layers for a week, your eyes will be permanently damaged if it gets in them, etc. Use appropriate caution. The solution can be reused, but eventually will become less effective with use.
 
The crank marks look to be from the manufacturing process but is a lot more exsessive than any of the ones I have seen. Have you found any metal bits in the sump? Soad blasting works very well for carbs! I have done dozens with great results in a very short amount of time. The painted ones require a bit more time a more air pressure to strip. For the head I would use beads as the soda is too soft. If you have a good large enough compressor it will be short work. :)
 
Cool. A friend has a compressor and two additional storage tanks for capacity. Should work well for the soda. Hoping to buy the siphon soda blasting kit from Eastwood but their "estimated restocking date" keeps moving further away whenever I check it.
Might have to go with a DIY setup if it takes too long.
There is a "blast it yourself" shop in town. They have beads and walnut but no soda.

Edit: Haven't taken the screen off yet but no metal bits came out when I drained the oil. Will check the screen today.

Paint will be damaged or removed, polished surfaces will be ruined, rubber will be dried out, your skin will be damaged and will peel off in layers for a week, your eyes will be permanently damaged if it gets in them, etc. Use appropriate caution. The solution can be reused, but eventually will become less effective with use.
Sounds great! :thumbsup:
I have the stove and a big pot. Might give that a try. Thanks Dave.
 
You can get a gravity fed gun for cheap. I have two, one for soad and the other for beads.
 
Back
Top