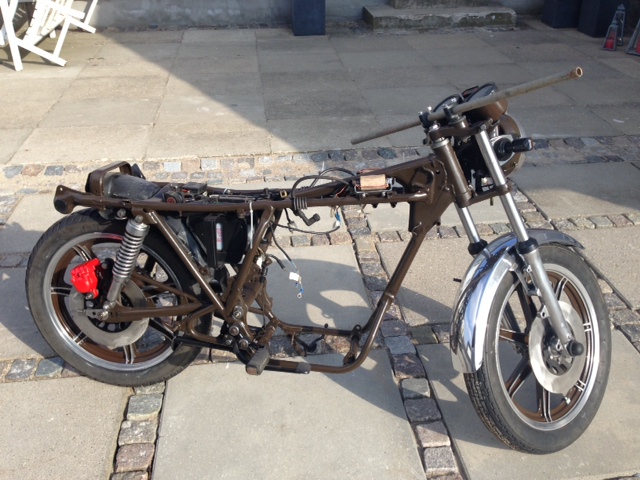
My Bratstyle build

The gusset area can be dealt with by building it up with Bondo[or your favorite brand]. Then paint it with the same paint as the frame. It looks good,as I have used it on a few chopper frames back in the '60s and '70s. This gives a finished look to the area and can be removed if needed later and leave it like it was before. Also,a box for the electronics,battery can be made from a length of 3" or 4" plastic pipe with threaded plugs for ends,so that access can be had from either side. lha
I'm honoustly not sure what the gusset area is!? :shrug:

I've considered using simple plastic pipes, but decided to go for a more solid material, and a flat box instead of a round fake oil tank.

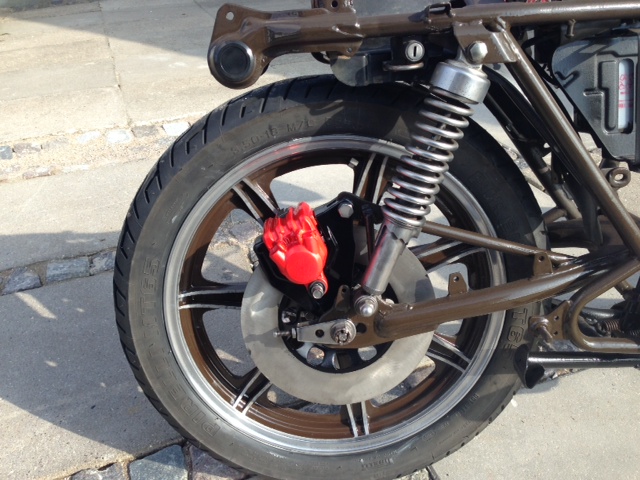
Going to try and find time soon to finish these parts, I'll take some better pictures when i get that far hehe

@xschris
thanks ^^
 
looking good! :)

the gusset area is the area in front of the tank, where there are gussets to reinforce the backbone(s). lhaolpas idea sounds good, there are some cool choppers with molded frames out there. do a google search for it! :)
 
It's basically still like in that last picture! Sadly lost my working space due to an extension to the house, and I've been really short on time :( build hasn't been cancelled yet though! Once it does continue I will be sure to post pics :)
 
Wow! Well everyone; It has been awhile! I have to start off with a confession: I haven't really done any work on the bike since my last post due to several circumstances which include losing room in the garage to work on the bike. On the bright side: that has been resolved and the project is once again underway! As it was easter I took a good look at what I need to do on the bike to finish it, and ouch that list is long! :eek:

Haven't really done any work I can report on just yet, but will post pics as soon as I've got something to show :) First off I'm going to buy a revision set for my brake caliper (including the piston as it was terribly damaged) and some new brake pads. I've decided to repaint the caliper while I'm at it, just can't decide on a colour! Red calipers have always looked good in my opinion, just not sure whether or not it would suit an xs400 brat :) Might just go for regular black... What do you guys think?

I've noticed that during my absence a lot of cool builds have appeared on these forums, so I'll be happily browsing for a while
 
Here you can see the rear brake caliper in red color...

full


full


I'm not sure if this is an appropriate color choice for bratstyle build...
 
Very useful reply, thank you! I agree, it probably wouldn't be an appropriate colour. My best bet would be to keep it black I suppose
 
I think the red color looks good,and sets off the calipre. The reason for molding the gusset area is that when using a different tank,sometimes the gusset is visible and kinda ugly. It's not a very complex task,just filling in the area which would be exposed by the difference of the tank. lha
 
I've decided on black! Well not 100% black as you'll see in the pics, but I like it.
As you can see the caliper didn't look great, moreover it didn't work properly...

DSC_0187.jpg

Don't mind the extra bit of rubber on the piston, merely stuck on there so I didn't lose it ;)

DSC_0188.jpg

As you can see the piston definitely needs replacing

DSC_0189.jpg

Inside of the caliper got some love from grain 1000 wetsanding. Looks fine to me now

DSC_0191.jpg

Some fresh and VERY durable paint! :)

Now I'm just waiting for the rebuild kit to arrive in the mail, new piston and seals etc, and new brakepads :)

edit: I see the pic doesn't quite do the paint justice :) It has a, sort of, metal effect in it though the pic makes it look rough
 
Last edited:
If you want the paint to last I would replace the bleeder with a new one:wink2:
 
Finished rebuilding the caliper, happy with how it turned out! The r1 master cylinder is very strong for just one xs400 caliper, but it seems to work fine (can't test it while driving yet so will let you know once it's on the road). If it doesn't work well i can always consider going for dual discs hehe :D expensive though
The original yamaha sticker is a lucky find in a local shop for just €1,50 hehe, how could i resist?
 

Attachments

  • IMG_20140503_173708.jpg
    IMG_20140503_173708.jpg
    211.5 KB · Views: 315
Thanks everyone! I'm busy making a 'checklist' of what stuff I need to buy and do on the bike before it's done... List is getting longer every second haha... Spent some time grinding the edges of my base for the seat smooth... Will send that to someone to get some nice leather and padding on there ;)
I really, really hope to ride the bike this summer, not sure it's doable though (finances are in issue as well)
 
Finally got some work done on the rear fender :) This was my first time welding, turned out allright I'd say.

The struts:
DSC_0207.jpg


With fender on:
DSC_0208.jpg


Lots of work still to be done on the bike though
 
Haven't been able to do much really... Did take off the carbs to clean them
I first stripped them down as far as I could, which was basically everything except for the pilot jets, which some jackass semi-stripped :mad: tried getting them out but obviously only made matters worse... oh well a screwdriver isn't going to cut it anymore.
I tried the torx bit method, didn't help :( So now I'm waiting for shops to open and I'm going to buy a small size leftturning drill (not sure this is what they're called in english), in hopes of getting them out...
Boiled the carbs in water/vinegar for a good half hour which got a lot of gunk off, then boiled them with some baking soda which got the rest off quite well. Cleaned them out with water and they're looking clean (though dull). Before I put them back together I have to get the pilot jets out, buy new pilot jets and buy a new float needle as one is stuck.

About jets;
My bike is a 4G5, but the engine is a 2A2... The carbs had 125 main jets, 150 air jets and obviously can't tell what size pilot jets... What size jets would work well with pod filters and free flow exhaust? Currently have 140 main jets installed and raised the needle 1 step. Was thinking the pilot jet could do with 1 step up, but I obviously can't be sure what size it currently is but i'd guess 42,5 as that's stock... though my main jets were smaller than other people's... So I'll just have to wait and see what size they really are before i buy new ones... Need to finish the bike first before I can testdrive as well :)
 
Back
Top