New Fuse Box

SilverTalon

XS400 Addict
Messages
175
Reaction score
0
Points
16
Location
Dracut, MA
I'll say it right now, I just wanted to brag a little. This is the first work I've done on my 400 without assistance :D

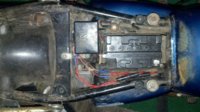
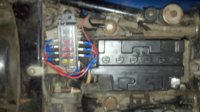
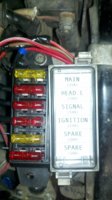
Re-spliced and wired everything connecting to the new box, and now everything is working a lot better (brighter lights and instruments)

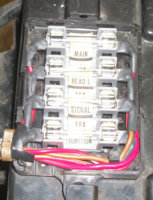
I also saw a post where someone had the original insert. I tried to emulate it as much as possible.
 

Attachments

  • 2011-08-13_16-00-31_74_modified.jpg
    2011-08-13_16-00-31_74_modified.jpg
    281.8 KB · Views: 1,739
  • 2011-08-13_16-45-38_647_modified.jpg
    2011-08-13_16-45-38_647_modified.jpg
    271.9 KB · Views: 1,028
  • 2011-08-13_17-21-00_373_modified.jpg
    2011-08-13_17-21-00_373_modified.jpg
    299.1 KB · Views: 907
  • 2011-08-13_17-22-06_421_modified.jpg
    2011-08-13_17-22-06_421_modified.jpg
    291.9 KB · Views: 1,406
good job, just an observation. its better if you can get the proper japanese bullet connectors and insulation rather than the blue crimp ones. the blue ones have a reputation for coming loose through vibrations, but still look attached.
 
good job, just an observation. its better if you can get the proper japanese bullet connectors and insulation rather than the blue crimp ones. the blue ones have a reputation for coming loose through vibrations, but still look attached.

Went with what I've had experience with. If it happens, I'll be on the road and I'll figure it out. Then I'll shout, "DAMN YOU DREWPY!" :laugh:
 
Thanks for bragging!!!! :thumbsup: 
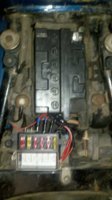
I think I'm going to get right on doing the same thing! I saw a post that said that the electrical system was weak, so I checked mine and sure enough, the glass fuse holders are about ready to crack and fall out... So thanks for making it easy for me :D
 
Very smart! As you said this was your first job without assistance, can I ask how easy it was? My fuse box is shot and the headlamp needs re-wiring as there is no fuse there what so ever! I'm a novice and will be following the manuals A-Z!
 
good job, just an observation. its better if you can get the proper japanese bullet connectors and insulation rather than the blue crimp ones. the blue ones have a reputation for coming loose through vibrations, but still look attached.

Or, when you get a chance, solder the butt/spade connectors you're using now and slide some heat shrink on them.
 
I did the radio shack one with the connections soldered, and heat shrinked.... works great, but when I rewire the bike I will be doing blade fuses.
 

Attachments

  • fuse.jpg
    fuse.jpg
    90.1 KB · Views: 2,636
Enjoy every success, revel in each and every positive step, and celebrate them! And when it the results don't pan out, learn from it and fix it right. Each one of us who works on old bikes, tunes up old cars, or fixes anything, are the hopeful breed that would rather light one little candle than sit and curse the darkness.

Good work! So what's next?
 
looks good.
i used the radioshack fuse replacement method on mine.
http://www.radioshack.com/product/index.jsp?productId=2062258 for the fuse block and
http://www.radioshack.com/product/index.jsp?productId=2103499 for the wire connections to the fuse block and still kept the same stock fuse box + fuses.

Howdy! Finally having issues with this and looking to do the same repair method (radioshack while they're still around). The links to the products are no longer valid. I had no problem finding the four position fuse block, but what are the "wire connections" you reference in the second link? I'm new to the electrical game so I want to ensure I purchase the right stuff.

Thanks!
 
Back
Top