1980g2 scrambler build

Drice82

XS400 Enthusiast
Messages
32
Reaction score
0
Points
6
Location
Traverse City, Mi
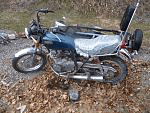
Reposting in the build section of a new winter project. I picked up this 1980 special II a few weeks ago and this is the progress thus far.

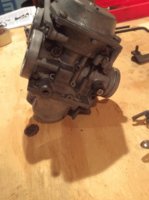
It was in pretty rough shape but the po said it ran last spring but now has a stuck float as fuel dumps out the carb. No battery but I can hear the cylinder turn with the kick and at least some compression.

The seat is 99% duct tape, sissy bar installed via hose clamps, and front and rear signals mixed around ( a front in the rear and vice versa) :shrug:

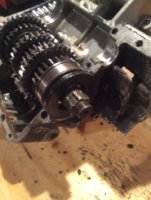
As winter is fast approaching I wanted to get the bike indoors as my garage is neither insulated nor heated and I'd prefer to park out of the snow. Tank, motor, fenders, wheels were all pulled and brought into the basement for more comfortable work.
 

Attachments

  • image.gif
    image.gif
    21.5 KB · Views: 573
  • image.jpg
    image.jpg
    59.9 KB · Views: 447
Upside down photo :doh:

Pulled apart the carbs as I already knew there was an issue and as has already been said you don't know it's clean unless you clean it yourself. The float bowls were full of nice green varnish and the left side float was totally stuck.

Disassembled everything, had to cut flat heads out of 2 rounded out diaphragm cover screws, and cleaned out various clogged jets. Am missing one screw from the front side support bar, cap over the idle jet recess (both were solid with grime), and possibly one other.

Questions are two: on the outboard side of the right hand carb there is a non threaded hole which corresponds to the fuel lines, I assume there's supposed to be a cap of some sort here? I can't tell on the exploded diagram. See photo below.

Second is when I disassembled the choke rod mechanism I retained the one (only) ball and spring, but can't figure out how to reassemble. The ball appears to be too big for the spring recess.
 

Attachments

  • image.jpg
    image.jpg
    174.7 KB · Views: 400
Last edited:
oil filter cover bolt was put on by Popeye so I had to weld on a nut to get it off to get the motor out of the frame. The missus was good enough to let this all happen and help me carry the frame and motor to the basement.

Everything is quite dirty/grimey, I'd like to paint/powder coat the motor and pieces so disassembly for cleaning I think is in order and an opportunity to check everything out, valve clearances, ring seals, clutch etc. when the time comes for reassembly, what seals gaskets etc do you think should be replaced regardless vs only if rotted, broken etc?

Below is my inspiration for a finished product, I'd like to copy drewpy'so ignition location (obviously kick only) I'm not sure on battery position yet nor electrical locations. I'll probably do a complete rewire as well as what's there looks quite cut up by the PO.
 

Attachments

  • image.gif
    image.gif
    134.3 KB · Views: 450
Jim-ive read through it and have been following closely.

Theres quite a few bits here and there from different builds that Im looking into incorporating into this project.

Im stuck with the cylinder head off but cant get the body to separate from the crank case. its stuck to the gasket. tried pulling by hand and gently persuading with a rubber mallet on the supported sides so as to not break the fins. any other ideas to persuade it off? the cylinders are free so thats not the problem, other than friction that is.

how do you remove the center part of the alternator? the three bolts are free from under the cover and the bolts on the coils are off and its free but the center section is still immovable. the manual doesnt seem to cover the disassembly of the alt, just removing the rotor from the crank...how does this come off? also.

will get pics up soon,
 
so in removing the field coil from the generator cover, after removing the three outside allen screws, and the three on the inside, should it just pullout? ive tugged on it but didn't want to pull to much to avoid damaging something unseen. the oil seal and outer portion is free. arrow indicates portion im referring to.

full


am I giving this the correct name "field coil"?
 
Yes after the 6 screws are out, both pieces should come out. Try giving it a few small hammer taps, should break it free.

And you are correct, that is the field coil in the center ;)
 
Removed the piston rings as they'll be replaced and got most of the carbon off of the Pistons themselves. The valve pockets seem a bit tenacious.

However even after reading this

full


I did this to one of them

full


I think this ones going to be a challenge to remove...
 
I use a new bit in a battery powered impact driver to remove these screws. It works very well and almost never strips one. Just make sure the bit is of the proper size and fresh.
 
I see the difference after looking up JIS. I filed the head into a Flat head and got it out with the impact driver.

The two halves are split but my main oil seal is stuck in the upper half which is holding the shaft with it. Can this just be pulled out/rotated out? There's no description in the manual or greasy fingers builds, just Want to make sure I don't damage anything unduly.

So far all the teeth in the gears look good so it should all be in working order when it goes back together.
 

Attachments

  • image.jpg
    image.jpg
    82.6 KB · Views: 388
Just give the shaft a tap underneat (not on the threads) and it should pop right off. It might have a little yamabond holding it on, and its also a very tight fit.
 
Back
Top