82 Maxim DOHC 400 electronics retrofit

sipma02

XS400 Enthusiast
Messages
78
Reaction score
5
Points
8
Location
Minneapolis, MN
Wow, the electronics on these old bikes are a NIGHTMARE. I started a build thread a few months ago, and got it finished (road worthy) a little over a month ago. Ive put about 1000 miles on it so far and i absouletly LOVE the bike. About a week ago, that hunk of junk left me high and dry though - I was at the MN state fair, and at about 11pm, wouldnt start. Ran impeccably, when I parked it. Ive troubleshot alot of issues with this bike (thanks to this forum!) and I immediatly knew it was a no spark thing. Sadly, I had to go back to school the next day, so I had to drive my car back (Cars are coffins, kids... ). Anyway, I had to have a friend pick me up and it was a GIANT inconvenience.

Per the manual, I tested everything on page 6-22 and 6-23. That led me to the igniton coil. That tested good on the primary side, but the secondary side didnt read anything at all. Im not sure I was testing it right - the manual recommends testing an impossible situation! on page 6-25 the diagram claims both spark plug wires come from the same coil. Wrong. So i tested between the 2 plug wires and got nothing (duh). Also tested between the orange wire (signal?) (aka the same wire I used to test the primary side) and the plug wire. just jammed the tester up where in connects onto the spark plug. Nothing, on both sides - but like I said, is that even the right way to test it?

With that in mind, I checked the pick up coils. (had to look on this forum.. it isnt in the manual?) The black wire (on the wire side of the ignition box) to gray tested within spec, but the black to orange did not. If one pick up tested bad, and one good, wouldnt that mean that I get spark on on side but not the other? Is it best to just replace the whole pick up plate assembly thing?

The real question is - why did this happen? symptom of 35 year of electronics? like I said, it was running fine for <1000 miles, and ran fine when I shut it off. What couldve really gone wrong when it sat parked for 4 hours?!

I mean, these bikes arent really that crazy complicated. Has anyone done some minor/major retrofitting of more modern parts? I just want to make my motorcycle more reliable :'(
 
Last edited:
Follow up for future readers - found a site that may help. Havent bought one, but I may if I cant make my current plans work.

https://imfsoft.com/en/category-control-units/master-mini-ignition-tci

Seems like it would work well, and replace some of the the old timey electronics in our (and other) motorcycles. Im currently working on a project with an Arduino to replace the TCI box. I will be updating when I have more completed!

Here is a thread with more info:

http://www.xjbikes.com/forums/threads/aftermarket-ignition.45931/
 
Last edited:
'm currently working on a project with an Arduino to replace the TCI box. I will be updating when I have more complete!
Interested to see updates on this.
I've been slowly working on the same thing. Code seems to be at a point where it may work. Just waiting on parts to show up in the mail to start a prototype.
 
Interested to see updates on this.
I've been slowly working on the same thing. Code seems to be at a point where it may work. Just waiting on parts to show up in the mail to start a prototype.

Thats so sweet! We should keep each other updated. Currently, I have a simple program written to trip 2 different Hall Effect sensors (https://www.adafruit.com/products/158) and light up 2 different LEDs. (code below) I really wanted to use the existing sensors (aka pickup coils) - they are variable reluctance sensors and really, are the ideal system to sense crank position and provide ignition advance. They actually output at AC voltage. (See page 6-19 of the electrical chapter of the DOHC manual, lots of info there)

The way I see it, we need to have 100% knowledge of the current system to modify it/make a new one.

Heres how the TCI works, as far as I know. The current TCI takes this AC voltage (which is an electrical wave, as all electrical voltages are) from the VR sensor (aka the pickup coils) and reads it. Because a VR sensor is magnetically based (its basically a mini AC electrical generator), the faster the crank spins, the more the waveform changes/the more voltage is produced. The TCI takes that signal, and uses it to A) know when to send a spark, B) know how fast the engine is spinning so it knows what advance to provide the engine. The differing advances are triggered by a set of capacitors (capacitors take a certain time to charge/release voltage, which is extremely carefully timed out by Yamaha engineers. this is used to delay the advance). I believe this is all based on analog circuits, not digital ones. This is based on what I have observed and researched, but I am very open to suggestions/corrections.

TLDR; pickup coil (VR) sensor tells when the piston is at a certain point, TCI uses a system of capacitors to provide delay and therefore ignition advance.

Basically, we are doing something very similar digitally with an Arduino. I did my very first version of the code with momentary contact switches, if you wanna try that. Heres my code. It took some trial and error, but I have it connected to analog pins, reading digital. It writes to the serial monitor zeros and ones. Make sure to use pull up resistors (i used 100k) or it wont read properly. Give it a try, if you need any help just let me know!

me said:
int pickup = A0;
int pickup2 = A1;
int led = 2;
int led2 = 3;

void setup() {
// put your setup code here, to run once:
pinMode(pickup, INPUT);
pinMode(pickup2, INPUT);
pinMode(led, OUTPUT);
pinMode(led2, OUTPUT);
Serial.begin(9600);
}

void loop() {
// put your main code here, to run repeatedly:
Serial.println(digitalRead(pickup));
Serial.print(digitalRead(pickup2));
if(digitalRead(pickup) == LOW){
digitalWrite(led, HIGH);
}
if(digitalRead(pickup2) == LOW){
digitalWrite(led2, HIGH);
}
if(digitalRead(pickup) == HIGH){
digitalWrite(led, LOW);
}
if(digitalRead(pickup2) == HIGH){
digitalWrite(led2, LOW);
}
}
 
Last edited:
It's mostly a project to keep me entertained while it's too cold outside to work on or really ride the bike.

My inspiration came from some DIY ignitions but largely from the Power Arc unit. Probably cheaper to just buy a power arc but complete control is nice.

Main ideas approaching the project were optical triggering, precise dwell control, the option for totally custom timing curves, and having everything in one compact unit that would fit under the SOHC timing cover.
Power Arc ignitions feature multiple spark discharge but I don't think it would be much of an improvement. It could be done entirely with code changes though so it might be worth a try sometime.

Once the basics are working I've been considering adding a sensor for vacuum advance but the task of tuning for it seems monumental.

Stock SOHC dwell is 105 degrees across all RPM ranges. At 10,000 RPM that works out to 1.75ms to charge the ignition coils. Probably adequate for the specials and DOHC bikes but maybe a bit short for earlier bikes with higher resistance coils.

As for code. This is where I'm at. Haven't tested it on any hardware yet. Still waiting on components to arrive in the mail.
Started using millis but quickly switched to micros. First time doing anything with interrupts.
It's entirely possible that my approach to some things might not work at all. Only testing will tell.
Still plenty of loose ends and improvements to be made....
Code:
//NOTE!
//RPM is measured at the camshaft which rotates at 1/2 crank speed.
//Current thinking is that all calculations should be done based on crank rpm & position, which seems obvious but worth noting.
//RPM will be sensed at camshaft, multiplied by 2, and that rpm value used throughout.
int SensedCamRPM;
int RPM;

//Optical encoder variables
//Number of RPM slots on optical encoder disc
unsigned char Slots = 100;
int EncoderCount;

//Crankshaft angle for determining when to right right cylinder, after Left TDC
int CrankShaftAngle = 180;
//180 degrees for XS400
//Try to write code so that this works for 180, 360, and 277 cranks by only modifying this entry...

//How long to wait in micros after TDC to activate/deactivate ignition coil IGBT. Calculated in void_loop
int WaitToDwell;
//WaitToFire may not be used... Should work as well to fire spark plug after dwell ends.
int WaitToFire;

//Timekeeping variables
volatile long TDCmicros;
unsigned long LeftDwellStartMicros;
unsigned long RightDwellStartMicros;
unsigned long FireCoilMicros;

//Assuming there's a measurable delay in how long the circuit components take to fire after the uC signals them to, enter that time here in microseconds
int IGBTOnDelayuS = 0;
int IGBTOffDelayuS = 0;


//Dwell can be specified in degrees or ms.
//Setting it by degrees means the actual duration that the ignition coils
//charge will vary by rpm.
//Setting it to a specific time in ms means it will always charge for the required time
//THIS COULD CAUSE PROBLEMS IF THE DWELL TIME IS LONGER THAN THE TIME BETWEEN TDC AND FIRING
//But at 10,000 rpm one complete 360 degree cycle still takes 6ms so we'r probably ok
//int DwellAngle = 105; //degrees
//int Dwellms = 1;
int Dwellmicros = 1750;

//Time per crankshaft degree
int millisPerDeg;
int microsPerDeg;

//PIN Declarations
int TDCInterruptPin = 2; //Pin to read signal from encoder. 1 slot on encoder wheel lined up with Left cylinder TDC
int CamRPMInterruptPin = 3; //Pin to read constant RPM. 50-100+ slots spaced evenly around wheel
int LeftIGBTPin = 4; //Digital pin to charge/fire left IGBT
int RightIGBTPin = 5; //Digital pin to charge/fire right IGBT

//Advance is retrieved from an array, given in crankshaft degrees, based on engine RPM
int Advance;
//Assuming max rpm = 10,000 but max advance occurring <= 5000rpm
//5000/100=50 increments, array size = 50 entries
unsigned char AdvanceArray[51] = {
  0, //0 RPM
  0, //100 RPM
  0, //200 RPM
  10, //300 RPM
  10, //400 RPM
  10, //500 RPM
  10, //600 RPM
  10, //700 RPM
  10, //800 RPM
  10, //900 RPM
  10, //1000 RPM
  10, //1200 RPM
  12, //1300 RPM
  13, //1400 RPM
  15, //1500 RPM
  17, //1600 RPM
  18, //1700 RPM
  20, //1800 RPM
  22, //1900 RPM
  23, //2000 RPM
  25, //2100 RPM
  27, //2200 RPM
  28, //2300 RPM
  30, //2400 RPM
  32, //2500 RPM
  33, //2600 RPM
  35, //2700 RPM
  37, //2800 RPM
  38, //2900 RPM
  40, //3000 RPM
  40, //3100 RPM
  40, //3200 RPM
  40, //3300 RPM
  40, //3400 RPM
  40, //3500 RPM
  40, //3600 RPM
  40, //3700 RPM
  40, //3800 RPM
  40, //3900 RPM
  40, //4000 RPM
  40, //4100 RPM
  40, //4200 RPM
  40, //4300 RPM
  40, //4400 RPM
  40, //4500 RPM
  40, //4600 RPM
  40, //4700 RPM
  40, //4800 RPM
  40, //4900 RPM
  40 //5000 RPM
};
int ArrayEntry;

unsigned long currentMillis = millis();
unsigned long currentMicros = micros();
unsigned long LastSensedmillis;
unsigned long LastSensedmicros;

void setup() {
  //IGBT output pins:
  pinMode(LeftIGBTPin, OUTPUT);
  pinMode(RightIGBTPin, OUTPUT);
  //Interrupts to sense when engine is at TDC and constant RPM (camshaft):
  pinMode(TDCInterruptPin, INPUT_PULLUP);
  pinMode(CamRPMInterruptPin, INPUT_PULLUP);
  attachInterrupt(digitalPinToInterrupt(TDCInterruptPin), TDC, RISING);
  attachInterrupt(digitalPinToInterrupt(CamRPMInterruptPin), CamRPM, RISING);
}

void loop() {
  //Halt interrupts while reading values set by iterrupt with noInterrupts()
  //RPM Calculation:
  if (LastSensedmillis >= (LastSensedmillis + 50)) {
    //Check rpm every 50 ms, equivalent to once per crank revolution at 1200 rpm
    noInterrupts();
    SensedCamRPM = ((60 * 1000) / ((millis() - LastSensedmillis) * 100) * EncoderCount);
    interrupts();
    RPM = SensedCamRPM * 2;
    LastSensedmillis = millis();
    EncoderCount = 0;
  }
  //Determine time period for each crank degree for determining how long to wait after TDC to fire
  microsPerDeg = (1000000 / (RPM * (1 / 60)));
  millisPerDeg = microsPerDeg / 1000;

  //Determine advance angle based on rpm
  if (RPM <= 5000) {
    ArrayEntry = RPM / 100;
    Advance = AdvanceArray[ArrayEntry];
  }
  //If RPM over 5000 apply last entry from advance array, which will always be the maximum advance angle.
  else if (RPM > 5000) {
    Advance = AdvanceArray[50];
  }
  //INCORPORATE ADDITION RETARD/ADVANCE BASED ON VACUUM LOAD???

  //Subtract advance angle from 360deg to get number of degrees to wait after TDC, multiply it by the microseconds per degree, less the dwell time.
  //Possibly add another subtracted value to reflect the delay in the circuitry actually firing. The "IGBTOnDelayuS". Actual duration, if not neglible, to be determined.
  WaitToDwell = ((360 - Advance) * microsPerDeg) - Dwellmicros - IGBTOnDelayuS;
  noInterrupts();
  LeftDwellStartMicros = WaitToDwell + TDCmicros;
  RightDwellStartMicros = WaitToDwell + TDCmicros + (CrankShaftAngle * microsPerDeg);
  interrupts();

  //LEFT CYLINDER IGNITION
  //Write code somewhere to change whichever pin controls the ignition coil to start charging
  if (micros() >= LeftDwellStartMicros) {
    //change pin state to start charging coil
    digitalWrite(LeftIGBTPin, HIGH);
  }
  //Trigger spark
  //We could EITHER fire the spark plug by "ending" the dwell time
  //This should work if the dwell time is always an exact time in ms
  //and always happens that exact time before the spark advance
  //Might be simpler than other methods and save cpu time
  //Ass with IGBTOnDelayuS above, it may be necessary to start the firing process slightly early to compensate for a delay in the components, "IGBTOffDelayuS"
  if (millis() >= (LeftDwellStartMicros + Dwellmicros - IGBTOffDelayuS)) {
    //turn off charge/change pin state back
    digitalWrite(LeftIGBTPin, LOW);
  }

  //RIGHT CYLINDER IGNITION - Same as above except starting some time after left cylinder firing based on calculations above for the crank angle and micros per degree at current RPM.
  if (micros() >= RightDwellStartMicros) {
    //change pin state to start charging
    digitalWrite(RightIGBTPin, HIGH);
  }
  if (millis() >= (RightDwellStartMicros + Dwellmicros - IGBTOffDelayuS)) {
    //turn off charge/change pin state back
    digitalWrite(RightIGBTPin, LOW);
  }
}

void TDC() {
  TDCmicros = micros();
}

void CamRPM() {
  //Increment encoder count for rpm calculation
  EncoderCount++;
}
 
Wow. I really like how this is program is written, however Im not sure i 100% understand it. Seems like it might be a little unnessiciarly complex. I could be wrong. I was planning on using the
delay(xxxx); //time in microseconds
command to provide advance, based on RPM. Any reason you're using camshaft speed to measure RPMs as opposed to crankshaft? Also, what sensors are you using, hall effect?

I know what dwell is (time it takes to charge coil), but I dont really know how to control that. When controlling dwell, do we need to actually provide a power source to the coil to charge it? I checked my manual for dwell time, and it isnt listed.

I am having a hard time with the math and figuring out how long it will take the engine to rotate a "certain amount". My setup is going to have my hall effect sensors mounted at 40 degrees BTDC for each side. (The DOHC is a 180 degree engine, not sure about the SOHC) When the sensor is tripped, the arduino will know where the engine is (at 40 deg BTDC). It will then delay a "certain time", then provide spark. This "certain time" will be the time in microseconds it takes for the crank to rotate. For 1200 RPMs, the advance as per the manual is 10 degrees, since the sensor is mounted to trip at 40 degrees, it would need to delay 30 degrees to spark at 10 degrees BTDC. As RPM increases, the "certain time" delay would decrease, therefore bringing the delay lower and lower, and bringing the advance in degrees closer and closer to 40 degrees. Past 5,000 RPMs, the advance would level off, and the delay would become nothing - as soon as the arduino recieved a signal from the sensor, it would spark (because the sensor is placed at 40 deg BTDC).

I suspect the reason the advance curve levels out at 5K RPMs is because the technology didnt exist at the time to trigger something that fast. (were there any engines that ran past 10K in the 70s/80s via electronic advance? Im not sure). Also, much past 5K rpms there probably wasnt enough dwell time with increasing advance. Added to that, there is probably a point of diminishing returns on a torque/HP graph.

I know this is alot of info, sorry I took so long to respond. Hopefully I will be able to respond faster now that all the new year festivities are over!
 
Last edited:
I did do some math, and it seems as though at 5000 RPMs, it would be 1000 microseconds for 30 degrees of crank travel. WARNING; I AM NOT SURE IF THIS MATH IS CORRECT. The arduino processes at 16MHz - thats 16 million cycles per second. Should be able the handle 1000 microseconds pretty good ;)
 
Cheers to long posts. Apparently I'm over the character limit so I'll break it in two....
Wow. I really like how this is program is written, however Im not sure i 100% understand it. Seems like it might be a little unnessiciarly complex. I could be wrong. I was planning on using the command to provide advance, based on RPM.
The delay command can be handy for very simple procedures but it completely stops any other processing from happening. Any event that could possibly overlap would break the system. There are dozens of articles on why not to use delay and tutorials on other ways to do timing.
Since everything in the motor happens sequentially in the same order every time you might be able to make something work but delay is a pretty clunky command. Generally anything that depends on physical events and timing is done with interrupts.
Delay is also in milliseconds but you can use delayMicroseconds().
Any reason you're using camshaft speed to measure RPMs as opposed to crankshaft?
Not sure about the DOHC bikes but the SOHC machines have the ignition system on the camshaft. I want the whole unit to live in that compartment so it senses camshaft rpm and converts that to crankshaft rpm. Might also help the microprocessor and sensors since events won't exceed half the engine rpm.
Also, what sensors are you using, hall effect?
Planning to try a photo-interrupter setup. Photodiodes sense the light from an infrared LED as a slotted optical disk rotates between them.
A power arc example here: http://www.powerarc.com/russian/DneprInstalled.jpg
One ring with lots of slots for rpm sensing and another ring with just one slot for sensing TDC.
It's not a common ignition triggering system but it works. Supposedly the optical triggering is more precise than hall effect sensors but there is the potential for dirt to block the sensing beam and the components don't have as great an operating temperature range as hall sensors (But the arduino's temp range is the same as the photodiodes I've ordered).
Wouldn't take much to switch the code to use hall sensors if the optical triggering doesn't work out.
I know what dwell is (time it takes to charge coil), but I dont really know how to control that. When controlling dwell, do we need to actually provide a power source to the coil to charge it? I checked my manual for dwell time, and it isnt listed.
The time it takes for any given ignition coil to charge is based on its internal resistance and the coil's inductance. It can be calculated if the manufacturer gives the inductance value for the coil.
It's important to note that the time an ignition coil requires to charge does not change with rpm or any other factors. I'll get to that.

Dwell is kind of irrelevant for the average rider on a bike with electronic ignition. It cannot be changed. If something goes wrong with it you replace the TCI and that's all there is to it.
On points bikes dwell time is affected by the points gap. It starts and ends based on the rotation of the timing cam on the camshaft. When the dwell time starts (105 degrees before ignition on SOHC points bikes) the contact breakers touch, charging the coil. When the contact breakers open the coils stop charging, their magnetic field collapses, and the spark plugs fire.
If the points gap is out of adjustment the dwell time might be too short or too long.
Too short and the coils don't charge as much, there's less voltage at the spark plug and ignition suffers.
Too long and the coils charge longer than necessary. They consume more current from the charging system than necessary, they get hotter, and eventually they burn out.

The problem with points ignitions and their dwell time based on camshaft degrees is that the dwell time always changes.
At a 1200rpm idle the 105 degree dwell time results in the coils charging for 14.6ms.
At 10,000 rpm the 105 degrees works out to 1.75ms.
Too long at idle and sometimes too short at 10k.

Electronic ignitions tend to do away with degrees based dwell and set the dwell in exact durations that don't change based on rpm. Dwell time is always optimal for the entire RPM range.
I am having a hard time with the math and figuring out how long it will take the engine to rotate a "certain amount".
I think your math is correct. It matches mine anyways. No guarantee that mine is correct but it seems to match what I'm seeing online.
Just to put it out there for everyone to see:
RPM*(1/60)= revolutions per second or Hz
1000/Hz = time in ms per rotation (or 1000000/Hz for microseconds)
time per rotation divided by 360 degrees = time per crankshaft degree
Multiplying that by whatever timing event we need gives the time for it to happen.

For example, 105 degrees for SOHC dwell at 10,000 rpm:
((1000000/(10000*(1/60)))/360)*105 = 1750 microseconds or 1.75ms dwell time
105 degrees at idle:
((1000000/(1200*(1/60)))/360)*105 = 14,583 microseconds or 14.58ms dwell time
Your example:
((1000000/(5000*(1/60)))/360)*30 = 1000 us or 1ms
DOHC max advance of 35 degrees at 7000 rpm:
((1000000/(7000*(1/60)))/360)*35 = 833 microseconds BTDC
or for how long to wait after previous TDC (360-35=325 degrees)
((1000000/(7000*(1/60)))/360)*325 = 7738 microseconds after previous TDC
 
My setup is going to have my hall effect sensors mounted at 40 degrees BTDC for each side. (The DOHC is a 180 degree engine, not sure about the SOHC) When the sensor is tripped, the arduino will know where the engine is (at 40 deg BTDC). It will then delay a "certain time", then provide spark. This "certain time" will be the time in microseconds it takes for the crank to rotate. For 1200 RPMs, the advance as per the manual is 10 degrees, since the sensor is mounted to trip at 40 degrees, it would need to delay 30 degrees to spark at 10 degrees BTDC. As RPM increases, the "certain time" delay would decrease, therefore bringing the delay lower and lower, and bringing the advance in degrees closer and closer to 40 degrees. Past 5,000 RPMs, the advance would level off, and the delay would become nothing - as soon as the arduino recieved a signal from the sensor, it would spark (because the sensor is placed at 40 deg BTDC).
You've got it about as figured out as I do.
Going back to the SOHC points example, max ignition advance is 36 degrees BTDC, dwell is always 105 degrees. That means the contact breakers start the dwell time at 140 degrees BTDC, which is at least as far BTDC as the sensor would have to be in this case.
Your coils won't ever need that much dwell time so you don't have to be anywhere near that far back.
DOHC ignition coils are only 2.75ohms so they can probably handle a slightly shorter dwell time than the 3.0 ohm coils on the SOHC TCI bikes. No way to know exactly without testing or better specs.

I'm currently going with the 1.75ms determined from the contact breaker's 105 degree dwell at 10k rpm but I suspect this will turn out to be too short for the ignition coils on my XS360.
Once I get something working I'll make a test rig that allows me to change dwell time or advance on the fly. With an oscilloscope hooked up to the ignition coils I can determine how much dwell time results in the highest spark voltage.
If this ever gets onto a working bike I'll make a test version with manually adjustable advance for some seat of the pants tuning.
Don't think I'll ever spend the money on a dyno run. :)

My code is assuming a trigger at TDC. I figured it'd be slightly simpler for the math and I'm not sure why it'd be a problem. If it is it should be easy enough to change if it becomes a problem.
Each spark has two important timing events; when to start dwell and when to spark. I figured it'd be simpler to simply "start" and "stop" the dwell time, with the spark being the natural byproduct of the dwell time ending.
The code currently reads rpm every 50ms (There's some math behind the 50ms but it's mostly a guess).
Currently it compares RPM to the advance degrees lookup table on every single loop but I'll probably build that into the 50ms rpm statement to reduce load on the microprocessor.
It also constantly calculates how many microseconds it takes per engine degree. Will probably move this into the rpm statement too.
Then we subtract the advance from 360 degrees to determine how many degrees after the triggering TDC to wait until the next spark, then subtract the precise dwell time.
I'm currently going with the 1.75ms determined from the contact breaker's 105 degree dwell at 10k rpm but I suspect this will turn out to be too short for those ignition coils.

You'd probably need at least two delays commands per spark. One that starts when the first trigger is sensed to wait until dwell starts and another delay for the duration of the dwell.
I suspect the reason the advance curve levels out at 5K RPMs is because the technology didnt exist at the time to trigger something that fast. (were there any engines that ran past 10K in the 70s/80s via electronic advance? Im not sure). Also, much past 5K rpms there probably wasnt enough dwell time with increasing advance. Added to that, there is probably a point of diminishing returns on a torque/HP graph.
There's a lot to read when it comes to tuning ignition advance. I'm just reading what I can and figuring it out. There's lots of physics behind flame front, time to burn, air-fuel ratios, knock, detonation, etc.
It seems to be pretty common for maximum advance to happen between 3000-5000 rpm.
Well funded race teams will test engines with in-cylinder pressure sensors to determine exactly how long it takes for maximum pressure to occur in a cylinder for every RPM range and tune ignition advance so that peak pressure coincides with the crank angle that gives maximum torque.
It's crazy how expensive that gear is. Well out of our reach.

The calculator is useless without more specs on our coils but there's some good info here:
http://www.useasydocs.com/theory/setdwell.htm
Dan explains points and timing pretty well here:
http://www.dansmc.com/bat_coil_ign.htm
Lots of other great info on Dan's page.

There's a pretty good chance mine will never get permanently installed. It's fun to tinker with for now.
Seems like my parts shipments have gotten lost over the ocean. Ordering direct from china has its downsides....

Random thoughts:
I noticed some aftermarket ignitions have a kickstart assist programmed in so I adjusted mine to match.
The usual 10 degree ignition advance is brought down to 0 degrees for very low RPMs. Prevents kickback on the kicker.
Not really a problem on our small-cc bikes, and not a problem on your kick-free DOHC machine at all. :)

Almost all electronic ignitions ensure the coils are unpowered when the bike is not running to prevent burning out the coils. Maybe a no-brainer but worth mentioning.

One thing I haven't coded yet is a rev limiter. Might be a good idea and shouldn't be too complicated.
 
Some links that helped me out:

I thought this guy's project was pretty awesome, especially the final product:
http://thebitwiserebellion.com/blog/2013/05/30/diy-electronic-ignition-conversion/
http://thebitwiserebellion.com/blog/2014/10/07/diy-electronic-ignition-cb77-take-two/
You'll notice he mentions the pamco ignition. He used the same IGBT ignition coil drivers, the GB14C40L. I've seen it mentioned on a few other diy ignition projects and it looks like a pretty good option.

Not arduino but informative:
http://www.sportdevices.com/ignition/ignition.htm

The information is scattered all over the blog but this guy made an arduino electronic ignition AND messed around with in-cylinder pressure sensors:
http://scottsnowden.co.uk/category/arduino-ecu/
http://scottsnowden.co.uk/in-cylinder-pressure/

This one shows a pretty simple arduino implementation with rpm calculation, an interrupt, and the delay command:
http://blog.nsfabrication.com/2009/06/20/arduino-based-small-engine-ignition-controller/

If you thought my code was complicated:
https://andersstenhammar.com/2016/02/15/working-on-an-diy-ignition-system/
I didn't bother trying to understand his code step-by-step...

Some more good, basic information:
http://christian.liljedahl.dk/guides/arduino-spark-plug
 
Yes. More info the better.

Interesting theory on the optical sensor. Ill be curious to see how it works! I too was thinking there was more chance for dirt, oil, ect, but it would be very easy to reprogram for hall effect sensor to be used.

Was doing some experimenting with some coding with a more experienced Arduino-er/programmer and he also suggested interrupts, and showed me why delays suck. Wont be using that.

Now the whole dwell thing makes sense. Comparing the coil charging to a cup of water. When you initially send power to the coil, it begins charging, or "filling its cup". When its at peak dwell (105 degrees or 1.75 ms for the SOHC) the "cup is full". then the power is taken away and it collapses, which forces the "cup" to tip over, which sends a spark to the spark plug.

So, that would require a different approach on the physical construction end. If I position my hall sensor at 40 degrees BTDC (the max advance on DOHC, and I actually think it might be 39. Ill have to double check), the Arduino will know when to begin fire, but not when to start charging.

Im planning on using a constant dwell time, (though I dont know how to seperate that from degrees... yet) not exactly sure yet but lets say 4 milliseconds for now. (that is a completely arbitrary number). My math is saying that 4 milliseconds at 10k RPMs is 240 degrees of rotation. If I have my sensors mounted at 40 degrees, that would mean it begins charging at 40 degrees BTDC, but doesn't actually fire until way after optimal position (exactly 200 degrees after, which I think would mean the piston is travelling upwards - detonation). I think your idea of having it mounted at exact TDC is a good call. I will have to look into/do some math about how that would work.

The problem with that is it would have to wait
Then we subtract the advance from 360 degrees to determine how many degrees after the triggering TDC to wait until the next spark, then subtract the precise dwell time.
.

This seems reasonable, except under hard acceleration, when the RPM values will change quite fast. At 3700 RPMs, if it receives a signal at TDC, waits (360 minus 30 degrees advance, minus 30 degrees supposed dwell time) 300 degrees or 13.5 milliseconds. What if the engine is accelerating fast enough that the Arduino reads say, 3700 RPMs, but by the time it has rotated 300 degrees and begun to charge the coil, the engine is actually spinning at 4300 RPMs and now requires full 40 degrees of advance. If the program reads the RPM every 50ms though, and can change the degrees of advance midway through the time between TDC and beginning of dwell, then that would work. However, I could just be wayyyy over thinking that all. Most times the engine doesn't even accelerate/change that quickly anyway.

A problem with using Hall effect sensors is that during the whole duration of the magnet, the sensor is tripped. I have ordered a phat stack of magnets from K&J magnetics to test with, but unfortunatly they arent here yet and wont be untill Im back from my trip. The magnet will trip the sensor for several degrees, depending on the exact size of the magnet. Obviously a larger magnet will engage the sensor for longer. You addressed this with using an optical sensor.

I found his page a few weeks ago, and bookmarked it. It is so helpful! Ill be modeling my coil/plug wiring from that.

Agreed, rev limiter should be easy to program in post finishing project.

Also, I had thought about having zero advance (so, spark firing at exactly TDC) at 100-300 RPMs (this is roughly cranking speed) to assist in starting. Seems like a neat idea, although my DOHC never really had trouble firing up according to stock ignition curves with the TCI.

My goal is to permanently mount this. Im excited for it! Unfortunately, I am leaving for a vacation soon. I wont have access to much, though I may bring the arduino/breadboard/sensors. We'll see.
 
Last edited:
Im
planning on using a constant dwell time, (though I dont know how to seperate that from degrees... yet) not exactly sure yet but lets say 4 milliseconds for now. (that is a completely arbitrary number). My math is saying that 4 milliseconds at 10k RPMs is 240 degrees of rotation. If I have my sensors mounted at 40 degrees, that would mean it begins charging at 40 degrees BTDC, but doesn't actually fire until way after optimal position (exactly 200 degrees after, which I think would mean the piston is travelling upwards - detonation). I think your idea of having it mounted at exact TDC is a good call. I will have to look into/do some math about how that would work.
Yeah, without better specs on the stock coils it could be difficult to determine the proper dwell time. Could be figured out with experimentation.
I forgot a link but I have one somewhere that talks about determining proper dwell time with an oscilloscope.
The problem with that is it would have to wait .
This seems reasonable, except under hard acceleration, when the RPM values will change quite fast. At 3700 RPMs, if it receives a signal at TDC, waits (360 minus 30 degrees advance, minus 30 degrees supposed dwell time) 300 degrees or 13.5 milliseconds. What if the engine is accelerating fast enough that the Arduino reads say, 3700 RPMs, but by the time it has rotated 300 degrees and begun to charge the coil, the engine is actually spinning at 4300 RPMs and now requires full 40 degrees of advance. If the program reads the RPM every 50ms though, and can change the degrees of advance midway through the time between TDC and beginning of dwell, then that would work. However, I could just be wayyyy over thinking that all. Most times the engine doesn't even accelerate/change that quickly anyway.
It occurred to me. I don't have the math but it's probably physically impossible for the engine to accelerate enough after tdc to make a difference to ignition.
Also, I believe the stock TCI probably can't respond to rpm changes that quickly.
I think it'd be a non-issue.

A problem with using Hall effect sensors is that during the whole duration of the magnet, the sensor is tripped. I have ordered a phat stack of magnets from K&J magnetics to test with, but unfortunatly they arent here yet and wont be untill Im back from my trip. The magnet will trip the sensor for several degrees, depending on the exact size of the magnet. Obviously a larger magnet will engage the sensor for longer. You addressed this with using an optical sensor.
The optical sensor has the same issue to a certain degree. The slots cause a signal for the entire time they allow light to fall on the photodiode, but they have the same solution too. Arduino interrupts can be made to trigger at the rising or falling edge of the signal. It can be made to trigger when the hall sensor first senses the magnet, rather than for the entire time.

There are also timer interrupts. They look more complicated than what I've done so far but are potentially more accurate for precision timing.
My goal is to permanently mount this. Im excited for it! Unfortunately, I am leaving for a vacation soon. I wont have access to much, though I may bring the arduino/breadboard/sensors. We'll see.
Awesome. Make sure you enjoy the vacation.
 
No reason to stick to stock coils, I suppose. Could buy a new pair of coils that you know all the info for (dwell time, ect). Ill use stock coils for the time being and probably guess on dwell time (at 4 ms) for now, unless I find some better info.

Ill be driving with some people, so there is some testing/programming testing I can do while we drive. This is some amaaaazing food for thought though.

Im a graphic design student, and Im familiar with motion graphics. I want to try to make a motion graphic explaing exactly what Im doing. May be useless but I got a few hours in the car to kill ;) Cant wait to do some testing!
 
Last edited:
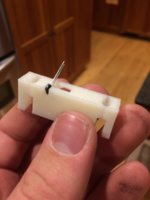
Made a little progress today! I used a site called TinkerCAD to make a mount. Its very beta, and its pretty ugly, but its a working model. My friend has a 3D printer so i printed a small mount. Its close, but not quite. Ill modify it a little bit and have him reprint, hopefully to have the sensor mounted by tomorrow! (The little black thing is the hall effect sensor Im using - its quite small)

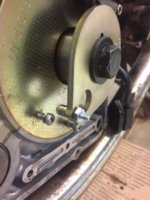
The other picture is my magnet mounted to the flywheel/crank. It is diametrically magnetized. The hall effect sensor reads the South pole of a magnet. Really hoping this is going to work!
 

Attachments

  • IMG_1984.JPG
    IMG_1984.JPG
    88.2 KB · Views: 505
  • IMG_1983.JPG
    IMG_1983.JPG
    149.6 KB · Views: 540
NOTICEABLE PROGRESS! I had to 3D print a version two of that mount, but it works! See the video in action - look for the small green light. It corresponds to TDC. Still haven't gotten the second cylinder set up yet, and unfortunately, I have to go back to school tomorrow. I will be removing that whole assembly (timing plate/sensor mounts) and creating a more refined, permanent version while I have access to better tools at school.

The code is written so the light triggers at perfect TDC. Im hoping with that setup, it will at least idle. If you watch carefully, you can see the light miss one revolution - it was an issue of adjusting the magnet. Its fixed now.
Do you think the bike will just idle with 0 degrees of advance, even though the service manual calls for 10 degrees? I cant wait to test it!!
 
Last edited:
Not sure if i will idle, but should run poorly at least. I've had cars running that were more than 10 degrees off optimal timing
 
Looks cool. Did it miss the fourth rotation?
I see 3 flashes, a pause, and then one more.

Finally got an a photointerrupter and slotted disk in the mail. Need to rig up a test setup and then I can test some of the code at least.
 
The hall effect sensor only is triggered by the South pole side of a magnet - so I had to adjust it a little bit.

However, I did some more research on hall effect sensors, and it turns out there is such thing as an "omnipolar" hall effect. These are sensitive to both South and North poles of magnets. I ordered some of those - I want as little problems as I can! Also, they were only $2.50 each ;) In this research, I also found the optimal/manufacture recommended way to mount them, so Im going to be recreating my mount a little bit to compensate.

Excited to see what you come up with!
 
Got the photointerrupter and optical disk working.
Made a smaller sketch with just the RPM calculating part from my code above... and it didn't work at all. After some tweaking it seems to be good though.

Need to get the testing motor running at a lower rpm. It's just an electric RC motor but it's doing around 12,000 rpm.
Once the IGBT coil drivers arrive I'll make a desktop test rig to fire ignition coils according to the optical feedback.
With that and my oscilloscope I should be able to determine the optimal dwell time for the SJ's 3 ohm ignition coils.
 
Back
Top