Carb Adjustment

Thanks xschris, I'll probably have to order the kit from Mikesxs and either add to it or take out as needed once it arrives. Trying to avoid it if at all possible.

Thanks for indulging my ignorance drewpy, and for the tip on the cam covers. So if I have sluggish operation at idle off chock (usually with an engine cut out after a minute or so) and on choke the engine runs away to about 4000, I would assume the carbs need to be cleaned (at least) and adjusted. Except I have pretty heaving carbon on the spark plugs (Lord knows how long ago they were put it), which would point to too rich of a mixture while everything points to too lean a mixture. I'm trying to get the bike on the road (reliably) as cheaply as possible, should I just bite the bullet and get the rebuild kits?

You probably wont need a full "kit" to rebuild your carbs. 95% of the work is usually just cleaning existing parts. Don't buy 650 carb boots.

Your plugs are probably carbonized because it's only been run on choke. If your carbs are dirty, you and the previous owner have probably been choking the hell out of it for long periods of time; this will foul your plugs. Full choke will easily hit 4k rpms; this is what my bike does.

Ignore everything else until you clean the carbs very thoroughly. You can't do any other trouble-shooting until you know things are not blocked. I usually brush the carbon off the plugs when trouble-shooting; they work fine when clean. Buy a new set once you're all done and ready to roll.
 
Okay tore the carbs down this evening and will be getting replacement rubber parts either monday or tuesday (my connection wasn't sure when he would have them:wink2:)

Now, I know I'm gonna get pounced on here when I say this, but...they looked pretty clean inside. Which is to say I could not find any clogging/obstructions in and of the holes, nor was there any varnish built up. even the rubber pieces looked good, as was the float bowl gasket (came off in one piece, no tearing). However, like a total newb, I forgot to measure the floatbowl height before I took them off, but the pilot screws were out 4 on the left ("driver's side") and 3 1/2 on the right ("passenger's side").

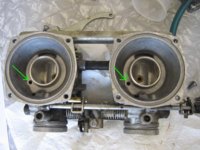
There was one other thing that bothered me. Inside the carb, underneath where the diaphragm sits, at about two o'clock position (looking straight down onto the carbs, with the engine side being 12 o'clock) there is something in there. I didn't try and pull it out since it's on BOTh carbs. It almost looks like scrap of metal like from a drill shaving, or a hardened insect body. I tried posting a pic, but my computer is thinking about going on strike right now. Any thoughts?

After I get back from a weekend with the GF, I'm gonna hit everything with tons of carb cleaner and compressed air and see what the new pieces look like.

Hopefully, my new carb mounts come in before I get finished with this.

Let you guys know how it goes.
 
Even if things appear clean pull out all the jets and the emulsion tube. Make sure the pilot jets and the emulsion tube are totally clean; they have lateral holes drilled in them. Blast the passages with compressed air for giggles.

Nothing comes to mind when you describe the strange thing in your carbs. Do you mean inside the venturi? If whatever-it-is is on both carbs in exactly the same place it probably belongs there :) Still, get the pics! Also, open the carbs up again and measure the float height :p it is important.
 
so i pirated this picture off another forum, because it shows exactly what i was trying to illustrate in my last post. The arrows point to the holes that have the metal flake/insect whatever it is. I'm thinking it could be paint chips? this guy had a similar problem and claimed it was sediment or paint from his tank. he also suggested an inline fuel filter and a petcock rebuild.

If sediment or paint or rust or whatever else was in the tank, could it have found it's way into these holes?


Posted via Mobile
 

Attachments

  • 432dtlw.jpg
    432dtlw.jpg
    52.3 KB · Views: 1,070
Last edited:
It WAS a bug corpse in one of the holes. Go figure. I don't know what was in the second hole, whatever it was broke apart in the tweezers when I pulled it out.

So the carbs are all broken down now with two exceptions. The fuel line connecting the two carbs and the butterfly valve assemblies with the throttle cable attachment and throttle stop screw. All of those pieces are still on the carb. I tried twisting the carbs apart to get that fuel line to separate without luck and stopped cause I was afraid to damage something that's not easily replaced. Is that just a standard piece of fuel line? How can I get it off if I have to?

Really my question is, can I soak the carbs still attached together with those pieces attached or do they all have to come off?
 
So the bike is back together and ready to start up, minus one part still waiting on from Boats.net, at least they upgraded the shipping to two day for my inconvenience.

Here's what I've done:

- Tore down and totally cleaned the carbs, replacing only the pilot screw o-rings, they were pretty flattened and the throttle plate screws. Soaked the bodies and pieces for a day in carb cleaner and put nylon line through every jet hole I could find. Did Carb cleaner, compressed air, carb cleaner, compressed air and hit every inside and outside surface I could find. Checked diaphragms up to the light and they looked go (no cracks or worn spots I could see. Reassembled everything back to where it's supposed to go (fingers crossed) and set the float heights to .905 inches (57/64 or 23mm, no metric ruler) from gasket mating surface.

- Replaced carb holders as the old ones were cracked, as well as all the fuel lines and vac line.

- Set pilot screws to 3 turns out.

- Took apart and cleaned the petcock, did not replace any parts (fingers crossed).

- Adjusted the valves to mid range of specs provided in haynes (.004" on intakes and .007" I believe on exhaust).

- Put gas in the tank and watched it go through the new transparent gas line to the carbs, so far no leakes.

Just waiting on the a fore mentioned part (view plug cap for the cylinder head, supposed to be here Friday) to arrive before I fire it up and see if all my hard work pays off.

Please, please...Anything I'm missing or got wrong that you see, please let me know you won't hurt my feelings, I just want to make sure this is done right.

Thanks guys.:bike:
 
Thanks HoughMade, I needed that encouragement! I can't wait to hear how it runs either.

Drewpy:

Yes. Yes. No, I replaced the rejet flange with a fluberschurber. But I did top off the blinker fluid :thumbsup:
 
I have never had a bike that I've suffered through carb issues as I have on this bike. I have open pipes, NO filters(I know, I'm asking for more problems), 24mm float height, 50 pilot, 160 main, at 3.5 turns out. My issue seems to be fuel starvation at either carb. At times it runs pretty well. Others, one carb seems fuel starved. Sometimes right, sometimes left. Anyone try a Keihin P series or Mikuni VM on these things? I'm tired of CV carbs! ARGH!!!

Lastly, the forks. I've stuffed the longest spacer I can muscle in, stock oil height, and I'm still running too much sag. I dread the wrestle with that clip and stopper thing!

floats = 26mm

fill fork oil to 6cm from the top, the air will cause a buffer effect
 
Success!!!:D

Got the cap in today, went out to the garage, put it on and kicked it over. Started up right away on the first kick. Little high idle that I adjusted with the center screw to around 1300rpm (give or take). Same temp and pressure out of both pipes and had no probably revving. Took it out onto the short street we live on and had no problems at least in the first three gears, didn't get much about 25mph. There's a popping and backfire noise coming from the front of the engine when you rev it on the stand, but I think that's just from the lack of flanges on the pipes under the collars, an probably needs new exhaust seals. That's one of the next items on the list, right behind new tires, chain and sprockets. Just need to figure out how to get the collars off, the inner exhaust stud bolts seem to be splayed down and towards center line, making it difficult to get the collars off without damaging the threads.

But one thing at a time, and I'll take this little victory for now. Thanks for all the help guys.:thumbsup:
 
Hi I'm new here anybody know the exact position of the throttle cable I'm new to bikes so I have no idea BTW I have a 81 xs400 specialII
 
Sorry I meant at what adjustment the throttle cable should be in with the Carb idle screw to idle right I. Know where the throttle cable is. My bike is idling at 4000 rpm a
 
Back
Top