Hello from Vancouver Island! Newbie with an XS360C

At first I was going to say it is a good idea to lightly hone the cylinders. But if the hatching pattern is still visible and there is no lip at the top, there may be no need to do so. Other engine builders will also have something to say.
On my my 15hp Yanmar 2 cylinder diesel engine, a set of rings was way too much money. I bought a set for a Volkswagen 4 cylinder engine, for a fraction of the cost.
Others may know of places to buy new rings at less money than Yamaha.

I am riding my 400 often. Still have a WOT issue at 8150 revs, but the bike is quite serviceable and nice to ride.

Unkle Crusty*
 
I can feel the lip at the top but only barely. Same for the bottom. Apparently if the cylinder is overly worn the rings will catch on the bottom lip but I had no problem lifting the jugs up off the pistons.

Ring end-gap is way over-spec at around .65mm on both top and bottom rings. Haven't taken out the oil ring.
I don't have the proper measuring tools to check the exact cylinder dimensions for wear or ovality so I'm not 100% sure whether it's the rings worn down, the cylinders worn down, or both.

New standard rings are rare but available. Someone recently linked to a german store with a set for 99 euros or about 140 CAD.
Cheaper than buying two sets of oversize pistons, rings, and honing to .25 over, but still expensive. Especially if it doesn't fix the problem.

My last compression test with the engine slightly warm was 130psi per cylinder. Not 150 but not too bad all things considered.
With the cost of doing anything to the cylinders and the compression not too bad (?) I think I'll just put it back together with the old rings.

I'll lap the valves and put new valve seals in, new gaskets for everything, but the search for why the right cylinder isn't running well continues.
 
I believe if you check ebay there is a guy from BC selling standard size rings for $50?

Though if your cylinder is worn they're no good to you since you'd need some oversize pistons and rebore.
 
I see the xs400 set but no xs360 set.
It would be cheaper to use xs400 pistons and rings but I'm not sure how the engine would handle a 66 to 69mm rebore. :)
 
Not much really. Other than looking different outside its essentially just the 66mm bore on the 360 vs 69 on the 400 and a different cam shaft.
I think I saw someone compare the crankshaft counterweights and one of them was noticeably bigger.
 
Small update. Was inspired by Gekko on xs400.net: http://www.fotoalbum.xs400.net/v/user/gekko/Auspuff/
IMG_20150917_183520.jpg

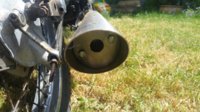
There was some minor warping during welding but the guts slide snugly inside the 3" pipe. The whole thing will bolt onto the stock muffler mounts
The second pipe will be assembled soon and mounting hardware will be added to both.
The guts can be removed at any time for cleaning or adjustments.
The rearmost plate bolts on and can be swapped out for tuning. I have a few blanks and will drill different numbers/sizes of holes as required.

They're hefty at around 5lbs each but will hopefully be quieter than the rusty aftermarket pipes that came with the bike.
Total cost will be around $250.
My wife donated her time cutting the tubes.
The welder is being paid with liquor.
The stainless pipes and sheet metal cost around $70.
The waterjet service was the most expensive bit at $160. Might try laser or plasma cutting next time.

A completely uneconomical project but going from my CAD drawings to reality has been quite the experience.
This bike will be shared between my wife and myself. If all goes well I might look into a designing a custom 2-1 setup.
 
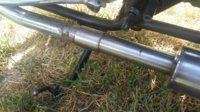
Not a whole lot to update here. New pipes are on:
20160515_184456.jpg

She usually starts on the first kick (without choke) but dies after a few minutes idling. I think it might be fuel starvation due to a minor petcock modification I did a while ago. Will be tweaking that soon.
She won't start with choke on and will usually die right away when it's applied.
Is this normal for warm weather?

20160513_125250.jpg
Sliced pieces of the 1.5" OD pipe used on the mufflers down the length so I could use them as clamps between the headers and new mufflers. Wrapped the actual joint with strips of pop can aluminum and high temp RTV before sliding the split pipe over the joint.
The spit pipe hides the RTV and works pretty well so far. :)

Getting some popping out of the exhaust. Seems to be running a bit lean.
Intake is stock so it shouldn't be too far off though.
The final exhaust port on the mufflers is interchangeable so I might try a plate with a smaller area hole to help with the lean running.
20160513_125234.jpg


20160507_141855.jpg
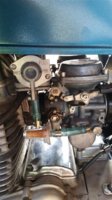
Disassembled and cleaned up the petcock.
Replaced fasteners with stainless hardware on the petcock and a couple on the carbs that didn't come with the kit.
Fitted right angle fuel filter.
I know the sintered ones aren't really considered the best but I had my mind set on a right angle filter. Went with the 40-70 micron one offered by JetsRUs: https://www.jetsrus.com/parts/fuel_filters.html
 
Really interested to see if cleaning the peacock and new filter fix the stalling after idling for a few mins as I have the same symptom and have recently fitted a straight off and on one. This was necessary after the vacuum seals on the original failed and fuel found its way all the way into the sump.
I thought it may have been related to the aging battery so replaced it and the plugs, but it still happens. Checked the carbs but they are fine, but I now feel sure it must be fuel starvation and the replacement petcock (made in China) is prime suspect.
 
Back
Top