Kong Style Chopper build

Herd

XS400 Enthusiast
Messages
35
Reaction score
2
Points
8
Location
Venango, PA
Hey, all! I picked this bike up in March of this year and have been working on converting it into a Kong Style chopper. There was a gentlemen named Kong in the CB750 chopper community who built some really cool looking bikes, and this bike is inspired by some of those builds. I picked the bike up for $400 and am hoping to complete the build for under $1000.
 

Attachments

  • IMG_0138.JPG
    IMG_0138.JPG
    47.2 KB · Views: 463
  • IMG_0139.JPG
    IMG_0139.JPG
    69.3 KB · Views: 495
The motor has 150psi in both cylinders! Carbs were filthy and the wiring/electrical components were literally stuffed under the seat. After cleaning the carbs, I attempted to get her running as is, but the carbs were overflowing and dumping gas down the jugs... I ordered some replacement carb parts, drained the oil and started stripping the bike.
 
Messing around with spare tanks and bars. Cut the seat rails, reversed, and lowered them about 2". I also narrowed the seat rails under the tank. Cut out about .5" of the gusset on either side of the main tube under the tank. Used some threaded rod to compress the rails together, so the gusset could be welded back together. This allowed the use of some other tank options. Probably could have chopped another .5" out of that gusset.
 

Attachments

  • IMG_0210.jpg
    IMG_0210.jpg
    296.7 KB · Views: 563
  • IMG_0223.jpg
    IMG_0223.jpg
    245.6 KB · Views: 537
  • IMG_0221.jpg
    IMG_0221.jpg
    240.8 KB · Views: 519
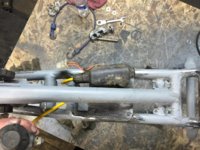
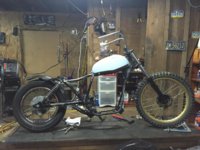
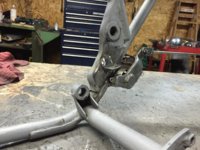
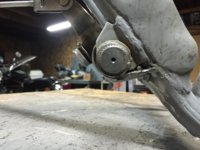
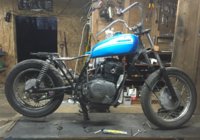
Swingarm was extended 4"

The process wasn't difficult. I used a simple pipe/tubing cutter to get a square cut, bought a foot of 1 1/4" tubing from a local welding shop, made some slugs out of an old set of handlebars. I placed the front section of the swingarm in a vice and welded up the extensions. I then put the swingarm back on the bike to tack up the other half to the extensions. It was a pretty simple operation and I was able to keep everything lined up by using the bike.

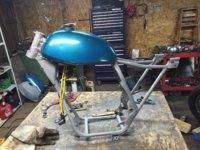
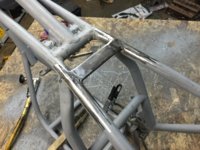
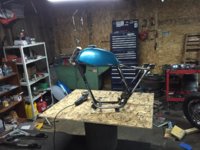
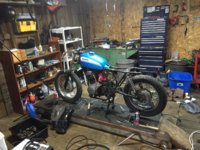
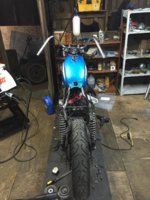
De-tabbed the frame and removed the center stand.

I got a 21" tire from a YZ125. Had to purchase a drum brake for it and some axel spacers. Have yet to install those. Fingers crossed that those all fit the XS400 front end.

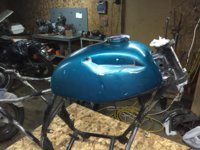
The tank is from an old Honda CL. It has a big old dent that will need some work before cleaning, lining with redcoat, and then molding & paint. Overall, the metal is in pretty good shape and it fits. Also, there is plenty of room to hide the coils under the tank. Made some new coil mounts.

I narrowed some old XS650 handlebars for some retro flavored pullbacks.
 

Attachments

  • IMG_0333.jpg
    IMG_0333.jpg
    287.6 KB · Views: 468
  • IMG_0322.jpg
    IMG_0322.jpg
    261.5 KB · Views: 453
  • IMG_0317.jpg
    IMG_0317.jpg
    242.7 KB · Views: 503
  • IMG_0248.jpg
    IMG_0248.jpg
    241.8 KB · Views: 471
  • IMG_0246.jpg
    IMG_0246.jpg
    264.2 KB · Views: 474
  • IMG_0245.jpg
    IMG_0245.jpg
    247.8 KB · Views: 510
Cleaned up the rear brake. Relocated the adjuster screw to the inside of the frame.
 

Attachments

  • IMG_0312.jpg
    IMG_0312.jpg
    212.3 KB · Views: 433
  • IMG_0313.jpg
    IMG_0313.jpg
    247.5 KB · Views: 417
  • IMG_0315.jpg
    IMG_0315.jpg
    191.9 KB · Views: 424
It was beautiful yesterday, so got a to wrench outdoors. Always a plus. Grabbed some paint from tractor supply. Was thinking of green and purple for the frame and tank, respectively. Messed around with what I picked up, but wasn't really feeling it. Honestly, the teal on the CL tank feels pretty good. Maybe teal and silver? Those feel like yamaha colors, more so than purple and green.

Also, I have a Unity police car spotlight. If you take the chrome off those things, there is some pretty sweet brass underneath! Still need to sort the light out. Had to find an aftermarket bulb and now there are some fitment issues, big surprise...

09e07b8c718ad362c7a2a21a9319d1cd.jpg


8926b5ce3ea5a5955f8965db6993f0aa.jpg


4b072698a5fc8c149882ca4e0ffe2b9e.jpg
 
Started making forward controls yesterday. Fabbed up some plates to attach to the front lower motor mounts. If I guestimated correct, the pipes should fit between the frame, with the new controls just up front of them. Still working on the design. Not sure if I want to brace the brackets I made with a tube or not. I have some brass that I am using for the new foot pegs that I got from the local recycling center. It looks like it used to be a section of a lamp! haha
I'm super stoked to see how it plays out. I want to use an old farm tool that kind of looks it was used to cut down plant stalks. I will get some photos up soon.
 
Little worried about the ride height. I bottomed out bringing the bike back into the barn where I am building, and that was without the pipes installed. The 4" stretch may have been a little too much. If I had to chop it again, I probably would have only done a 2" extension. I may relocate the bottom shock mount on the swing arm forward an 1" to compensate. In theory, it should bring up the frame for a little more clearance.
 
So... my friends seem to think that this would be a good idea. WTF. I wouldn't have even considered it, but its so weird, it kind of works. I think I am going to pass on that one, but it sure is interesting.

db18a91b65b25509eb42e284b0170916.jpg


PS: you can see the bracket/plates I started fabbing for the forwards mounted to the front lower motor mounts. Speaking of motor mounts, they sure aren't very substantial on these things, are they?
 
Got a great deal on an old solo seat ($15, hell yeah!)
Not sure about using it on this build, probably save it for later. I need a spot for the electronics (what a mess they are...), and am planning on fabbing up a box that could be concealed and accessed thru a seat that I have yet to make. Not enough hours in the day.

0dd8510872f4d4bb5ecf23fd2ed0053a.jpg
 
thanks, guys!
trying to knock it out, cause riding season is here.

Has anybody put forwards on one of these? just measured, and it looks like I need to put at least a 5" spacer between my bracket and my foot clutch. seems like a lot. that would be about 9-10" extended past frame, lower motor mount.
 
Hey there, nice project. Wanted to give you a heads up on the swingarm stuff. I believe you should take out the two inches from your stretch instead of moving the lower mounts forward. Seems that engineers want to keep forces that load suspensions as close to the axels as possible. Moving the lower shock mounts may compromise the swingarm and create a stress point.

I know it's a pain in the ass but probably the best route. You've got the skills obviously. Hope it comes out great for you regardless.
 
Back
Top