Painting

domdom

XS400 Enthusiast
Messages
92
Reaction score
0
Points
6
Location
Omaha
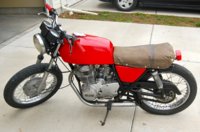
Hey guys (second thread of the day, I know). I've just completed fabricating a seat out of Fiberglass and am in the process of sanding it down right now. I'm going to paint it pretty soon. What would you do and how would you do it?
Here's the things I'm gonna need painted.
-2 Side covers
-Tank
-Seat
-Helmet

I called a couple of auto body places and they quoted me around $700-800. Forget it.

Thanks for the help

Dom
 

Attachments

  • DSC_3016.jpg
    DSC_3016.jpg
    317.2 KB · Views: 361
if you can fab a seat outa fiberglass...you should be able to shoot paint from a gun.
Harbor freight has cheapy guns...and base/clear isnt all that bad to learn...probably cost ya $100 or so for what you need...g to a reputable supply shop they can hook you up.
 
I did paint a bike with those hobby spray guns, for air i used a refigerator motor with a few drops of oil in to stop it burning out.
use an old air cannister as the storage. if the pressure gets too high the tubes just jump off!
 
I did the whole thing with cans of paint purchased from an auto paint store. Just make sure it's auto paint. For what you want to do, 2-3 cans of colour, 2 cans of primer, and 2 cans of clear should more than do it. Cleanup is easier without the gear, and unless you're planning on doing more bikes later, it's probably cheaper to do it with cans.
 
So I buckled down and got an air compressor (which I've wanted for a little while now) and a paint gun. I'm pretty stoked. The seat's not completely ready for the painting yet. I still have to sand the last bondo layer down to the texture I want and make sure there are no more low spots (man, this is getting old). Then I think I can start. I have two rattle cans of primer from earlier, but now that I have the spray gun what primer, paint, and clear coat should I use and from where?

Here's the compressor (didn't pay as much as quoted :))
http://www.harborfreight.com/2-hp-8-gallon-125-psi-portable-air-compressor-67501.html

Here's the gun:
http://www.harborfreight.com/20-oz-high-volume-low-pressure-gravity-feed-spray-gun-47016.html


Hose:
http://www.harborfreight.com/1-4-quarter-inch-x-25-ft-self-coiling-air-hose-47.html
 
yeah the coil hose can be a pain...but for a one time use,it'll do.

You want a 2k high build primer...go to a autobody supply store...for what you are doing...get a qt of high build 2k urethane primer and hardner.....if you are down to bare metal...use an etching primer first.
The high build you will want a few good coats..using the spray gun for the primer will give you a feel for how it sprays..and if you get runs in the primer...you'll be sanding it out anyhow....and then let it dry for a day or so.
Then wet sand it with 400 grit....until its nice and smooth...not orange peeled.
use an ammonia free glass cleaner...wipe everything down before you spray the top coat.
If you want the flat black look...go with a single stage paint mixed at the autobody supply...a qt should do you fine...and get the recommended reducer and hardner...they'll show ya how to mix it...pretty straight forward.
Mix only as much as you plan to use...once its mixed it will harden and cant be stored


so :
2k urethane high build primer
etching primer..for bare metal
1 qt flat black single stage
reducer
hardner
tack cloth
paint strainers
paint stick
water filter for the air hose
respirator
lacquer thinner...to clean out the gun after

do a test pattern with the spray gun...should get an oblong football shape....if its an HVLP gun you want about 25-30 psi at the gun...so a regulator at the gun/hose connection is a good idea.

That compressor is small for the task at hand...so its gonna run non stop when you spray...you are doing small pieces so that should be ok...but dont bleed the tank volume down with excessive spraying....let it stay relatively full...as in ..spray the tank..let it build back up...spray the panels...let it build..etc,..
my tank is 6.5 hp and 60 gallons...and its a little on the small side for larger projects...works ok for bikes etc,..

I use a roll of 3 mil plastic from home depot to make a spray booth in the garage..tarp of the walls with it...about 8'x8' and then hose the floor down to reduce dust...give plenty of room to move around the table...make sure you keep as much dust out as possible...mask the table if you have to etc,..
practice on a piece of scrap metal or paneling etc,.. to get the rhythm of the gun down.

make sure you clean the gun out with lacquer thinner as soon as you finish priming...several times until it comes out clear thru the nozzle....that way it doesnt screw up the color coat.

NOW...after having said all that.....IF flat black is what you want....rattle cans will work way easier...the only thing I dont like about rattle cans is...they are typically only 1k products and dont hold up well to gas and abuse...and flat paint jobs fade quicker..and are harder to keep clean... as in hand prints and oil smudges, chalking etc,...
if you are going the spray gun route...pick a cool color and go with it...if you want to get crazy ...go base coat clear coat...and it will be sweet and shiny
 
Last edited:
Skillz, you are the man. Thanks a lot. I'll keep you posted on how it goes and what I end up doing on it! Seriously, this is very helpful.

Dom
 
LISTEN TO SKILLZ. he knows his stuff. lol. ive only painted twice. primer and flat black with no clear. didnt turn out bad. but make sure you start apraying something that doesnt matter before you spray the important stuff. that way you can adjust and other such things. runs on your side covers look terrible. even worse on a tank.
 
This stuff is largely trial and error....I have no real formal training...just 4 yrs apprentice on the weekends in my uncles shop...on the job training I suppose...but my technique is different than what my uncle taught when it comes to the spraying...the fundamentals of prep and body work are the same....but the spraying is a matter of finding the best way to make it do what you want....there are 'gurus' out there who will scoff at the 'amatuer' setups etc,...but I take great pleasure in the fact that my uncles shop was a converted horse stall with a floor poured 5 bags of cement a week until finished...and the car show trophies that accumulated from that 'shack' put the $250k shops to shame...sooo....rock out with yer c**k out and shoot them tins!!!
 
just because the whole helmet thing got dropped. you have to use special paint on helmets. (thats only if it is not a fake helmet that you will die in anyway) the plastics and resens that the build the helmet with can have a advers reaction with paint and it will soften (dead again) or bubble and look like crap.
 
ok, so here's what I've got so far. Some pics of the progress on the bike as a whole. New clip on handlebars, fabbed and primed the seat, head lamp ears. I bead blasted the exhaust, trimmed off extra crap and accessories that don't need to be there, and here I am right now. I'm waiting on a carb kit, as well as a brake cable and I will get the new tires on this week. Skillz, check out my home made "paint shop", haha.

http://s1098.photobucket.com/albums/g364/domandsuz/Bike/
 
having fun yet!!??
one thing to keep in mind with the spray booth...a small one creates alot of air pressure inside the booth while spraying...which means the overspray will swirl around quite a bit...and any dust present will get stirred up quite a bit easier...what you have there is ok for primer...but a little bigger for finish coat will help you out.
Check the paint dept at home depot/lowes...they have large rolls of masking plastic...get something that will reach ceiling to floor....and that you can tape up for temporary.....run it in a 6' or 8' square and then you'll be set to go...and it will keep the overspray from getting all over the rest of the garage and bike etc,..

Whenever you sand your filler out...take a step back and look at it from a few angles and see if the dimensions are what you want...as in...is each side the same?...how do the lines run?...if you have straight/square edges...check them with a tape measure...99% of a good paint job is bodywork...and the details in the prep will show up huge in the shiny coat at the end....especially with a dark color.

Good progress so far...it gives me the 'bug' to go build something when I see guys doing stuff!!
 
check the paint finish in the sunshine too, its amazing how things change in different light.

I always slighly dampen the floor too, it prevents dust rising when you walk over the floor.
 
Back
Top