Suncoast400
XS400 Member
Hey xs400.com, first off I need to say thank you to this community for the invaluable stock of information shared on this site. This is my first post, but I have referenced this site countless times (even bookmarked you on my homescreen) since first getting my 1978 xs400 just over a year ago. I wish I had been more active rather than a "leech" per say, but life can get busy, you know how it goes. Anyway, thank you and here's an overdo introduction and a few pictures of my cafe racer project.
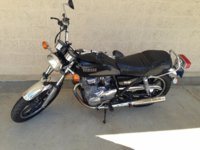
I paid $1800 for a 1978 Yamaha xs400 near San Francisco about 15 months ago, and while that may be high, Bay Area prices are inflated and these mid-cc bikes are being gobbled up by the hipster crowd. Also, this was an exceptionally clean bike, off the road for 20 years with 9,400 miles, it was kept as a decoration in a rich guy's bathroom. It was running when I got it but needed a lot of adjusting, replacing anything rubber which dried and cracked with age, etc, etc, ETC$$$ (haha) but I have had an awesome running bike that I have averaged over 1,000 miles a month! I ride the hell out of her, and had it through Napa Valley, the entire Blue Ridge Parkway, Tail of the Dragon, and even with a pack of big-inch dressers at 100mph on I-40 West. Doing the ton on an xs400 is no laughing matter as you guys know haha")
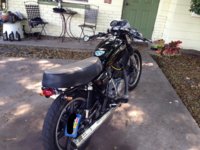
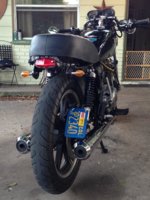
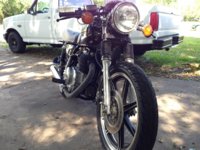
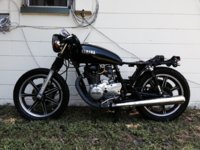
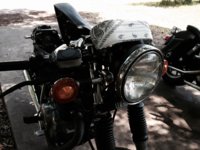
Because this bike was so pretty I was hesitant to make changes, but then I started noticing some cool looking naked cafes around town and I got the "itch." I got a larger headlight bucket from a scrapped Yamaha which accommodates a modern sealed beam H6024 available anywhere for cheap, but I got a Silverstar but considered one of the many LED options on eBay. The larger headlight gives it a unique bug-eyed look which is complimented by the clubman bars. When i pulled the fenders I got crafty and made a little bracket for a Dime City taillight and mounted smaller turn signals to the existing spots.
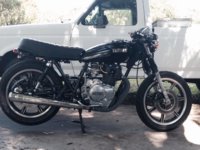
The seat I had reupholstered and trimmed down back when the bike was still mostly stock, and it looks great in that two-tone but I am starting to feel it just looks too big to fit this bike and I am at the point where I need to make a decision to cut the frame and maybe experiment with a brat style seat, or perhaps just keep it the way it is. The existing seat just kind of gives it a "junk in the trunk" kind of look.
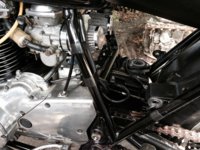
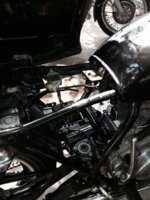
I used pod filters, rejetted up 2 sizes main, drilled some holes through the baffles and ended up with a small performance boost as well as a better sound. I wanted that hollowed out middle section look, so I got a small sealed-gel battery for $42 at Dime City which sits perfectly longways on the swing arm, secured by a few stainless zipties and painted black. So far it has worked excellent, sits lower than the top of the rear master cylinder cap, keeps great charge, and the best part is I still retain my electric starter - I mounted an aftermarket lawnmower starting solenoid which had a convenient bracket on it, upside down under the seat, attached by the fuel tank bolt, and just rerouted a longer primary cable.
One of the photos shows it as I purchased it, and one shows a profile with the seat removed where I was messing around in Photoshop by erasing some frame and superimposing some cafe and brat seats, haha.
So that's where I am at with it. A great running bike, and a pretty cool looking one at that, I get compliments and questions every single time I ride, it actually gets annoying if I'm in a rush, but who can complain? Again, thank you guys so much, I have used your information for so many aspects of maintenance to repairs, timing, ignition, everything. I know my bike back to front now and a lot of it is owed to your wisdom.
Let me know any comments or questions. I'd love to hear seat ideas!
Thanks,
Steven D.
I paid $1800 for a 1978 Yamaha xs400 near San Francisco about 15 months ago, and while that may be high, Bay Area prices are inflated and these mid-cc bikes are being gobbled up by the hipster crowd. Also, this was an exceptionally clean bike, off the road for 20 years with 9,400 miles, it was kept as a decoration in a rich guy's bathroom. It was running when I got it but needed a lot of adjusting, replacing anything rubber which dried and cracked with age, etc, etc, ETC$$$ (haha) but I have had an awesome running bike that I have averaged over 1,000 miles a month! I ride the hell out of her, and had it through Napa Valley, the entire Blue Ridge Parkway, Tail of the Dragon, and even with a pack of big-inch dressers at 100mph on I-40 West. Doing the ton on an xs400 is no laughing matter as you guys know haha
Because this bike was so pretty I was hesitant to make changes, but then I started noticing some cool looking naked cafes around town and I got the "itch." I got a larger headlight bucket from a scrapped Yamaha which accommodates a modern sealed beam H6024 available anywhere for cheap, but I got a Silverstar but considered one of the many LED options on eBay. The larger headlight gives it a unique bug-eyed look which is complimented by the clubman bars. When i pulled the fenders I got crafty and made a little bracket for a Dime City taillight and mounted smaller turn signals to the existing spots.
The seat I had reupholstered and trimmed down back when the bike was still mostly stock, and it looks great in that two-tone but I am starting to feel it just looks too big to fit this bike and I am at the point where I need to make a decision to cut the frame and maybe experiment with a brat style seat, or perhaps just keep it the way it is. The existing seat just kind of gives it a "junk in the trunk" kind of look.
I used pod filters, rejetted up 2 sizes main, drilled some holes through the baffles and ended up with a small performance boost as well as a better sound. I wanted that hollowed out middle section look, so I got a small sealed-gel battery for $42 at Dime City which sits perfectly longways on the swing arm, secured by a few stainless zipties and painted black. So far it has worked excellent, sits lower than the top of the rear master cylinder cap, keeps great charge, and the best part is I still retain my electric starter - I mounted an aftermarket lawnmower starting solenoid which had a convenient bracket on it, upside down under the seat, attached by the fuel tank bolt, and just rerouted a longer primary cable.
One of the photos shows it as I purchased it, and one shows a profile with the seat removed where I was messing around in Photoshop by erasing some frame and superimposing some cafe and brat seats, haha.
So that's where I am at with it. A great running bike, and a pretty cool looking one at that, I get compliments and questions every single time I ride, it actually gets annoying if I'm in a rush, but who can complain? Again, thank you guys so much, I have used your information for so many aspects of maintenance to repairs, timing, ignition, everything. I know my bike back to front now and a lot of it is owed to your wisdom.
Let me know any comments or questions. I'd love to hear seat ideas!
Thanks,
Steven D.