Disclaimer: Unless the DOT is alright with you putting a bulb in a reflector not made for that bulb, DIY style, do this at your own risk
So, just got my first bike, an XS400 Heritage Special (with a 360 engine in it, my luck, but it was free can't complain) and have been upgrading some things before it hits the road. One main objective: replace the dim-as-hell headlight. 25 watts? C'mon, that's nothing when it comes to country road safety.
So I go to take the headlight out, hoping for some easy peasy H4 or similar bulb to swap in a nice LED off Amazon. Nope, sealed beam. No problem, I'll just get a standard 7" LED drop in replacement. Googling leads to a heart sinking conclusion: this bike takes some odd 6.5"-ish sealed beam that you can't find in an LED variant, or in a reflector that accepts a separate bulb, unless you dish out some $200+ or find an older one used. I wasn't willing to replace it with another dim sealed beam either.
Google also helped me stumble upon this post for aftermarket headlights, and the first post by cutlass400 sparked an idea: https://www.xs400.com/threads/aftermarket-headlight.16885/
Let's put our own LED into the original sealed beam reflector, keep the classic look, and have modern bright and effective lighting!
Materials:
-Basic hand tools, like screwdrivers, pliers, etc. for prying and grabbing.
-Dremel, or other tool to cut through the reflector. Might not be needed for smaller bulbs, needed for the one I used.
-Flexible, thinn but strong metal wire. I used 99¢ "mechanics wire" from harbor freight. Thin picture hanging wire should do too.
Procedure:
Remove your sealed beam. If it's like mine, the back has all these little tabs that look like they are the only thing that holds the bulb in. hahaha... you wish...


Pry up all those tabs, and remove.the small washer (if you have it) like so.

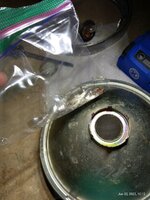
Now, you have to get the bulb out. Equip some thick gloves and a pair of pliers, this is the step where you will be breaking glass. My bulb was larger than the hole the terminals poke through, must have been installed before the lens was cemented on.
I gently started wiggling the bulb outwards, it was only held in with that tight rubber bushing thing as seen in the photo. I just kept wiggling and pulling until the glass broke.


Using a screwdriver, poke it into the reflector housing and onto any pieces of glass to large to fit back out the hole. Give it very gentle taps to break these pieces up without cracking the lens, and dispose of them properly. I then took the lens outside, took proper safety precautions, and used compressed air to blow out any tiny shards left behind.
Now this is where the procedure varies: What bulb are you going to use? I'd recommend getting something in an H4, because it will plug right in. Standard halogen? Silverstars? Small LEDs? These will fit right in the existing hole, and you just need to cut the "crown" (part with the flappy bits folded up) off of the reflector with your Dremel.
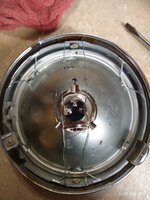
I however picked out this LED from Amazon, that has a blue halo built into the top. It also houses all of its heat dissipation (sink and fan) in the top of the bulb, to be inserted into the reflector. I liked this design because I wasn't sure if an external heatsink would fit in the XS400's bucket.
https://www.amazon.com/gp/aw/d/B07Z4QKB33?psc=1&ref=ppx_pop_mob_b_asin_title
It was mich larger, at 37mm, so I needed to cut some of the reflector off with the "crown" to accommodate it. Excuse my messy cutting, I'm not very good with a Dremel.


The smallest tab on the H4, most isolated from the other 2, should be pointing up. You may have to experiment with other bulbs. to find correct orientation. If you ride in the rain, or it's humid around you, and you're worried about condensation, now is the time to use some silicone sealant around the bulb.
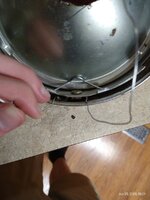
Temporarily tape this in place, and if it is not installed in the chrome ring, do so now for mounting. Once in, run a wire under-and-back around the adjustment hinge screw thread block, as show:

...and over the bulb, back around the other block:

Twist right, check firmness, and snip off excess. This took me 2 tries, I overtightened this one and snapped the wire. The next run, I used 2 pieces of wire, each wrapped around a screw at the halfway point, and 2 sets of twists. I also left the tape on because it was holding on well and provided extra insurance.

Feel free to run wires in other patterns with other parts of the outer ring, whatever mounts it securely for you.
Done! I cannot stress this enough, check your beams. Make sure light is concentrated In a tight, wide line with a little spread on the bottom, and the high beam raised the beam correctly. Don't need to blind others or not have good quality light ourselves! A standard H4 or H4 LED seems to be at the right height when it's metal baseplate is flush with the back of the reflector. I got a very bright, wide beam that lights up the road well, side to side.
Enjoy your budget, but well functioning, original lens retrofit without dropping the dough for a different bucket or specialty headlight.


So, just got my first bike, an XS400 Heritage Special (with a 360 engine in it, my luck, but it was free can't complain) and have been upgrading some things before it hits the road. One main objective: replace the dim-as-hell headlight. 25 watts? C'mon, that's nothing when it comes to country road safety.
So I go to take the headlight out, hoping for some easy peasy H4 or similar bulb to swap in a nice LED off Amazon. Nope, sealed beam. No problem, I'll just get a standard 7" LED drop in replacement. Googling leads to a heart sinking conclusion: this bike takes some odd 6.5"-ish sealed beam that you can't find in an LED variant, or in a reflector that accepts a separate bulb, unless you dish out some $200+ or find an older one used. I wasn't willing to replace it with another dim sealed beam either.
Google also helped me stumble upon this post for aftermarket headlights, and the first post by cutlass400 sparked an idea: https://www.xs400.com/threads/aftermarket-headlight.16885/
Let's put our own LED into the original sealed beam reflector, keep the classic look, and have modern bright and effective lighting!
Materials:
-Basic hand tools, like screwdrivers, pliers, etc. for prying and grabbing.
-Dremel, or other tool to cut through the reflector. Might not be needed for smaller bulbs, needed for the one I used.
-Flexible, thinn but strong metal wire. I used 99¢ "mechanics wire" from harbor freight. Thin picture hanging wire should do too.
Procedure:
Remove your sealed beam. If it's like mine, the back has all these little tabs that look like they are the only thing that holds the bulb in. hahaha... you wish...
Pry up all those tabs, and remove.the small washer (if you have it) like so.
Now, you have to get the bulb out. Equip some thick gloves and a pair of pliers, this is the step where you will be breaking glass. My bulb was larger than the hole the terminals poke through, must have been installed before the lens was cemented on.
I gently started wiggling the bulb outwards, it was only held in with that tight rubber bushing thing as seen in the photo. I just kept wiggling and pulling until the glass broke.
Using a screwdriver, poke it into the reflector housing and onto any pieces of glass to large to fit back out the hole. Give it very gentle taps to break these pieces up without cracking the lens, and dispose of them properly. I then took the lens outside, took proper safety precautions, and used compressed air to blow out any tiny shards left behind.
Now this is where the procedure varies: What bulb are you going to use? I'd recommend getting something in an H4, because it will plug right in. Standard halogen? Silverstars? Small LEDs? These will fit right in the existing hole, and you just need to cut the "crown" (part with the flappy bits folded up) off of the reflector with your Dremel.
I however picked out this LED from Amazon, that has a blue halo built into the top. It also houses all of its heat dissipation (sink and fan) in the top of the bulb, to be inserted into the reflector. I liked this design because I wasn't sure if an external heatsink would fit in the XS400's bucket.
https://www.amazon.com/gp/aw/d/B07Z4QKB33?psc=1&ref=ppx_pop_mob_b_asin_title
It was mich larger, at 37mm, so I needed to cut some of the reflector off with the "crown" to accommodate it. Excuse my messy cutting, I'm not very good with a Dremel.
The smallest tab on the H4, most isolated from the other 2, should be pointing up. You may have to experiment with other bulbs. to find correct orientation. If you ride in the rain, or it's humid around you, and you're worried about condensation, now is the time to use some silicone sealant around the bulb.
Temporarily tape this in place, and if it is not installed in the chrome ring, do so now for mounting. Once in, run a wire under-and-back around the adjustment hinge screw thread block, as show:
...and over the bulb, back around the other block:
Twist right, check firmness, and snip off excess. This took me 2 tries, I overtightened this one and snapped the wire. The next run, I used 2 pieces of wire, each wrapped around a screw at the halfway point, and 2 sets of twists. I also left the tape on because it was holding on well and provided extra insurance.
Feel free to run wires in other patterns with other parts of the outer ring, whatever mounts it securely for you.
Done! I cannot stress this enough, check your beams. Make sure light is concentrated In a tight, wide line with a little spread on the bottom, and the high beam raised the beam correctly. Don't need to blind others or not have good quality light ourselves! A standard H4 or H4 LED seems to be at the right height when it's metal baseplate is flush with the back of the reflector. I got a very bright, wide beam that lights up the road well, side to side.
Enjoy your budget, but well functioning, original lens retrofit without dropping the dough for a different bucket or specialty headlight.