Bear Hands XS400 cafe racer

Bear Hands

XS400 Member
Messages
29
Reaction score
16
Points
3
Location
Gloucestershire UK
Hey guys,
Not usually one for posting on forums, but I've lurked around this site for a while getting ideas for my XS cafe racer and decided to try and give back to the community.

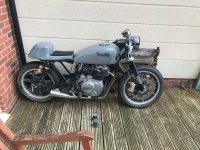
Here is my project, bought as you see it. Audi Nardo grey, Aprilia RS125 from forks, RFY shocks and a custom built seat unit.
Honestly, it looked ok from maybe 10 feet away, but up close its a bodge.

Oh, and the engine is knocking REAL bad, big ends? mains? I'll find out soon!
 

Attachments

  • XS400 1.jpg
    XS400 1.jpg
    335.7 KB · Views: 393
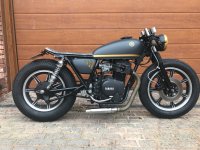
So here is my inspiration, I nabbed this picture from this forum, I believe it belonged to MonkeyRacer, I dont know if they are still active here, but I would love to know what size tyres they used. And yes, this is going to be a mostly show bike, I know balloon tyres handle like cr*p...
 

Attachments

  • IMG_0470.jpg
    IMG_0470.jpg
    223.7 KB · Views: 328
Stripped the bike down to get a good look at the frame.
XS400 2.jpg
IMG_2154.JPG


Suspicious looking patch repair at the bottom of the frame tube turned out to be horrendous rot underneath. The welding was awful with zero penetration and most of the welds came off with a chisel...
IMG_2159.JPG
IMG_2162.JPG

Yep, theres even a chunk of filler in there. Nice.
 
I decided just cutting out the rot and grafting a section in would seriously weaken the frame. So I came up with A Solution.
Welded a spacer onto the base of the frame tube, and then ran a suitably sized hole saw down it, this cut the frame rails to a nice fish mouth.
IMG_2227.JPG

Cut about 2/3 of the downtube away and bought a length of 38mm mild steel tube, just the right size to slide over the stub of downtube and sit in the nice fish mouths. Profiled the top of the tube to match the edge of the pressed backbone joint.
IMG_2229.JPG

Persuaded into place with a hammer
IMG_2231.JPG

Welded the top first to allow for expansion, then once it cooled I welded the two fish-mouthed side rail joints.
IMG_2236.JPG

Dressed all the welds smooth and also cut off the small cross tube/bracket and smoothed that off too.
IMG_2241.JPG

Pretty happy with that repair, looks a bit... chunkier? I like it anyway, and its easily as strong as the original, probably stronger.
 
Moving on to the rear end, I know the look I want and I bought a suitable seat and kicked up seat loop, but they're 230mm wide, and as anyone who has cafe'd one of these knows, the XS has wide hips.
I dont like the idea of just bending in the sides, shock mounts and all, the shocks should run parallel as far as I'm concerned.
So... serious surgery time. I cut the shock mounts off, and cut through the join to the seat support on one side, then took a section out of the angled seat rail and, with smaller tube inside for strength and alignment, welded it back up. Note the angle iron used as a centre line to measure off.
IMG_2185.JPG


I pulled the seat support in with a ratchet strap before fully welding it, then repeated the process on the other side to keep everything aligned.
Welded my new kicked up seat loop in:

IMG_2189.JPG

Obviously now there's no shock mounts:
IMG_2205.JPG

So out with the grinder and an offcut of 6mm steel plate to make two of these:
IMG_2208.JPG

I used a length of all-thread and 4 nuts to hold the shock mounts parallel and at the right distance apart (same as swingarm)
IMG_2209.JPG

Weldy-weld:
IMG_2211.JPG

And we're getting somewhere:
IMG_2216.JPG


I've bought some high tensile shouldered bolts to weld in place to hold the shock, the same as the stock swingarm.

Next step is to find the right rear mudguard to sit within the curved kick of the seat loop. I've also bought a pair of side panels so I need to decide whether to use them and mount the battery under the seat, or whether to keep the frame clear and mount the battery under the swingarm pivot.
 
Nice work! Well thought out repair to the lower front. Should last a long time. I like where you're going with this. Looking forward to the rest of the build.
 
Thanks, I worried over it for a few weeks before deciding to repair, I nearly bought another frame but it wasnt registered in the UK and I didnt want that hassle.

Bought a couple of rear mudguards to try but not happy with either of them, will post pics when I get a chance.
 
The one skill I never developed while working on cars and bikes was welding and Pop used to be a master of it while welding on NASA Saturn launch vehicle fuel tanks for Apollo moon missions. I picked up everything else though, I solder and braze like a madman and understand that welding is not that hard, I just never was forced to need it absolutely. I instead figure out ways of bolting things together and so far it always works. Put me on a mill or lathe and I can make most anything. I did do welding inspection on high pressure heat exchangers for battleships and reactors though.

I always admire good welding, it is an art like painting. I see some of that in this thread.


Welding inspector with no welding experience........ those people always scared me........... I have been welding for 30 plus years and the last time I had one of those he was MIA on the second day as he got flashburn..............
 
I was the final assembly lead that put the exchangers together and tested them at 4000 psi as well. I served as the lower level inspection until the unit was considered good enough for the official A.S.M.E. guy who then came in to do the final and sign off on it. I was to make sure the official guy's visit was not wasted, they paid him a LOT. I had a small enough number of assemblies rejected that I got made a shift leader over 3 departments pretty quick over it. Within one year of having never even seen an exchanger before. It was a fantastic job until the union came in and messed the whole plant up.
 
Last edited:
Not much chance to work on the bike around Christmas, so I had to make up for it by spending money on eBay...
Bought an air filter (I’ll create a separate post with that, I’ve had a novel idea instead of individual pod filters...)
And a pair of these bad boys:
E9EF337C-E4E1-49D0-AA09-F46B18DFA12A.jpeg

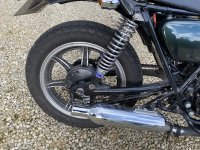
Stock silencers from a Triumph Street Twin, for the same price as a pair of crappy Chinese chrome I got brushed stainless, and neat little covers over the clamp joint. Tidy.
 
Yep that’s the same as I did, only got a pair of ex-triumph scrambler silencers. It’s 800 cc so I figured 2 into 1 would be ok for a 400. Had to drill out one of the baffles to boost the top end a bit, and it’s got a cat which means no nasty smell of Unburnt petrol or oil fumes. It does get a bit hot, but it’s well out of the way.
im in Gloucestershire too, and done complete rebuild except engine finished in May.
 

Attachments

  • 29D6FEAC-0F1D-40A4-9A9D-DA94696FB2DA.jpeg
    29D6FEAC-0F1D-40A4-9A9D-DA94696FB2DA.jpeg
    369.3 KB · Views: 272
Its been a while since I updated the build thread, but progress has been happening, its just slow and fiddly.
I bought 3 rear mudguards before I found one with the right profile, once I was happy with the shape I welded in a spare seat hoop as a frame brace / mudguard support:
frame brace.jpg

Then welded on four tabs to hold the mudguard:
mudguard mounted.jpg

Drilling the brand new alloy mudguard was scary, but happy with the positioning.
I've decided to go with side panels rather than the open frame, which was not my original intent with this build, but I think its will look right and it makes it much easier to find space to mount a battery and electrics etc.
This was tricky as the previous bodger had removed ALL the original mountings. But it worked out for the best as I formed a strip behind the panel which also acts as frame braces.
Here the panels are on, but the chinese ebay special seat is just placed on top with the plastic pan removed (it doesnt fit):
side panel mockup.jpg

Happy with the mudguard etc I could start on the pan, to do this I used cardboard and parcel tape to get the shape:
seat pan mold.jpg

This was coated in release wax and layed up with 6 layers of fibreglass:
seat pan layup.jpg

I wont lie, I was shitting bricks about removing the pan from the mold, I was convinced it would be stuck solid and would have to cut it off, but it only took a few minutes of gentle levering at the front and it popped of lovely:
off the mold.jpg

So using an angle grinder I trimmed the excess (XS?) off to leave the finished pan:
seat pan trimmed.jpg

Tonight I'll make some mounting brackets and glue the foam to the pan ready for covering.
 
Progress has been slow recently, change in role at work means I actually go into the office rather than working from home so less opportunity to get into the garage.

Bought a new AGM battery for the bike so knocked up a racy style battery box to hold it, started off with a sheet of 1mm thick steel and planned it out, used a sheet metal punch to reduce weight and add lightness:
Batt box unfold.jpg

Folded it up and tacked it together (and cleaned the rust off first!)
Batt box.jpg

Then promptly realised there is not enough width between the frame rails to mount it where I wanted it. Arse.
So did a bit of CAD work (Cardboard Aided Design) to come up with another solution:
Batt box CAD.jpg


And then cracked out the punch and grinder (sounds like a puppet show) and fitted it properly. Its a weird design but strong, and I quite like the detail of the race holes.

Batt box fitted.jpg


Next step is to make mountings for all the electrics, fuse box, reg/rect, relays etc. Then I'll do a mock build so I can fab the exhausts and brackets. Really looking forward to sending this off to the powder coaters.
Also booked a slot in April for the DIY vapour blasters for all the engine casings and wheels ready for paint.
 
Back
Top