First Time Bike Rebuild: Thoughts?

maxholland1

XS400 Enthusiast
Messages
38
Reaction score
0
Points
6
Location
New York City
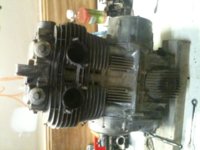
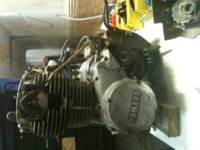
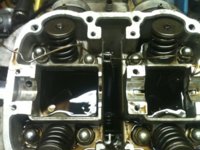
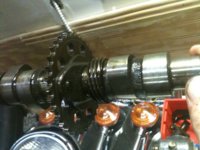
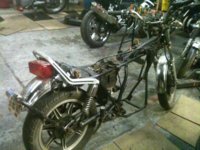
This is my first time building a bike. Its an 1980 XS400 that was laying in dirt for years.

I just got the engine out and opened it up. What do you think? Clean, Medium, or Crazy messed up.....

Advice or perspective welcome. Pictures below:
 

Attachments

  • photo 1.jpg
    photo 1.jpg
    202 KB · Views: 346
  • photo 2.jpg
    photo 2.jpg
    215.6 KB · Views: 339
  • photo 1(1).jpg
    photo 1(1).jpg
    214.5 KB · Views: 376
  • photo 2(1).jpg
    photo 2(1).jpg
    239.8 KB · Views: 357
  • photo 3.jpg
    photo 3.jpg
    286.5 KB · Views: 332
  • photo 4.jpg
    photo 4.jpg
    228.3 KB · Views: 311
Hi there,

Welcome to the forum. That's a good looking project (lots of potential). I had my motor apart this time last year, and I wish mine looked as good as yours. I did not see any broken fins. in the third picture, on the left side it looks like there is a little gasket material still on the cylinder head. I hope that is all it is, and not a crack (yikes)!

Are you planning on getting deeper into the motor or is this just a valve job?
 
welcome to the forum.

a little scuff marks on the cam bearings and the oil is dirty.

should be fine though if you give it a good service
 
I am going to go deeper into the engine? Any recommendations....

Do I need to replace the cam bearings, or can it be a bit scuffy?

Thanks. Keep the advice coming
 
The bearings are expensive as heck if they arent making noise I would leave them alone.Other than maybe take some 2000 grit and wet sand the surface a little.
BTW I wish i had a place to take my engine out.
 
I would try service it first and see how it runs, it may run good in which case you can save the cost/time of a rebuild. But if you want to rebuild it for experience and fun then do it! Heres my teardown/rebuild thread:

http://www.xs400.com/forum/showthread.php?t=6775&highlight=motor,+tear

Itll give you a good idea what your in for and PLENTY of great tips and advice from more experienced guys here. Like you, this was also my first attempt at a rebuild, it was very rewarding as was all the advice I got from this forum :)
 
if you took it apart that far, you should take the cylinder head off and have a look into the combustion chamber and at the pistons and cylinders.
Just a few more screws:)
 
the bearings are in the head its self so cannot be renewed.

make sure you get some good oil in the engine and regular changes and it will be fine
 
Thanks for the advice. New Question. I have taken the outer bolts out, to get into where the pistons are....but I cant get the inner four off. They are really tight. I have sprayed liquid wrench.

Any other ways to get those out? Is there an order?
 
Sorry....I am new

Hey everyone,

So I have removed the valve cover on top of the engine and I am working my way downwards. I am trying to remove the head but I was unsure of the order in which to remove the 8 head bolts. So far I have removed the first four exterior bolts (in a diagonal pattern) but the interior four bolts won't budge.

Does anyone know the correct sequence?
 
I appreciate your pics of you getting into the engine.I thought about at one time taking mine apart I have since reconsidered that idea for now.Good luck with your project.I dont beleive theres a sequence for losing them.Just take your bolts and keep them labeled in a plastic bad.When you put it back together then the tightening in a sequence and torque will be required.
 
Please download the manual for your model; we have it here. There is a proper sequence to tightening and loosening those nuts. Failing to follow these procedures could result in damage to the top end.
 
Thanks BC I didnt know it mattered in which sequence you have to loosen the bolts on the head,Why would it matter?:)Tightening them down in sequence I understand the importance of.
 
Aluminum warps easily. Uneven stress is the cause. I remember the manual specifically saying to follow the proper pattern when loosening or tightening the top end. I've come to use an alternating pattern when tightening and loosening pretty much everything these days.
 
This thread has been particuly usefull to me as well because I do plan on removing the head of my bikes engine someday soon.As alot of you may know I attempted it not long ago and didnt know about the sequence on loosening.Thank you.
 
Without anyone else to actually show me I have taken my time loosening and torquing down everything. I spent something like 15 minutes on each layer of the engine. I probably go through the pattern 30 - 50 times before I hit full torque. This is beyond overkill but I always like to err on the extra cautious side.
 
Thanks for the help. I got them off. The sequence was on figure 1.14 of the manual.

I have removed the cylinder head and the block. The pistons were stuck in, but I was able to remove the block with no scarring. The only noticeable replacement that needs to be made is piston rings.

I have attached pictures. Anything else look like it needs to be replaced or repaired?

photo 1.jpg

photo 2.jpg

photo 3.jpg

photo 4.jpg

photo 1(1).jpg

photo 2(1).jpg

photo 3(1).jpg
 
I would do new oversize pistons and rings plus valves guides and seals. Have the valves lapped also. With all the rust and years of crap in there I don't think it is going to work well with just rings:(
 
I'd take a chance and hone the cylinders and see what I'd get.

My main concern is photo 2 where the spark plug enters the cyl head. looks like there was an issue there. Has the plug end melted?

maybe looking at a helicoil or timesert job.

valves need cleaning in situ with a brass brush in a drill and then the guides need checking for wear.
 
Back
Top