LED indicators and relay

willem

XS400 Guru
Top Contributor
Messages
1,510
Reaction score
11
Points
38
Location
Netherlands
So basically I've been struggling with this one ever since I got the XS. I'm a little electrically challenged I think.

The previous owner of my bike converted the turn signals to LEDs. They look a lot nicer than the stock ones (those are HUGE on the Seca) but they have never flashed with me. They just go on, or off; no flashing. Guess the PO didn't finish the job, which is a pity.

So I got myself a LED flasher relay (3 pin), dug into the frame of my XS and stuck it on there. No lights went on anymore.

So my first thought was that the new relay was bad. With the 3 pins there's no other obvious way to connect the relay, so my idiot brain figured to go back to the shop with it. I did that, only to come back and get a new one a few weeks later because I hadn't tried switching the wires yet.

My next move was to just try different connections. With some pieces of wire I connected the 3 pins to the 3 holes on the bike's connector in all possible configurations. None of them worked.

Then I read here that it may be necessary to add an extra ground connection to the relay for it to work. I tested which wire was the ground wire using my electrical tester device (whats that called, voltmeter?) anyhow, I hooked up an extra wire from that one to the frame and stuck my new relay on. Then, after a small spark, all the lights went out, and I blew the signal fuse :doh:

I'm getting close to giving up and getting a mechanic to fix it for me... which I hate cuz I want to be able to fix everything on the bike. So I'm off to get new fuses because that was my last replacement.

What am I doing wrong?? And besides from identifying the ground wire, is there a way to tell which wire should go to which pin? there are markings on the relay (E for earth, and then there's L and B I think. I'm guessing B is battery, and L is lead or something?). And how would I test that with my voltmeter?
 
On my little bike I ordered a set of bulbs and a flasher from Super brite leds.com. The only issue I had was that my indicator lite would stay on constantly with or without the signals being on. So I unplugged it. Good luck
 
Willem, you are correct in thinking that E is for Earth and B is for Battery on your flasher relay. L is for Load or Lights. If you take a look at the wiring diagram on page 6-32, you will see that power comes from the fuse (#23) to the flasher relay (#16) via the Brown wire (BR). NOTE: This is DIFFERENT from the standard European wiring color code that has Brown for Ground/Earth. The BR wire has to connect to the B terminal of your flasher relay. The Brown with White (BR-W) wire connects to your relay's L terminal and feeds power to the signal switch and on to the lights. The Yellow with Black (Y-B) wire connects to the ground (E) terminal and goes to a diode and then to ground for German spec bikes.

As you have determined, you may have to move the wires in the stock connector so that they connect to the correct terminals on your new flasher relay. I'd also suggest connecting the ground terminal of your flasher relay (E) to a good ground if the relay refuses to flash. The diode in your harness may have too much resistance or be blown.

Finally, make sure that all connections in the entire wiring harness of the signal light system have very low to no resistance. LED's draw so little current that any resistance will reduce current flow to the point that even the proper flasher relay my not detect the load and operate. This will have the lights coming on, but not flashing. I found, on my Maxim, that the ground for the rear turn signals had too high a resistance that I couldn't correct. As a work around, I installed an adapter module used for adapting automobile wiring with separate turn and brake lights to work with a trailer with combined brake and signal lights. This module now has my rear turn signals also operating as brake lights - I have red LED bulbs in my rear turn signals so this isn't a problem. The additional light output from doing this has most motorists keeping their distance when I apply the brakes! :)

MrStubb : On your bike, the single turn signal indicator will require either removing the bulb for the indicator light like you have done, or rewiring the indicator bulb. To rewire the indicator, cut both wires to the socket, install a diode in each wire and join them together to one connection for the indicator bulb. Then wire in a ground wire to the other wire for the indicator bulb. Your indicator should work properly now!

Hope this helps!
Dave
 
Thanks Dave, that helps a lot! Exactly what I needed. This is why I love this forum! :thumbsup:

I'll probably have another try this Thursday, and I'll let you know if it works out. Thinking back on when I connected an extra ground wire to the E terminal on my relay, and sticking the bike's connector on there (connecting the BR wire to the E terminal), I actually connected the battery to the ground which was of course a bad idea... no wonder the fuse blew :laugh:
 
I don't think a three prong flasher of any kind other than the stock flasher will work wired like Yamaha did, and then only with stock turn signals.
When you add LED turns get a two prong flasher that is LED compatible. Plug it in to the socket so the prongs go in to the brown wire and the brown/white wire. The third wire won't be used. It was either a ground or went to the self canceler.
Leo
 
Many 2 pin LED flasher relays have an additional wire that has to be grounded. The 3 pin relays have the ground on the 3rd pin. Different connections for the same result.
 
I have a 3-pin relay already, so I'll try to get that working first. But that would have been nice, just sticking a 2 pin relay on there and perhaps adding the extra ground wire would have been less trouble. But then again, the 3-pin will be cleaner I guess.
 
I can't say your wrong Dave, I have never seen a two prong relay that needed a third wire. Any that I've seen that needed a third wire had a third prong.
I use the LF1-S-flat LED flasher from www.superbrightleds.com. $8.95. It comes with leads to a plastic connector. Remove the leads from the connector and you have two flat blades. One wire is red or grey, plug this blade in where the brown wire is. The other lead is black, plug it in where the brown/white wire is. All done, your flashers now work. No extra wires.
Clean and simple.
Leo
 
went with that same flasher for an integrated LED taillight. plug and play then find a place to secure it.

i still have stock front flashers though. You lose auto-cancel and the audible click but it all works fine.

i think i have a short in the control switch, it wont flash on the left side if the handle bars are turned (e.g.on the side stand).
 
well it looks like the wrenching will have to be pushed back a week or so. The weather is terrible here and as much as I don't mind riding in the rain, I don't have a garage and wrenching in the rain is a different story.
 
shopping


not terribly expensive
 
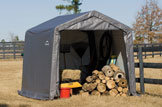
Here state side is a company that sells Tarpaulin Garages. Shelter Logic is the manufacturer. The local farm supply has them. A 10 x10 foot one runs around $200. A steel frame with a Heavy nylon tarpaulin cover. Won't last forever but are easy to set up.
You will have a dirt floor but better then working in the rain.
Leo
 

Attachments

  • pic-sheds.jpg
    pic-sheds.jpg
    7 KB · Views: 151
thanks guys, but I think I'll just wait till the rain stops

don't think I can justify another 200$ into fixing this bike towards my better half :laugh:
 
It can be used for many things besides working on the bike. It can store things to, like the bike.
Leo
 
Finally, after 9 months of not having flashing flashers, they flash :D

turns out the 3-pin connector had the wires at the right places, I just had to add an earth wire for the new relay to function properly. Had tried this in the past, but I had the earth wire wrong (thought it was brown, but it was yellow/black).

Thanks guys, especially Dave!
 
Turns out the lights aren't actually LEDs, just smaller, brighter bulbs with a lower power draw.. but works the same I guess.

Found out because I opened one up which wasn't working anymore (it flashed a couple of times after I put the new relay in, then died) and found one bulb nearly exploded. Melted part of the glass and everything. I think the bulb was sitting against the flasher housing, the bike got hit by a car at that end a few months back and the housing was a bit messed up. Didn't check the internals back then, as I should have.

anyway, getting a new bulb tomorrow and then it'll be all fixed :thumbsup:
 
Back
Top