82 Maxim Cafe Build

As long as the shock was designed to work that way, you will be fine. If you hear the shock making loud sucking noises, you will have to install it the right way up. You can test it by removing the spring, installing it and compressing and extending the shock a number of times.

Personally, I'd want the lighter end of the shock connected to the swing arm. Unsprung vs sprung weight. Grams matter...
 
I doubt that the shock was designed to have the reservoir down, but why would it matter?
 
Thanks for all the feedback, didn't think I was gonna start this kind of debate! I'm gonna keep it as is for now and flip it later if its a problem when I ride it. I sat on the bike and compressed the rear, nice and smooth and no noise. We will see.......
Off to pull the motor so I can fab up some front tank mounts
 
Ya it should work I have flipped them around on snow mobiles to get certain A arm setups to fit and I have never had a problem, but I just was wondering what the issues could be if it was mounted upside down. GTIDave whats your input why would it function differently? What would the issues be if there happen to some? Kinda want to know myself.
 
Didn't get much accomplished today. Fabbed up the tank mounts and filled in some holes on frame. The seat I'm planning will sit on top of the top bar so I want everything smooth. (ok, maybe a little ocd) The tank mounts should work well, I obviously haven't cleaned up the welds in the pics. And I plan on using rubber bushings to isolate vibration. Didn't have it in me to clean up the welds after I pulled the motor and found the crack..... See my other post.
 

Attachments

  • IMG_1659.jpg
    IMG_1659.jpg
    241.7 KB · Views: 306
  • IMG_1661.jpg
    IMG_1661.jpg
    214.8 KB · Views: 329
  • IMG_1665.jpg
    IMG_1665.jpg
    219 KB · Views: 318
  • IMG_1667.jpg
    IMG_1667.jpg
    177.2 KB · Views: 283
  • IMG_1668.jpg
    IMG_1668.jpg
    222.8 KB · Views: 326
  • IMG_1670.jpg
    IMG_1670.jpg
    100.2 KB · Views: 312
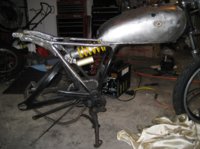
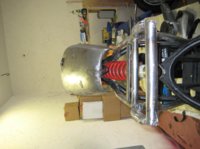
As I understand it - and I've been wrong before - the big thing is where the weight is. The reservoir is a pressurized chanber with nitrogen and oil, with a floating piston that separates them. There are also valves to control compression and rebound rates. The shock was designed to have the reservoir end connected to the frame so it isn't subjected to as much vibration which may cause the seal on the piston to leak gas into the oil.

Also, having the shock inverted puts the weight of the reservoir on the unsprung side, and that is not a good thing. The lower the unsprung weight, the better the suspension will operate. Why else would Yamaha use aluminium for the brake shoes rather than cheaper stamped steel? Lower unsprung weight. This is also why inverted forks typically perform better than conventional forks. Less unsprung weight allows the wheel to react to changes in the road surface faster. Only sprung weight can be controlled by the suspension.

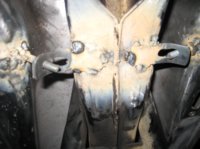
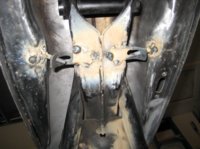
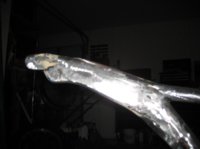
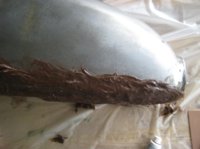
With regard to the welds, it looks like you need to increase the heat, lower the wire speed, or both. If the wire is touching the surface as you are welding, you will feel the gun push back, reduce the wire speed or increase the heat. The opposite also applies. The arc should carry the metal to the weld once established.

It appears like the welds are on the surface rather than penetrating the metal. Hit them with a small hammer and see if they break off. MIG welding should hiss and produce minimal splatter, not crackle and splatter everywhere. Even with flux core wire. Also check your welders polarity to make sure that the wire is negative and the clamp is positive when using flux core wire.
 
Ok if I get what you are saying the vibration and weight are the main issues. The weight difference would be something as small as getting a larger rear tire or adding dual disks(much more weight) or less or more because its closer to the pivot. Not really sure on that one, Im definitely not a physics master.

The rebound and compression don't matter. Compression- shock gets shorter, Rebound- the shock gets longer. I was schooled in that during my snowmobile racing days. Also have seen inverted mountain bike shocks that are built pretty much upside down, and I didnt think about it until now but that would probably make the shock perform better because there would be less unsprung weight. cool info!!!

I would agree with you doc just go for it and if it starts to perform worse look into it.

Oh and I would be as OCD as you can on your build. Mine is pretty much done and its all the small things that stick out to me that I dont like. Dont get me wrong I am super stoked on it for my first build but there are things that I could have done better. Even if other people dont notice the small things you always will. I had to go buy another bike so I can do another build with extreme detail. Hopefully you have another bike to ride while you are building this one. That was one of my main problems the winter went away and I had to ride.
 
Dave, thanks for the welding wisdom! I have only welded in h.s. shop class twenty years ago with a stick welder. I am using a flux core welder. The welds in those shots are some of the worst I have done this whole project! I didn't want the tank to move as I welded on those brackets so I was under the tank, jumping like crazy cause I was getting pelted with hot steel! Tomorrow I plan on flipping the frame over and redoing or at least reinforcing them.

Of course those are the welds I don't clean up before taking pictures of!

Fortunately the shock has the same eyes at each end, so it will be easy to flip around if the ride isn't how I like. Just prefer how it looks this way.

Thanks again guys, love the info and encouragement!
 
Fortunately the shock has the same eyes at each end, so it will be easy to flip around if the ride isn't how I like. Just prefer how it looks this way.

If it works and you are happy, then all is good! To me it looks upside down, but what does that matter? I'm just the guy trying to convince a buddy to let me borrow a Ducatti shock to try with the Kawasaki suspension in my Yamaha... :doh:
 
Well, hello again, been awhile. Life got in the way and didn't have time to devote to my bike. Made some great progress this week though.

Thanks to Sqirrel and Dave for the spirited discussion on whether or not the position of reservoir would work as mounted. I have, in the end, however decided to go a different route. The choice was made for too reasons: I didn't trust my welds on something as structural as shock mounts, and I still didn't like the stance.

I ended up going the route used by Patriot and swapped out the original shock for one from an xt250. I was able to use the stock mounts and only hade to modify the pass through.

So I have finished fab on the frame and stripped it to prepare for paint. What I found was a ton of surface rust. I spent all day yesterday with the die grinder and brass wheels! The rust I couldn't get to I treated with the solution that turns it black and paintable.

Powder coating I assumed would be too expensive (actually I never looked into it) so I painted the frame with VHT high temp epoxy. After my research I decided this would give me the best long term protection.

Below are some pics, figured I would post them while waiting the three hours while the paint cures.
 

Attachments

  • IMG_1690.jpg
    IMG_1690.jpg
    177.3 KB · Views: 278
  • IMG_1689.jpg
    IMG_1689.jpg
    155.3 KB · Views: 347
  • IMG_1688.jpg
    IMG_1688.jpg
    148.5 KB · Views: 287
  • IMG_1686.jpg
    IMG_1686.jpg
    168.1 KB · Views: 272
  • IMG_1685.jpg
    IMG_1685.jpg
    173.3 KB · Views: 314
  • IMG_1680.jpg
    IMG_1680.jpg
    183.2 KB · Views: 306
Didn't have much time tonight but when you get a package containing parts from Paolo Tarozzi you got to put em on the bike, right?

Did a quick mock up to see how everything will look, and got to admit I'm pretty psyched! I ordered rearsets which came on Monday and were for an XJ750 instead of my 82 maxim, so sent em back to Omar's and hopefully he will get the right ones to me soon. I had been waiting on them and my clip ons before I started denting the tank to know where my knees, bars, etc. would need room.

Anyway, enough rambling hope you like the pics.
 

Attachments

  • IMG_1701.jpg
    IMG_1701.jpg
    204.9 KB · Views: 287
  • IMG_1702.jpg
    IMG_1702.jpg
    193.3 KB · Views: 293
  • IMG_1704.jpg
    IMG_1704.jpg
    177.3 KB · Views: 302
  • IMG_1707.jpg
    IMG_1707.jpg
    130.9 KB · Views: 295
  • IMG_1710.jpg
    IMG_1710.jpg
    142.8 KB · Views: 275
So today I had a "I hate this f#%@ing bike!" moment. I spent all of yesterday and today stripping, polishing and painting the controls and levers. Hours! They looked like new! Started putting the left side controls on the bar, everything is looking great and then snap! The clamping bolt snapped in the clutch perch in such a way that the only way to get the perch off was to break it.

Can anyone relate?

So now I am searching for a new perch, hopefully one I can put on without having the remove the brand new grip and bar end mirror I just installed.

Ok, rant is over, god I love this bike!
 

Attachments

  • IMG_1726.jpg
    IMG_1726.jpg
    252.5 KB · Views: 282
  • IMG_1712.jpg
    IMG_1712.jpg
    222.1 KB · Views: 290
  • IMG_1725.jpg
    IMG_1725.jpg
    179.8 KB · Views: 278
  • IMG_1723.jpg
    IMG_1723.jpg
    211.8 KB · Views: 267
To give you all an idea of where I am trying to take this build I thought I would show you a few of my inspirations. The 550 for design and the others for paint scheme.

Hope you enjoy, and hope I can even come close.

Thanks for looking.
 

Attachments

  • TZ250_4-600x450.jpg
    TZ250_4-600x450.jpg
    86.5 KB · Views: 283
  • lossa-yamaha-sr500.jpg
    lossa-yamaha-sr500.jpg
    96 KB · Views: 297
  • 4529323511_e722e0bd44_b.jpg
    4529323511_e722e0bd44_b.jpg
    117.4 KB · Views: 279
  • 4529325543_3211a09f32_b.jpg
    4529325543_3211a09f32_b.jpg
    122.2 KB · Views: 292
Had a little time this weekend to work on the bike. I like the tank I got but couldn't stand the pinched joint along the bottom of it. Didn't want to make any major changes to the shape, just clean it up a bit.

This has probably been done hundreds of times before, but here is how I am going to change it. I used Bondo Glass with the long fibers because I needed something with strength to fill in the "triangle" between the tank and the joint. It was not the easiest thing to work with, but seemed to do the job. Once I sanded it down I think it did exactly what I needed it to do, give me a strong base to start with the mud.

Got as far as putting the first of many layers of bondo on. Thought you might enjoy some pics.

PS: Am I way too anal to worry about something like the seam of a gas tank?
 

Attachments

  • IMG_1729.jpg
    IMG_1729.jpg
    119.4 KB · Views: 278
  • IMG_1736.jpg
    IMG_1736.jpg
    122.3 KB · Views: 236
  • IMG_1737.jpg
    IMG_1737.jpg
    159.2 KB · Views: 252
  • IMG_1738.jpg
    IMG_1738.jpg
    168.2 KB · Views: 255
  • IMG_1743.jpg
    IMG_1743.jpg
    110.6 KB · Views: 252
  • IMG_1745.jpg
    IMG_1745.jpg
    135.3 KB · Views: 249
some pics.

PS: Am I way too anal to worry about something like the seam of a gas tank?

No Way! It's the first thing I notice and one of the best features on good custom tanks is that they don't have those awful pinch welds. I'm planning to do the same to my '81, so thanks for posting... I wouldn't have known to use the long fiber bondo! :thumbsup:
 
What bike did the tank come off of? I have an 84 Maxim and Im trying get my parts sorted out. Also the spring for the monoshock, did u paint the stock spring? build looks great.
 
Back
Top