New Member Intro - 83 Maxim

TroyXS

Axe of Theta
Messages
9
Reaction score
0
Points
1
Location
Troy NY
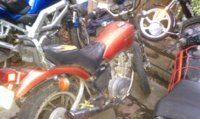
I recently got an opportunity to buy an 83 XS400K Maxim from a friend of mine, moving to Ohio. For the right price of only $400 I am not the proud owner of a bike that looks like is might have had a bit of a tough life.

I have been combing the threads here to see what options I have for modifying my new bike and I think I have a short list of things that I need to do and want to do:

Need to do:
-New Front Tire
-New Brake Lines
-New Battery

Want to do:
-New Seat
-Paint
-Pod Carbs
-2 to 1 Exhaust with Wrap
-New Bars

Any other ideas? I have seen some amazing stuff on this site in the last few weeks and I finally joined today. Happy to be a part of the community!

Attached a picture of her current condition.
 

Attachments

  • IMAG0313.jpg
    IMAG0313.jpg
    179.9 KB · Views: 225
About 14,500.

I guess my other question to the forum would be how different Maxim parts are to the older XS models. I see a ton of parts sites with XS400 parts and everything stops at 1982 usually. Any issues that people know to watch out for?
 
Maxim doesn't share a lot of parts with the xs400. The suspension, frame, gas tank, seat, exhaust, etc etc are different.

I have heard of people having problems with the heads leaking oil around your mileage... but I personally haven't ever seen it. bikebandit has a fair selection of OEM parts.
 
Right now with the bike having been stored in the elements for over a year, a full tear down is in order just to get everything back to working order, then upgrades. Looking forward to getting to know the bike and then making it into a lean, mean, fighting machine.

Thanks for the tip on bikebandit DanMach
 
Nice find - yeah, it looks like it might need a bit of a hug.

Change all the fluids. Make sure you can get it idling (clean the carbs, possibly several times.) Check your valve clearances (these are generally sold as beginner bikes, and beginners never check their valves because it's a little tougher than changing oil.) Check your brake pads and tires, and make sure you can stop before you go.

Check your chain. If you're not sure about it, new chains are cheap.

Install a fuel filter. Our gas tanks have spots that are lower than the fuel petcock. Water collects in those spots, rust floats around, and gums up your carbs. a $5 fuel filter stops that from happening.

Other than that, I'd recommend riding it for at least a season before launching into any serious modifications. You guys have winters like (worse than?) ours, so save the upgrades for when you can't ride anyway.

Even something like Pod filters can become a big job, once you realize that your jets are no longer the right size.

Welcome!
 
Quick how to on checking valve clearances for this bike. 1. Buy the correct tool from pro-motion, its about 17$'s on the net. 2. Remove gas tank. 3. Remove valve cover. 4. Remove spark plugs. 5. Remove alternator cover. 6. 10mm(IIRC) nut on the alternator bolt to turn the engine. 7. Turn engine to cam lobes pointing AWAY from the valve you want to measure. 8. Use feeler gauge, get the clearances. 9. Using the special tool + tweezer/magnet/needle nose/whatever keep the valve compressed and then turn the cam AWAY from the tool. Turning the cam into the tool can crack your head. 10. With valve compressed, and cam away, use tools to remove the shim and record the # on its back. 11. Replace shim (number side down towards pistons) 12. Refrence manual to determine correct replacement size. 13. Repeat process with new shims.

About 2 hours your first time to get all the shims out. 45 mintues to replace them all when they arrive.
 
Thanks for the help on the valve clearance! I definitely would have been "doing it live", which might not have been the best methodology.
 
Not 100% sure. I thought I read that Maxim Tanks had slightly different mounting. Dime City Cycles is where I have been looking for alternate tanks. It lists all the tunnel dimensions for their custom tanks and they all seem to be significantly different. Their Wassel-Style P-Nut Tank has the narrowest tunnel at 1-3/4" wide.
 
Had a chance to get her running today and I found that I had to start the bike with the choke all the way off (with some starter fluid) and then as the bike warmed up I had to have the choke all the way on or the idle would hang high. I think i have read about this problem elsewhere on the forum and I know how important it is to have clean carbs, but is there a specific issue with the carbs that would cause this particular issue? My buddy diagnosed a punctured diaphragm. Does that make sense?
 
Hmm that is weird. These carbs don't have 'chokes' in the traditional sense. They are just enrichment circuits that supply a higher amount of gas than normal. In some ways I could see how a punctured diaphragm would cause it to run lean and thus need the choke... either way, you should probably pull the carbs.

Pull em out, pull them apart, place them in carb dip and give them a good cleaning and then get a mikuni bs34 rebuild kit from mikesxs.net.

I'm sure bentwrech will pipe in and give us some insight on it.
 
Finally had a chance to get a battery to get the bike running and attempt to get it back to my house for the teardown. I put the battery in and sprayed in a little starter fluid and the bike roared to life...but then stalled out. I got it to start three or four times but it won't stay running. I looked at the carbs and they appear to be more JB Weld than metal. So it looks like brand new carbs are the first order of business. My front brake resovoir is also shot. I opened it up to check fluid and it is bone dry and the diaphragm is brittle and cracked in a bunch of places. The brake lever has no resistance at all in it.

For replacement parts: BS34 carbs and any brake set up off an XS will work?
 
Back
Top