Poor Power <2500RPM Adjusting Carburetors and Valves?

I don't think you need it quite that big but bigger than what you have:laugh:
 
I think I would be looking at both cam and ignition timing at this point, maybe even a leak down test just to be sure!

What is a leak down test?

After I rebuilt the carbs, I sprayed the external housing with carb cleaner, then air to see if the idle changed. It didn't, so I'm hoping that means my Airbox-Carb-Engine interface is sealed properly.

Also, I had taken the cam shaft cover off, and the seal was badly damaged, so I'm ordering another one, can I do a compression test with that cover only lightly tightened? I assume that all I'd lose is oil, or will the test be off?
 
Don't crank the motor without the cover on properly. Google leak down testing a motor and you will see what it is. Basically it tests how well the top end of the motor seals/leaks compression.
 
For syncing carbs you do it at idle. Your manometer needs to be much longer. To test compression you do it with the motor off and cold. With one piston at a time and with the throttle wide open turn it over. If you are getting 125 with a warm engine I would say your compression is too low and a lot or you problem.

Re did the compression test;

About 110PSI for each cylinder, engine cold, throttle wide open, no plug in either chamber.

If 125 was low, then this is a problem...

Hone + new cylinder rings?
 
That's what it sounds like. Hope all it needs is rings and a hone and not oversize pistons. Make sure to spec all the components in the top end while you have it apart and replace all the seals and gaskets. You may even want to find a donor motor that is in good shape.
 
Hey Folks,

I'm back from a hiatus. Less one girlfriend, moved a few times. Ready to start on this project again.

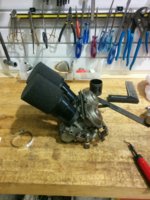
I've acquired some shop space, and started stripping down the engine. I'm sad to say I'm not pleased with what I've found.

Definitely in need of some guidance and mentoring on this one...

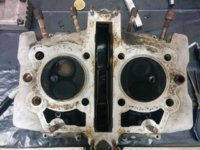
1. Jug/Crank case gasket is super baked on. I can't get it off. It's rock hard.

Does anyone have any suggestions? I'm hesitant to take a knife or scraper to it because I do not want to mar or scratch the surface. Any magic chemicals that breaks this stuff down?

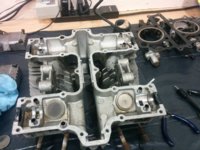
2. Broken valve shim. Whats the deal with this? The cams and lobes look fine. I know that I need to replace the shims anyways as the valve clearances should be tightened up.

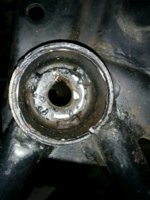
3. Exhaust valve seating is crap. Intakes seem fine, pass a gasoline seep test (poured gas into valve seat with valve closed, no gas comes out intake hold, even blew compressed air into intake, no bubbles at valve).

The exhaust valves are either both bent or warped. Or were burned... I don't have the measurement tools to determine if it's the valves, but that's my hunch. I started to lap them, but the wearing pattern on the valves was so bad that I thought I should stop as I don't know if there are replacement valve seats available for this bike.

Does anyone have any lines for replacement valves? I can't seem to find them anywhere at all. Do the XS650 valves fit? (I'm guessing unlikely as this is a DOHC engine).

The seat on the head *looks* fine, but what I'd rather do is just have the seat ground/machined and replace the valve.

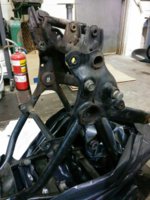
4. Rear swingarm is biffed. Hoping it's just the bushing. Haven't had time to take it off yet...

please help! I wanna get her running before summer is over :(
 

Attachments

  • IMG_20150725_192555_nopm_.jpg
    IMG_20150725_192555_nopm_.jpg
    229.2 KB · Views: 344
  • IMG_20150629_234145.jpg
    IMG_20150629_234145.jpg
    162.2 KB · Views: 354
  • IMG_20150629_233433.jpg
    IMG_20150629_233433.jpg
    177.3 KB · Views: 328
  • IMG_20150629_233424.jpg
    IMG_20150629_233424.jpg
    271 KB · Views: 341
1. There is such a thing as gasket remover/softener; it works but the process is SLOW; mine was baked on as well. In the end I ended up soaking overnight and using a razor blade on it. It took a few days to get it off. I held the razor blade nearly parallel to the surface and just went super slow. I replaced blades often; probably went through like 12-24 of them.

2. Never seen a broken valve shim, but anything is possible!

3. Replacement valves would be on here or ebay; I don't think any parts from the xs650 will fit on your bike. The two bikes have little in common.

Depending on your budget buying an entirely new top end would likely be a lot cheaper than getting a full valve job from a real shop.

I'm not sure what you mean by "wear pattern" while you were lapping the valves. Do they have a lot of lateral play in them and wiggle in the guides? What's the deal?

4. Can't help you with the swing-arm without more of a description! What is biffed?! You'll have to remove it anyway it seems.

If you're aggressive and buy replacement parts quickly you can get this done quick. If you fart around and try to repair everything, well, it might take a while.
 
Does anyone know if there is any validity to replacement valves from an alternate bike, I found this website:

http://xs1100.com/partinfo.php?myid=708

It seems to imply a number of models share the same exhaust valve.

Anyways, having a devil of a time finding replacement exhaust valves. Mine are bent. Explains maybe where the cracked valve shim came from...
 
Updates:

1. Found a spare engine (XS400 Seca with 6spd) in apparently running condition (not on a bike, no carbs..) so that's cool. I'll be performing a leakdown and compression test on it to see if it's in better shape than the head that I just dropped off at a machine shop last week :(...

2. Also acquired an extra head, which I pulled the exhaust valves from, they seem as if they are not bent, great! Will see what I can do.

3. The biffed swingarm

The swingarm appears to have been converted to Needle Bearings, and then I assume never greased. There are no grease ports on the arm. The bushing itself is fine on the non-chain side, but is pretty badly pitted on the drive side. To the tune of measuring under about 0.2mm.

The mounting points for the main rear swingarm pivot bolt are gouged and ovalized, I assume from the rear swingarm not being tightened properly. This is where the huge amount of rear slop was coming into play.

Plan as of now is to die-grind out what looks like welded in 1/8" washers in the small cup that the suspension pivot bolt sat initially. I'm thinking I'll remove the washer, and oversize the hole so I can machine an insert that I will weld into the frame cup. It would be centered by the frame cup and oversize hole.

I will then machine the bushing down on both sides to 0.5mm undersize, and machine bronze bearings to fit the new bushing. I will replace the thrust washers and seals and also add a grease nipple to the swingarm on both sides.

Does anyone have any suggestions for an easier path?
 
The needle bearings on the swing arm pivot are stock for DOHC bikes. The grease fitting sounds like a good idea. Be sure to get the swing arm aligned in the frame, otherwise you will be selling your bike to a hipster with "cafe racer" delusions shortly after fixing it.
 
Thanks for the info on that Dave, good to know.

I'm hoping that the cups that the pivot sit in on the frame are aligned, and I'll use them to guide the new material to alignment.
 
OK.

Here are some details on the swingarm status.

See the images included.

Looks like the previous owner for some reason decided to weld on washers onto the frame to reinforce the pivot bolt mount. They however did not take into account that this extra thickness would space the bolt out so that it was no longer riding on the 16mm shoulder, but instead on the threaded portion of the bolt, which is smaller than the mounting hole in the frame, thus introducing a significant amount of slop.

I'm not sure what my best course of action is at the moment, both sides of the frame are pretty badly mangled. I'm debating removing the washer and enlarging the hole, and simply welding my own spacer in that I turn down on the lathe, this would be steel. My spacer would have the correct frame spacing.

Alternative idea, clean up their messy work. Weld in a threaded plug on the one side that the pivot bolt would thread into that is aligned properly.

Alternative idea, make my own, longer, pivot bolt. It's a 16mm shoulder bolt. I could make one with internal threading, and a longer shoulder to align it and take the shear load.

trying to decide on the best combination of fast to repair and a good repair.

Also note that the bushing, which rides on needle bearings has some significant wear. I think I'm going to flip it so that the un worn side is on the drive side, to get it to last longer. Replacements are expensive.

Any suggestions or thoughts?

-R
 

Attachments

  • download_20150901_204423.jpg
    download_20150901_204423.jpg
    284.8 KB · Views: 316
  • download_20150901_204441.jpg
    download_20150901_204441.jpg
    243.5 KB · Views: 330
  • download_20150901_204447.jpg
    download_20150901_204447.jpg
    220.7 KB · Views: 325
Got the washer out. Kinda messy under there. I think I'll probably end up making a bushing with threads that the swingarm pivot bolt will secure into, though I'd prefer to have some kind of mechanism to prevent the bolt from being able to un-do itself.

My pivot bolt had a castle nut on it, but it doesn't have a hole for a cotter pin...

Is the standard component a Nylock?
 
Mild sad news about replacement engine, I was a bit duped as I was told the engine ran.... Clearly a lie as the compression measured 30PSI dry and 60 wet. On the bright side, at least the cost of the engine was about the same price as a new set of valves, which I managed to get out of the deal.. so I still have a bunch of other replacement parts in the engine.
 
I'm pretty bummed about the spare engine, but I suppose now I'll just have to use it for parts.

I ended up trying to seat my valves myself by lapping, but discovered that they were bent. So I decided to have the engine looked at by a local machine shop, they did a great looking job and machined the valve seats and installed new exhaust valve guides.

So now I have honed cylinders and properly sealing valves.

I've got piston rings and suspension components on order.

I also finally got around to machining carburetor headers for some UNI pod filters, as I saw 16VGTIDave's great work on that front, and decided it looked great and was sensible.

My dilemma now is that I have an engine that needs to be broken in, but my carburetors are not tuned to the intakes and exhaust. I'd put on the stock components, but I don't have a stock exhaust.

I'm hoping now to get some guidelines from Dave on his carb settings when he had an exhaust that had less back-pressure (this current exhaust I own is one of those MAC 2-1 units, very little baffling). The last post I saw him explaining his carb settings had him at:

I'm currently running the following:
Main jets - 127.5
Needle clips - middle (stock)
Pilot jets - 40

Dave - any chance you remember what you were running with the more forgiving exhaust (from a back pressure stance :p).

If anyone has any input on jetting for a DOHC that has:

Pod Filters with 60mm stacks
Stock Mikuni Carburetors
Mac 2-1 exhaust

I'd love to hear it, I'd prefer not to break my engine in with improper carb settings, which could lead to poor performance permanently.

thank you thank you thank you!
 

Attachments

  • IMG_20150906_223937.jpg
    IMG_20150906_223937.jpg
    205.4 KB · Views: 357
Last edited:
Carb jetting is not something that can be "shared" with any precision. Every setup is different, so the best we can do is get you headed in the right direction. Also keep in mind that the DOHC engines don't need to be jetted as large as the SOHC. Probably due to the YICS system. The stacks also seem to improve the mid and high rpm carb function, which again reduces the need for large jets.

I'd suggest starting close to stock with the jetting as it will get you running. 45 pilot jets, pilot screws 2.5 - 3 turns out, needle clips in the middle groove, float height set correctly, should get you running. The manual suggests 132.5 main jets were the larger size used for German spec bikes. I know they are very rich for my bike. I've reduced my main jets to 125 and the bike pulls real well above 7000 RPM. With your exhaust, you may need larger.

One thing to keep in mind is to not make any other changes to the bike while tuning. To the point of starting with a full tank of fuel and not adding more until you are done for the day. Also, note how the jets overlap in operation. Some say to start tuning by getting the main jets dialed in first, then the needles, float height, pilot jets, and finally the pilot screws. Another thought is to get the pilot screws adjusted for best idle, and then determine the pilot jets based on the screws. If the screws are more than 4 turns out, increase the pilot jets. If less than 1 turn out, decrease the pilot jets. Then adjust the needles, float height, and finally the main jets. Which ever method you try, make sure you get the engine fully warmed up (20 min riding hard) before you do your testing. That requires you to ignore how the bike is running during the warmup ride. Not an easy thing to do! I'd also suggest keeping detailed notes, and only adjusting 1 thing at a time. You may think you are good enough to make multiple changes, but you will learn what I have - you're not that good. 1 adjustment/change, warmup ride, WOT test ride, note behavior, 1 adjustment. Once practiced, you will be able to pull the carbs, change jets, and have it running in less than 30 minutes. And you will get lots of practice!

Good luck and let us know how it goes!
 
hey folks,

appreciate the feedback and help.

I have one more question before I get to some engine work.

I'm new to this whole thing and I made a rookie mistake a while back.

When I was pulling the engine apart to look at valves, rings, etc. I didn't clean the engine well enough. There was debris between the jug and the threaded rods for the head. Some of that debris fell into the main engine cavity.

My questions:

1. Is there a flushing product you would recommend to clean the engine out, one that would be low viscosity etc to slosh around and get all that gunk out?

2. Should I just drain it, visually inspect and remove what I can from the top end, then put in cheap oil, slosh it around, drain it, cheap oil, slosh, drain?

3. Rebuild the whole thing (I dread this).
 
Back
Top