Replacing Valve Seals.

jctanner

XS400 Member
Messages
15
Reaction score
0
Points
1
Location
Chicago, IL
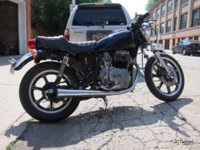
So I got the bike running last week, and unfortunately, had quite a bit of smoke coming out of the left exhaust. After some research (thank you XS400!), I decided its most likely the valve seals.

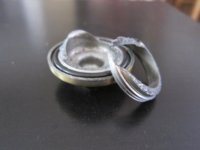
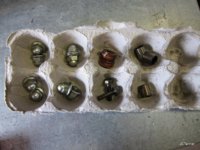
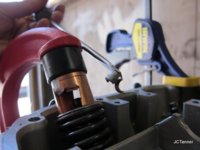
Started taking apart the top end and the previous owner apparently snugged the valve caps on pretty tight. I was able to get all four out, but had one casualty. Luckily found a set on eBay.

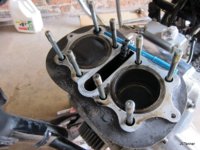
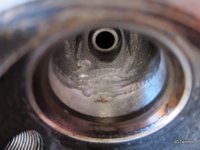
Everything looked pretty good once I got in.
https://picasaweb.google.com/JCTanner/XS400_TopEnd_2011?feat=directlink

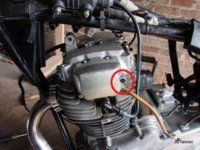
Only concern is the rubber seal between the cam shaft and the distributor is a little nicked up. Didn't seem to leak however.

Parts should be in on Tuesday.

Now just need to locate a valve spring compressor and a valve lapping kit. Anyone in the Chicago area have one i can borrow?

If there are any tips/tricks I should know about, please let me know!

I'll be updating as I proceed.
 

Attachments

  • IMG_1178.jpg
    IMG_1178.jpg
    309.9 KB · Views: 713
  • IMG_1169.JPG
    IMG_1169.JPG
    50.8 KB · Views: 804
  • IMG_1171.JPG
    IMG_1171.JPG
    51.5 KB · Views: 803
  • IMG_1173.JPG
    IMG_1173.JPG
    46.8 KB · Views: 725
  • IMG_1175.JPG
    IMG_1175.JPG
    47.8 KB · Views: 794
you can always use a G clamp and a cut out tube. google homemade valve compressor, a few ideas come up.

that first pic of the valve cap was what i had when I took mine off:eek:
 
That happened to one of my valve caps aswell. Got one from a XT i believe. It was from a good junkyard I now keep on my hot-list when things don't go my way. :)
 
That happened to one of my valve caps aswell. Got one from a XT i believe. It was from a good junkyard I now keep on my hot-list when things don't go my way. :)

good to know, because getting specific 400 ones were hard to get and it was only because a mate had a (rough) spare that I got one.
 
Day 2:

So I got to dig in further and removed the cylinder head.
https://picasaweb.google.com/JCTanner/XS400_TopEnd_2011d2?feat=directlink

So far every thing has been pretty straight forward. No big issues.

Two question: Should I go ahead and pull off the jugs and inspect the pistons and rings? The cylinders look and feel great. I assume this is a good sign that the rings are good. The bike does have 26,000 miles on her btw.

Whats the best way to clean-up the carbon off the piston heads? I read somewhere to use a spoon? Is this really the best approach?

Thanks.

Tanner
 

Attachments

  • IMG_1195.JPG
    IMG_1195.JPG
    104.3 KB · Views: 606
  • IMG_1194.JPG
    IMG_1194.JPG
    113.1 KB · Views: 604
  • IMG_1193.JPG
    IMG_1193.JPG
    64.7 KB · Views: 620
  • IMG_1188.JPG
    IMG_1188.JPG
    66.3 KB · Views: 582
  • IMG_1185.JPG
    IMG_1185.JPG
    111.8 KB · Views: 643
  • IMG_1181.JPG
    IMG_1181.JPG
    109.7 KB · Views: 629
I used a brass wire brush in a drill, block off all the holes (keeping the barrel on and whir away!
 
just one question. I have replace valve seal but one spark is black and i think one new seal was not very good, can i replace valve seal with engine in frame? Is it possible to remove clinder head with engine in frame?
 
just one question. I have replace valve seal but one spark is black and i think one new seal was not very good, can i replace valve seal with engine in frame? Is it possible to remove clinder head with engine in frame?

Niko, Yes it is. All work I've done so far has been in frame.

The biggest set back I had was having to drill out the brass plug (circled in red) that the factory inserted in front of one of the screws that covers the electronic distributor. Depending on your year, you may or may not have this problem.

Other than that, you shouldn't have a problem. Just a lil tight.

Tanner
 

Attachments

  • IMG_1180.JPG
    IMG_1180.JPG
    126.6 KB · Views: 641
  • IMG_1164.JPG
    IMG_1164.JPG
    80.2 KB · Views: 574
Day 3:

I went ahead and pulled the jugs off to take a look at the pistons.
https://picasaweb.google.com/JCTanner/2011_d3_XS400_TopEnd?feat=directlink

The rings look great. But then again...I don't know what a bad ring looks like either.
Anything that I should be looking for? They look clean to me.

Drewpy: I took you're advice and ended up making a tool to compress the springs. Worked perfectly. 8in "C" Clamp, and a 3/4in Brass coupler notched out. Magnetized a flat head and used that to snag the cotter's. :thumbsup:

Good idea to whack the valve retainer a couple of times to free it up cotter. Otherwise the cotter will stick to the retainer when you begin to compress the springs. Luckily remembered reading this somewhere (probably a Drewpy post) after the first valve.

I fairly certain that this is the first time the top-end has been open on this bike, but I did notice one thing. In the pictures showing the intake port, it looks like someone started to smooth out the port a little. Or is this factory??

Tanner
 

Attachments

  • IMG_1217.JPG
    IMG_1217.JPG
    44.5 KB · Views: 596
  • IMG_1233.JPG
    IMG_1233.JPG
    40.4 KB · Views: 571
  • IMG_1232.JPG
    IMG_1232.JPG
    40.8 KB · Views: 606
  • IMG_1224.JPG
    IMG_1224.JPG
    37.9 KB · Views: 572
  • IMG_1223.JPG
    IMG_1223.JPG
    35.9 KB · Views: 610
  • IMG_1220.JPG
    IMG_1220.JPG
    38.8 KB · Views: 618
  • IMG_1235.JPG
    IMG_1235.JPG
    64.9 KB · Views: 619
I have 3 valve compressors at home,one is the banjo type,one is for overhead valves,one for flathead engines.I also have a lever type one,and a valve lapping tool with attachments for valve seat grinding.I got these over a period of 10-15 yrs,some from flea markets.A homemade tool may work,but I'd be careful so it doesn't slip and all the springs and stuff go flying across the room.I bought 2 self-advancing valve lappers at a flea mkt for $5.00,and it's circa 1940's in perfect shape. A regular lapping tool should be available at most auto parts stores cheap,and lapping compound shouldn't be expensive.after lapping,test it with water or W-D-40 to make sure they aren't leaking.If you go to flea mkts,and know what to look for,you can buy good stuff that will come in handy later. You can see if your cylinders/rings need attention by inserting the top ring into the cylinder,using a piston to push it down square with the cylinder,and measuring the gap with a feeler gauge,then compare with your manual. lha
 
I've seen a lot of xs engines that have been slightly smoothed. I think it was factory standard at the time.
 
Day...I'm not sure anymore. Update 4.

Well I finally got to start reassembly last week. While the jugs were off, I went ahead and painted them a nice glossy black. Very happy how they turned out.
YDYAWmkPf_34ON37G9-FbA


I re-lapped the valves and used my homemade compression tool to insert. The collets are a royal PITA by the way. lhaolpa, I used your advice and used some gas to check for leaks. There were none!

Using the Manual, reinserted the cam shaft paying attention to the timing marks. And torqued everything down. Adjusted the valves too.

She started up on the 2nd kick! And just a puff of smoke (from reassembly). Adjusted the carbs/idle and rode her around the block. Runs beautifully. And most importantly...NO smoke.

Thank You everyone for your help/input.

Here's the final product. :D
MV55T41tC_dX52PuaHdEWg

Y3QE00y0wTMFsXovOoCkkw

Video:
 

Attachments

  • IMG_1252.JPG
    IMG_1252.JPG
    70 KB · Views: 495
  • IMG_1255.JPG
    IMG_1255.JPG
    67.5 KB · Views: 473
  • IMG_1256.jpg
    IMG_1256.jpg
    239.3 KB · Views: 489
  • IMG_1253.JPG
    IMG_1253.JPG
    53.9 KB · Views: 452
That is a good post,shows a lot of info.Did you put new rings in? The pistons looked like they were in pretty good condition.Usually if the ring gap,measured in the cylinders is within specs,you can clean everything up well,lube it and put it back together,and get many good miles from it.I've done this on many a good car when there was a bad valve or something like that.You should be in good shape.Good luck....lha
 
Back
Top