The "firsts" build thread!

danisawesome

XS400 Addict
Messages
101
Reaction score
0
Points
16
Location
Olympia, WA
Hello everyone and welcome to my build thread! My name is Dan and this is my first motorcycle and project I have ever gotten to do, so I'm really excited to get this thing going and on the road in time for our amazing upcoming PNW summer.

The History

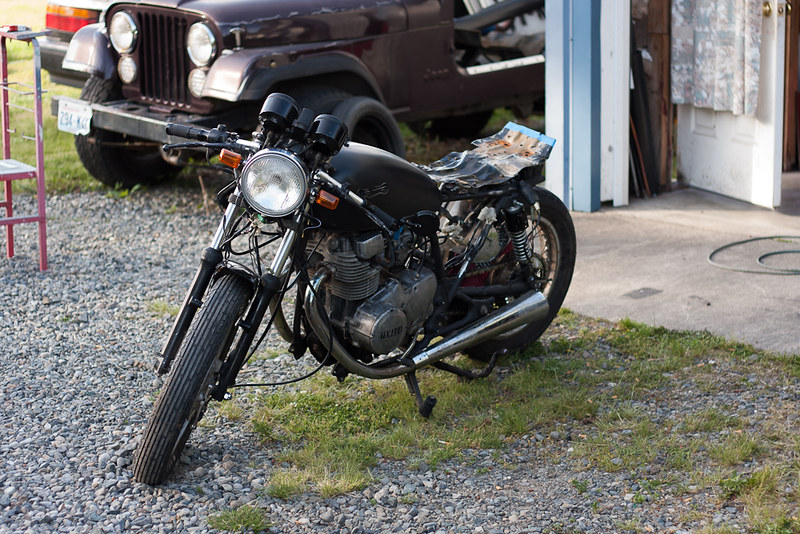
I began looking for a bike about 2 or so months ago after talking to a good friend of mine, who rides a cafe'd CB350, about my new found interest in motorcycles. He gave me a lot of really good info and I ran with it. I had a pretty limited budget, but was determined to find something to at least start working on, and, after having many Craigslist finds sold from under me or have no contact info, my father-in-law informed me that he had an old Yamaha that is just taking up room in his shop. I was trying to look at a CL350 up in Washington when I called him, but, after seeing a few pictures and deciding on a price, I was the proud new owner of what turned out to be an '82 XS400 Heritage Special. Oh, you are wondering how much I got it for? $150 and a bottle of scotch.

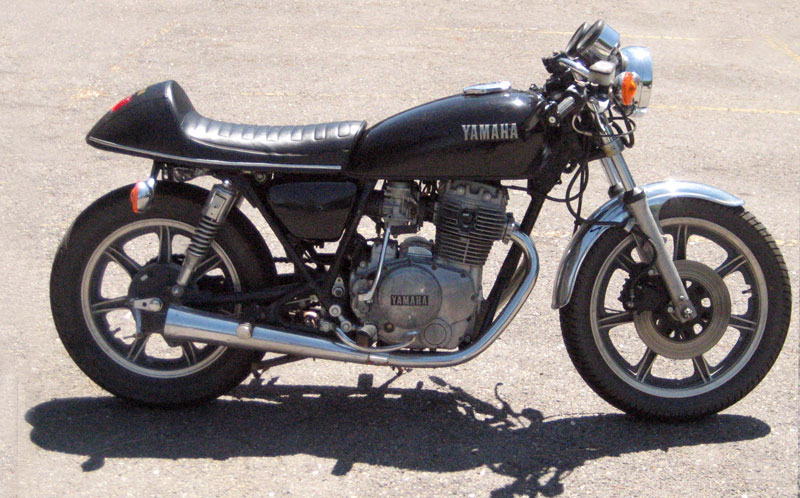
And here is the first picture I saw:
S959563AB.jpg


It was a little scary at first since it looked a little junky and I had never ridden or worked on a motorcycle before, but I somehow saw past that to the potential that it contained.

The Beginning

I started amassing parts for my new project and I made my first trip up to see it (it is 2 hours away in Washington while I'm stuck here in Oregon). The carbs and petcock came home with me to be rebuilt while I planned my next weekend off to officially start working on the bike.

I bought a small ultrasonic cleaner from Harbor Freight, a bucket of carb dip, rebuild kits for both, and got to work.

Petcock before:
IMG_5822.jpg


And After:
IMG_5833.jpg


I was pretty impressed with that ultrasonic cleaner and began tearing down my carbs to strip them of the nasty black caked on paint/grime and get them ready to rebuild.

A before/after dip and ultrasonic comparison:
IMG_5840.jpg


And completely assembled:
IMG_5845.jpg


I also ended up putting a couple of cone pod filters on them and throwing in larger main jets (140, two sizes up) to compensate for the new pods.

Along with these rebuilds, I ordered a new chain, sprockets, headlight brackets, clipons (clip-ons?), turn signals, mirrors, carb holders, and a few misc. small things that are escaping me at the moment.


The Present

So, now that you are all up to speed, we are finally at this past weekend, where I finally got a chance to get some actual work done.

First thing I did was throw those beautiful new carbs on the bike and chuck that old battery and it's rusty tray. I replaced the battery and tray with a smaller 5Ah battery from BatteriesPlus (WKA12-5F).

After installation and removal:
IMG_6184.jpg


After that, we got a temporary fuel tank solution together and she fired up and sounded great! Before the carb rebuild, the left cylinder was hardly firing at all, but after the rebuild both cylinders were firing normally and temperatures at the headers were the same. My first victory and also my first time hearing my new motorcycle run! Still need to buy/make a syncing tool, but it actually didn't sound too bad with my eyeballing it. Also, no pops or backfires and the idle was nice and flat, so I'm thinking those jets were a great choice!

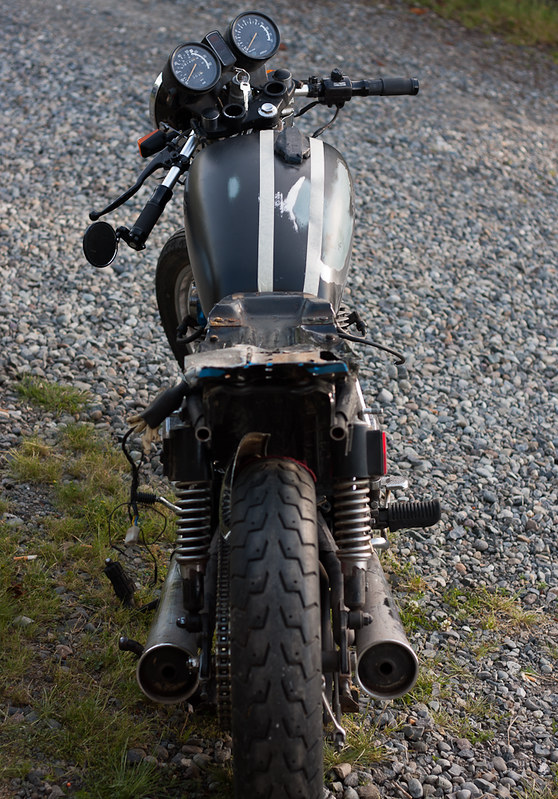
At the end of that day, this is what I was left with (ignore the seat foam and cell phone quality picture, it is just there to cover up all of the to-be-hidden electronics and I forgot my nice camera):
IMG_20120527_192508.jpg


The next day we changed the sprockets and chain and I cleaned up misc pieces of the bike. Didn't take any pictures as it was a pretty lazy day and not much had changed.

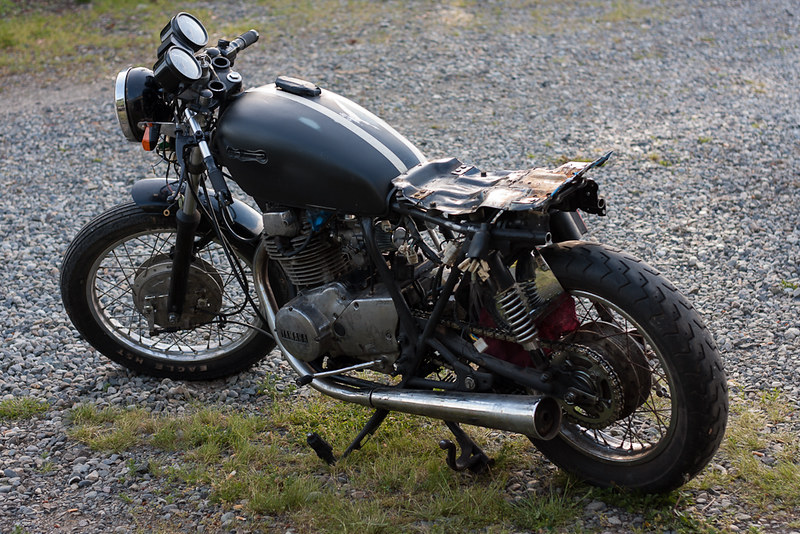
On my last day in town, I got about an hour to work on it and convinced my father-in-law to come out and hack off the rear fender mount brackets in preparation for a loop to be welded in. As an added bonus, he also cut off the mounts for the battery box.

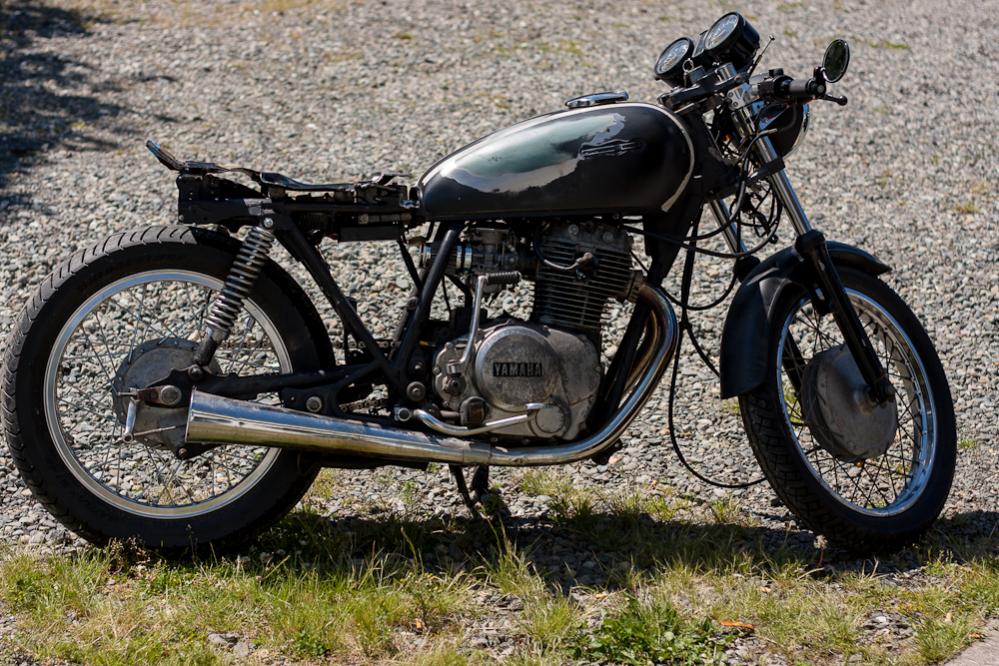
As of now, this is the state that she rests in:
IMG_20120528_194419.jpg


I couldn't be happier with the progress that was made this past weekend and couldn't of done it without the help I received out in the shop as well as everything I have picked up so far from this forum. I'm really stoked to contribute to this community as you have all been welcoming and friendly (especially compared to some other motorcycle forums...). I have a lot of learning to do, but I'm hoping to really dig into it here once school is done and get this thing on the road.
 
Last edited:
That looks great! A lot of people chop the rear fender off much closer to the shocks but I'm excited to see what your plan for that is! Also, I couldn't help but notice that you mentioned your bike was a heritage special. I notice all the hardware (including the side covers) points to that model, except that they came with a front disk brake as far as I am familiar with my own.
On your battery box, I'm wondering what measurements you plan to use for your new one. I'm in the market for a new battery but figure that I obviously cannot just pop a new, smaller battery into the stock box without damaging it shortly after take-off.
Either way, it sounds like a great find and an excellent way to dive into the motorcycle subculture. Welcome to the forum!
 
At first I wanted to chop it real close to the shocks, but we decided not to cut too much at first and see if we can use that rear brace for something seat related. As far as the battery goes, it will be mounted on its back underneath the seat in a box that will follow the bottom line of the tank back to where the splash guard thing is.

According to the model numbers, it is an XS400SJ. I'm not too familiar with the stock features of any of the models, but you aren't the first to think it was supposed to have a front disk. Its possible it was swapped out during its life outside.
 
Trying not to post too much, but I got my clipons today! I didn't realize when I ordered them, but they are adjustable. Not too bad for some "cheapo" eBay ones. Super excited and now I need to plan a trip to get the front end all sorted and begin work on the seat and tank.

Quick pic of the clip...ons.
IMG_6188.jpg
 
Something to think about (that I didn't, and should have, when I switched to clipons.)

All your cables and wiring will be longer than is needed. You may want to look at shortened cables, once you know how much shorter they need to be. You can do this yourself (with a bit of work), or just budget for the parts later.

Good luck!
 
Welcome and great intro! Didn't get a chance to read it all yet. Look forward to the progress reports :thumbsup:
 
Something to think about (that I didn't, and should have, when I switched to clipons.)

All your cables and wiring will be longer than is needed. You may want to look at shortened cables, once you know how much shorter they need to be. You can do this yourself (with a bit of work), or just budget for the parts later.

Good luck!

I'm hoping to make my own cables once I get the whole front end sorted. I need to look up how people are routing cables still because they definitely are an eyesore.


Welcome and great intro! Didn't get a chance to read it all yet. Look forward to the progress reports :thumbsup:

Thanks! It is a little bit of a wall of text, but that's what pictures are for :D
 
I got the same clip-ons. I agree, the quality looks quite good for the price. Only problem I had with mine is one clamp was slightly larger in diameter and wouldn't clamp the fork tightly. I removed a bit of material from either side of the opening in the clamp and now it clamps tight. For half the price of any other 33mm clip-ons, I'm happy.
 
Pictures are always good, and good pictures are even better. Your father-in-law will want to be borrowing that bike when its done. You should have no problem whoopin that CB350 when riding with your bud, :bike: I think they were famously slow and didn't sell enough and is why the CB400 shortly after.
Nice thinking, getting the jump ahead starting on carbs and stuff before even getting the bike. And darnit why didn't I get that ultrasonic from Harbor Freight, I really was going to :( The wire spokes look good if you can live with drum brakes. Classic look :thumbsup:
Do you have some mechanical background, sounds like you going about it effortlessly, unlike myself :laugh:
 
I got the same clip-ons. I agree, the quality looks quite good for the price. Only problem I had with mine is one clamp was slightly larger in diameter and wouldn't clamp the fork tightly. I removed a bit of material from either side of the opening in the clamp and now it clamps tight. For half the price of any other 33mm clip-ons, I'm happy.

Good to know! It's great to hear from someone else who has these as I was a little nervous about fitment even though they look nice.

Pictures are always good, and good pictures are even better. Your father-in-law will want to be borrowing that bike when its done. You should have no problem whoopin that CB350 when riding with your bud, :bike: I think they were famously slow and didn't sell enough and is why the CB400 shortly after.
Nice thinking, getting the jump ahead starting on carbs and stuff before even getting the bike. And darnit why didn't I get that ultrasonic from Harbor Freight, I really was going to :( The wire spokes look good if you can live with drum brakes. Classic look :thumbsup:
Do you have some mechanical background, sounds like you going about it effortlessly, unlike myself :laugh:

Considering the amount that he is helping me out, that is perfectly fine with me! I've mostly just worked on my cars, but I tend to go a little overboard researching things online. I'm finding the simplicity of everything just makes sense and is a really great break from my car (a 2002 VW GTI 1.8T).

That little ultrasonic cleaner is one of the best tools I've bought in a long time. A buddy of mine works at Harbor Freight, so the price I got was one I couldn't refuse. Regardless, I highly recommend getting one!

The wire wheels will be on there for good as I love the look of them. I might try to find one with a front disk, but, as long as I can stop, I am happy.
 
Alright! Finally got a few days off of work to go put some time into the bike.

Day one: As soon as I got into the shop, I pulled the triple tree off and threw on my new headlight ears and clipons. I also lowered the forks about an inch or so to help level the tank out since it looked like it wasn't completely flat at the stock height. Threw on my turn signals and the stock headlamp (which will be getting replaced) and snapped a picture at the end of the day.

2q384yh.jpg


Day two: Sanded. All. Day. Long. Sanding bondo really sucks, but the tank is almost ready for paint, just need to get a few of the high points down and it should be good to go. Didn't really get anything other than that done this day.

Day three: Did a bunch of running around and finally got a few hours to work on the seat pan. A buddy of mine who is at the shop is really handy with welding and making metal into whatever he wants it to be, so he commandeered the pan creation. We ended up using the old stock pan for ease of mounting and just cut away until we got to a shape that is more like what I'm aiming for. There is still a lot of work to be done on it, but it is a good start and will be great once he welds some more pieces on to tidy it up and blend things together. Here is a picture of how I left it today. (Ignore the rear fender that fell weird on the back tire and the halfway down center stand)


Now I need to order a few more things in preparation for my next trip. Paint on the tank should be done by the time I get back and hopefully I will be able to ride it soon!:thumbsup:
 
Dan, this is a clear, concise, and visually interesting write up. GOLD STAR for you SIR!

Thanks, Drewcifer! I'm getting really pumped to get this thing done and I have to tell somebody about it, because my wife can only really hold interest in my babbling for maybe a couple minutes, which is understandable.

Last night I put in an order at MikesXS for a rim and spokes to build an 18" rear wheel, a 7" headlight bucket, some miscellaneous cable ends to tidy up my overly long cables, and also ordered a smooth throttle tube from Dime City in hopes that I can actually get my right hand grip on the rest of the way. I also just ordered some tires (Bridgestone Battlax's) so I will actually get to ride when the seat and tank are done.

This is gonna be a long week... :bike:
 
Tires showed up today! Yes! I also got a new throttle tube and a tail light earlier in the week. Tomorrow should bring my rim and spokes and bunch of misc. other stuff. Can't wait to plug away at the bike next week!

full
 
nice I love the smell of rubber..................

Me too :D

I just got back from my "vacation" to celebrate my wife's graduation from medical school (woo!) and to go and work on my bike some more. This time around I brought tires, an 18x2.15 rear rim and spokes to build myself a wheel, my newly assembled headlight, and some other miscellaneous little things.

Headlight just after assembly.
full


On the first day I spent a while trying to get a grip onto my new throttle tube, with great, hand blistering success. I also took apart the rear wheel so I could use the hub for the new wheel I was going to build. After lacing it, my father-in-law helped me tons by making a simple truing stand out of leftover wood and the rear axle bolt. I must say, it worked great and beat paying the $50 to Harbor Freight for one. My night was spent watching TV and truing. Very relaxing.

Truing stand up on the coffee table for ease of truing and TV watching.
full


The second day was by far the best of the three (well, 2.5 really). I rechecked the wheel and did some final small adjustments before heading over to begin work on the bike. After getting stuff together, we ran into town to get the tires mounted and grab some connectors to start wiring the front up. We decided to look around at the shop and, upon digging around in the clearance section, I scored a pair of brand new Alpinestars leather pants and a toolkit that fits perfectly where the starter was for a whole $22! We ran around town for a little while longer, scored a free drink at Taco Bell, and raced back to throw my newly wrapped wheels back on the bike. After doing that, we got the wiring for the headlight and turns sorted and decided that it is about time for me to ride this thing. This is where my great day turned into the greatest day.

We threw the tank on and fed it a little gas, zip-tied any loose connectors and the battery to keep anything from flying off the bike and then started her up. After some convincing, and trying to find the non-existent clutch friction zone, I took it around the yard and killed it a couple times while doing so. I made it back to the garage and my father-in-law asks if he can ride it really quick. Of course I agree, he has had a huge hand in helping me put her together, so why not? Mind you, this bike doesn't have a tail light, an attached seat or license plates and it is about 10:30 at night. As I'm thinking about all of this, he rockets out of the driveway, throwing rocks everywhere and blasts down the road just out of earshot. We then watch him rocket back down the road into a sharp corner and takes off for a few minutes. He finally makes it back and says, "She sure does have a good growl once you get it up there!" This was followed by a burnout against the side of the garage while slipping the clutch, which helped heaps in freeing up those old discs and getting some of the friction zone back. We called it quits for the night after that and I pretty much fell instantly asleep from all of the excitement of the day.

Today was more of a half day and not nearly as exciting as the previous one, but definitely productive. Brackets to hold the battery were fabricated and all of the electronics fit nicely up there with it. After all of that was said and done, this is my bike progress report:

full


It looks so much better with the matching front and rear wheel sizes and with the electronics being tidied up under the seat pan. I'm very happy with the progress from this trip and just need to get the seat pan worked out and tie up some odds and ends and I will finally be on the road, or at least close to it!

And I apologize for the lengthy updates, but without all of the details, it's just another build thread. :bike:
 
hi welcome looking really good and you really are going really quick on this
good luck
looking forward to reading more
al

Thanks! I'm moving as fast as possible so I can actually get to ride in the 2 month window we have here in the Pacific Northwest.

:laugh: pops shows how it's dun:thumbsup:

He owns a couple Harley's, but he was smiling pretty good when he got back from his ride on that "little 400." :D I have to admit, I was jealous that I'm not up to that skill level yet, but I will get there soon enough.
 
Well, it's been a pretty slow month as far as progress on the bike goes, but I'm hoping to get back into it this weekend.

I got a short window to work on it last week, but ended up not getting a whole lot done. I replaced a burnt out bulb in the speedometer and drained the oil so I could clean the sump filter and figured I should adjust the valves while I'm at it. Well, I didn't realize that the cover to the sump filter had never been removed, and the gasket didn't fare well and I didn't think to order one before removing it. Luckily I found one on eBay and it is now in my hands waiting to go on the XS. I also flattened out the gauge bracket to make the gauges sit down a little further and close the gap between them and the headlight and also had new holes drilled into the front fender so it hugs the wheel nicely. And on top of all of that, the tank and front fender are all primered and ready for paint which is really exciting! Can't wait to see how it all turns out!

When I got home from the trip, I was trying to figure out something to do about a seat because that is what is really holding the project back now. The pan idea we have been working on was going really slow and not really shaping up to what I had in mind, so I started browsing around and getting ideas for complete seats I could buy off of the interwebs.

A few days of research later I decided to buy an XS650 sport seat, which will have to be modified to fit the bike, but I think will look really awesome when done. There is one XS400 that I saw with that seat on YouTube and it looked great, although I think with better fitment will look even better.

This is the XS400 that I found with the seat:

side---cafe-seat.jpg


Here's what I have in mind for fitment as far as photoshop goes:

6yf62v.jpg


I think if I have it follow the contour of the tank more, it will bring up the rear slightly and look a little more aggressive and have a more natural flow aesthetically.

The package can't come soon enough and this weekend is definitely taking its sweet time getting here, but hopefully there will be tons of progress, and even more riding (and pictures!) when it's all done.
 
Back
Top