thielb's 82 Maxim restoration

thielb

maxim
Messages
162
Reaction score
0
Points
16
Location
Milwaukee, Wisconsin
Hi all
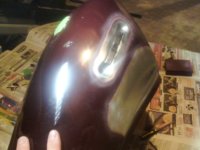
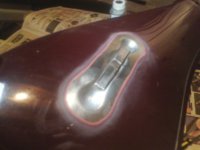
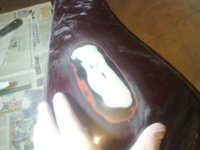
My name is Braden and I've been around here since April. I bought a mostly all original 1982 maxim that appeared to be in much better condition than it was actually in. So over the course of the sumer I drove it to work everyday and fixed up some odds and ends (thanks to all of the helpful feedback her) that the PO half-assed. I just finished my fall trimester in Milwaukee and I'm back home, ready to take on the full blown project. My plans for the bike are: rebuild front brake, rebuild forks and add gaiters, repair the gas tank, and repaint all panels fenders and tank. The exhaust pipes may get painted but the mufflers are fine and I'm not gunna try to fix carbs that aren't broken so those are staying put. My goal is to get the painting done/mostly done over this brake from school and then do the front caliper and forks over christmas. I just finished pulling everything off of the bike and am ready to start on the tank. My badges were broken and I planned on going with a badge delete on the tank anyway. My first question for you guys is about filling the old badge dents. With that small strap tacked over the dent, I'm not sure about how to go about sanding it all clean and filling it. Can that strip just get ripped off or would that rip the tank open? I've seen some de-badged maxim tanks around on here that were actually filled good and proper vs. painting over the dents so that's what I'm going to attempt...cant stand it when the badges are just taken off and a nice tank job is ruined by the badge indents that didnt get filled. Any one have some advice on removing or cleaning around the badge mount so I can sand it and fill it smooth?
 
When I cleaned the tank on my bike, the maxim badge fell off. But before I reattachched it I thought dam... it looks so much better without it. A new paint job may be a winter project for me so I'm interested in smoothing out that dent/strip under the badge too.
 
People on here are forever warning not to spill brake fluid because it's such a good paint remover.
But I have doubts, so you may want to get confirmation from others before trying it.

If it removes paint without damaging the metal, maybe you could use something like a bent Q-tip to carefully apply it on/around/behind the badge mount. Since there's an oily component to it, I would imagine it would not clean up with just water - might need varsol to remove it all for filling and painting.
 
happy turkey day!
First off, my game plan is way off schedule because i ended up spending way more time in the woods than anticipated but it payed off :thumbsup:
Making progress on the tank. I ended up cutting off the ends of the mounting tabs with a small cutting wheel on a dremel. That made it possible to clean in and around the welded part of the mount. The dent cant be reached from the inside due to the splash flange so that's just going to get filled as well. After stripper, sanding, and some delicate work with a pick in the tight little spots around the mount, the tank is ready for bondo tomorrow. Any tips on bondo work? It's my first time so we'll see how she goes...
 

Attachments

  • deer.jpg
    deer.jpg
    166.7 KB · Views: 232
  • Image027.jpg
    Image027.jpg
    219.9 KB · Views: 201
  • Image026.jpg
    Image026.jpg
    182.8 KB · Views: 217
perhaps I'm too european to understand this deer hunting but I personally can't see the fun of it :shrug: to each his own I guess, but all I see is bambi's mom

nice job on the tank though! looks real clean! I have no tips on the bondo, I haven't tried it myself yet. But I think with metal this bare it'll stick no problem. Also the mounting tabs give you a lot more surface to stick it to, so I think it should be a relatively easy bondo job. I would take some more paint off in the area around it though, better too much than too little.
 
Theres another type of body filler that a lot of people have used cant remember the name of it at the top of my head but its much better than bondo.If you use bondo tip is to apply very thin layers at a time till you get the proper depth to fill your dent.Then the fun begins sanding,you want to use a medium grit till you get it smooth.Then work your way to super fine when it comes to feathering it to blend.There was a member on here that has been doing dent filling and body work for 20 years or something,anyways hes realy good and made a knee dent tank that turned out realy well.Maybe if you search the forums you can find his thread and body filler he used.
 
So when I finish all of the bondo work and its time to prime, I just have to cover the repaired areas yea? I plan on sanding through the clear all around the tank too so when I repaint, I'll be directly on top of old paint and new primer from the repairs. Or am I supposed to prime over the old paint too and just cover everything?
 
Just my opinion but I would strip the whole tank down to bare metal,prime and paint.Depending on the paint already on the tank you can sand it to scuff it up and then prime over and hope it doesn't bubble up from underneath.This was the problem I had with mine.
 
Getting back home to the bike in a week and I'd like to get the forks finished up. The plan is to replace the existing fork oil with some fresh 20w. I've read plenty of threads on the process so I think I'll be able to handle it. My only question is will I actually have to replace the stopper clip as the manual recommends? Also, the fork seal kit from mike's would be a good idea while I'm at it too right?

On another note, the front caliper needs a rebuild, I've been having some sticking problems. I can't find a rebuild kit that fits from mike's, has anyone rebuilt a maxim caliper and would you be able to point me in the right direction?

Thanks guys, have a good one :thumbsup:
 
I didn't replace the stopper clip, and I don't see what the need is to replace it if it's still in good condition. BTW, it took me a few tries to flip it out of there with a tiny flat screwdriver, just try to get under it from the top down while you push down the thing it's supposed to stop. Don't worry too much about breaking it, they're not so fragile.

I have no experience with mike's rebuild kits for the fork seal nor for the caliper
 
Thanks willem, knowing my luck it'll shatter but we'll see what happens :thumbsup:

Looking at the parts diagram, the piston assembly for the caliper is all lumped into one part number...which im guessing isn't a matter of just waltzing on in to the yamaha dealer and finding a large stock pile of said assemblies. A thorough cleaning and a new brake line might just have to do I guess. If its really beat to hell in there, might just try to pick up a new brake assembly. :shrug:
 

Attachments

  • front brake.PNG
    front brake.PNG
    176.1 KB · Views: 175
Makin progress on the tank! Really pleased with how well the badge delete worked as well as that massive dent. Not quite as scared of bondo anymore :laugh: 
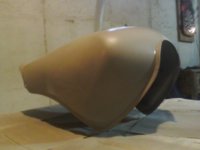
Got er all primed up now!
 

Attachments

  • Image069.jpg
    Image069.jpg
    198.6 KB · Views: 196
  • Image072.jpg
    Image072.jpg
    170.5 KB · Views: 208
Back
Top