Carb cleaning with Lemon juice?

arfstrom

XS400 Guru
Top Contributor
Messages
1,832
Reaction score
24
Points
38
Location
Red Wing, MN
Hi guys I know this is out from left field, but I was wondering if anyone has cleaned the varnish from your XS400 (substitute your bike here) I was reading a carb cleaning that the author really feels his carbs were best cleaned by boiling your carb in the lemon juice. I am almost ready to try it. (not really convinced yet) my wifes bike has been sitting for nearly 9 years with no activity, and we were able to start it prior to my replacement of the Float needles, now I am thinking I need to remove all the rubber stuff, pull out all the needles,:banghead: and do something more than when I last did anything :doh:with it. Thanks for any input.:)
Tobie Arfstrom

ps the web site for the above mentioned clean suggustion is
http://cycles.evanfell.com/2008/09/how-to-clean-a-motorcycle-carburetor-the-right-way/
 
I boiled my carbs with 1/4 cup white distilled vinegar to 1gal water for 30 minutes. after that i took an air compressor and blew out all the holes and crevices on the carbs. Please note that some may need to do this several times before getting all the gunk out of the carbs. This worked great on my carbs in just one shot.
 
I used vinegar as well, but I would use lemon juice. I just happened to have vinegar. No reason it wouldn't work, but it;s not a magic cure-all for carb cleaning. the passages should still all be checked for flow.
 
Vinegar/lemon juice will work well. The heat and water are able to get places that a simple spray can't. That and the acidic properties help loosen and disintegrate the gunk/varnish fairly well.
I boiled mine for about 4 hours each carb and they came out super clean. Make sure you spray all the orifices/jets well, just in case.
 
I used house hold vinegar, it is so strong and concentraded it is not advisable to eat. Doesnt work half as good as the brake cleaning fluid i used afterwards, with this you will even dissolve tons of goo not visible to the naked eye and your carbs will work and look as good as new.
 
I did it last night, now to put it all back together. I was trying to figure what hole was on top of the Carps, right under the diapham. Seems there are lots of weird stuff in that hole. One carb had what looked like a silicon plug, like you get from the tip of a caulking gun, The other one was not as gunked up. I am assuming that gunk was varnished gas. Other people had said that hole has had bugs in it.

432dtlw.jpg


I said carps, sorry, my spell check didn't catch it
 
Last edited:
there shouldnt be anything in those holes. if it still looks like something in them you will need to do it again and again until all holes are cleaned out. also after boiling, take an air compressor and blow all the holes out until they are gunk free.
 
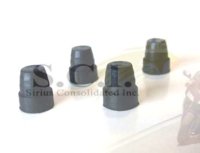
I'm having trouble visualizing what your saying but its possible your talking about the slow passage plugs. This is in the bowl so if I'm way off base just ignore me. I'll attach a picture. Mine were toast I had to buy new ones. Rubber was rotted.
 

Attachments

  • slow passage.jpg
    slow passage.jpg
    14.3 KB · Views: 251
Those are used on some,but not all years,as in my '82 seca DOHC,none are shown on drawings of the carbs. lha
 
Ya I think your right from what I understand none of the dohc have them. I only own singles. I was assuming its a single over head cam. I probably shouldn't make assumptions.

Tobie what year is your bike? DOHC?

Although I'm not sure if I'm even close on this one as you said top of carb and the plugs are on the bottom in the bowl .

Picture?

Shaun
 
432dtlw.jpg

Thats the hole, What bike I have, its a 81, XS400SH. I am guessing that this bike is not a DOHC,
Okay CMOORE.... I boiled it for 20min apiece. I did blow quite a bit of air thou it. It was when I was done, and using a probe thing when I found the gunk. I still think its just gas that varnished, I will see if I can get a photo of that one.

Shaun, now that i have attached a pic, enuff said ;) ohhh sorry I should have put that in there before this.

Thanks everyone for taking time to help me today. my weekend is non traditional, so I may not get to do anything to the bike till my next weekend(Tuesday/Wednesday)

1981 Yamaha XS400 SH, 4R4
 
Yup thats not the part I was talking about. Digital cameras are great aren't they. I use mine constatantly. My recomendation ultrasonic if you know anyone that has one. My carbs were brutal and it actually took several hours of ultrasonic to get out all the varnish. It's also abit less hard on rubber parts because it can be used hot but not boiling. Also getting your carbs right apart will allow the varnish to more easily flow out of the carb and all the little holes.

Shaun
 
http://www.thegsresources.com/images/carbs/025_Prepare%20to%20remove%20air%20screw.jpg

Okay, looking at this pic, I skipped this step. Before I get to reassembling my carb, should I pull the plug on my Air screw? and do this here stuff (http://www.thegsresources.com/gs_carb_02.htm) Are the chances that the Air screw being messed up, or all that? Does anyone fill that hole with once you pull that plug? (silicon? another rubber plug like the one in the bowl?)

2nd question for a second dipping, would water alone be allright, or should I just redo the lemon juice or Vineagar one more time?
Tobie Arfstrom
PS Thanks
 
Your air mixture screw is already unplugged (that is, if the above pic is of your carbs), and if you're cleaning the carb, you should go ahead and remove it. It's just a screw with a spring. There is a very small o-ring with a very small washer on top of it. Pull that out too. I bent the end of a paper clip so that there was a 1mm "L". Slid that in and hooked under the washer to pull it out. Here's a pic.

48-5011.jpg


Also be careful, sometimes the little tips of the actual screw break off and stay seated in the hole. I'd shoot a lot of penetrating lube (PB blaster, Gibbs, etc) in there and let it sit for a while, then be very gentle. Once you get it out and clean everything up, put it back in. No need to plug it back up.
 
All right, "I CAN DO IT!" Thanks I believe its the Mikuni B34sIII, from the Pics from the german website, (I am going on memory now)
Thanks
Tobie
 
Back
Top