First Build

pezt

XS400 Member
Messages
27
Reaction score
0
Points
1
Location
Sweden
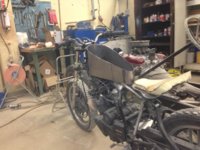
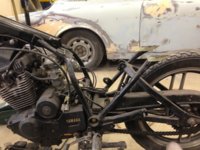
I Got a 82 xs400 the other day, and since I currently goes to a school for autobodywork , why not build something cool !

just been at it for 2 days though.

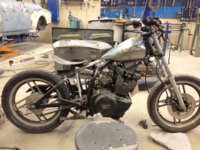
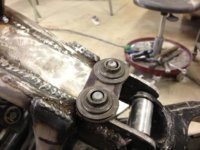
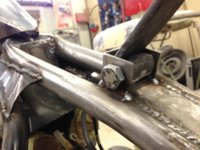
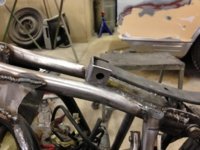
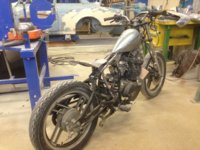
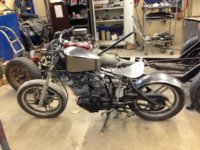
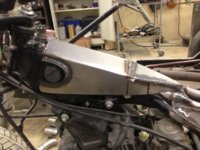
Its gonna be a hardtail bobber , nothing fancy , just plain and hopefully bitchin by the time its done .

Im handmaking as much as possible as I am in school to learn stuff like that .

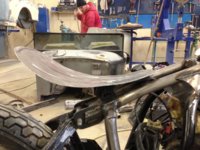
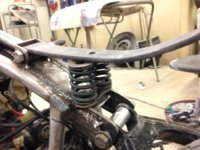
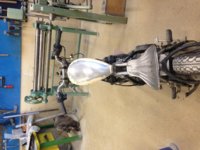
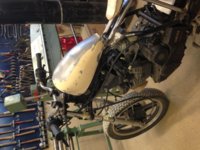
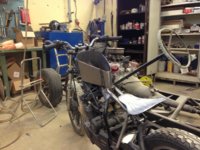
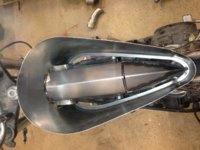
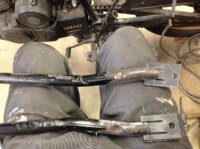
the "gastank" in the last pic, is just a few thin pieces i
I shaped up a bit to mock-up something to kinda see where I want the tank to sit , and yes they are warped and messed up ..but I did not care one bit =)

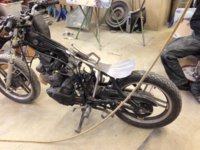
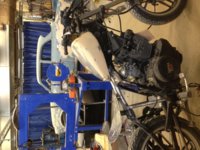
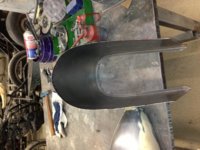
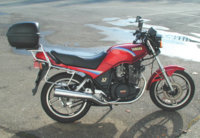
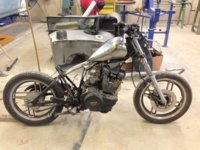
oh yes , the first pic isnt of my bike , but its the same make and model and color and everything ..just what it looked like 2 days ago :laugh: .

gonna try to update when ever something fun happens on it .

Take care !

/Erik - Sweden
 

Attachments

  • IMG_1406.JPG
    IMG_1406.JPG
    108.7 KB · Views: 337
  • IMG_1409.jpg
    IMG_1409.jpg
    220.9 KB · Views: 300
  • IMG_1412.jpg
    IMG_1412.jpg
    306.3 KB · Views: 340
  • IMG_1415.jpg
    IMG_1415.jpg
    268.1 KB · Views: 342
  • IMG_1418.jpg
    IMG_1418.jpg
    240.9 KB · Views: 394
i like that look that's where i am wanting to go with mine but i just got mine running and i'm gonna drive it for a little bit before i start cutting it up. did you bolt on the new part of the frame or did you bolt it on. i've been talking to some more guys on the forum and they have been bolting them on just wondering?
 
looks like the rear is bolted, and the front of the new frame parts are welded on. Correct?

That's a good start for just a two day job by the way! Did the bike run well before you started chopping?

oh yea and welcome :)
 
The rear is bolted in the original swing, there is a pic of the struts i made to be able to bolt the new frame mod to the existing upper swing mount. since the swing was aluminium that was to me the easiest way to join it together .The front is welded! So that is correct! Used the pipes we cut off to rebuild the front frame , the bends on them fitted in nicely , I thought at least ! So there is zer0 material cost so far!! Free is yummy!!
Welded on 2 additional supports , in between them I will try to fit in the electronics and battery box , I'll add a pic when I get home!!

The bike ran nicely! But there was some glitch between the start button and the starter motor.
But the electronics will get an overhaul when the rest is done.
Thanks for the welcomes!!

/Erik
 
Last edited:
Today I reinforced the mods I did to the frame some ,

I also got some help from my teacher to figure out a good way to get some "suspension" in the seatpan , regular bobberstyle seatsprings would be a pain to fit ,since the swing is aluminum its harder to weld something on it ..mainly because we aint got a tig that will weld aluminum in our shop .:shrug:

We ended up re-forgeing an old leafspring with an oxy-acetylene torch, to serve as suspension and seatpan mount , we´ll see if it works out once I got it fitted , gonna drill through the frame and weld in some casings for a bolt that´ll hopefully will hold the front end of the seatpan in place ..then fit the leafspring with a rubber bushing in the hole that is already present in it..might be fun ! might be failing ..time will tell ! .:thumbsup:

the seatpan in the pics is just a mock-up I made to test shape and placing .

have a nice day !!

/Erik
 

Attachments

  • IMG_1427.jpg
    IMG_1427.jpg
    231.1 KB · Views: 294
  • IMG_1426.jpg
    IMG_1426.jpg
    238.3 KB · Views: 292
  • IMG_1422.jpg
    IMG_1422.jpg
    259.1 KB · Views: 317
  • IMG_1420.jpg
    IMG_1420.jpg
    241 KB · Views: 257
Your swingarm is aluminium? Are you sure? The stock swingarm on my '82 Maxim was steel. I just checked it with a magnet to be certain. Steel for sure. Could you double check yours? I'm curious if this is yet another difference between Maxim's and Seca's, or a European vs. North American model difference...
 
sure thing ! i´ll take a magnet to it tomorrow ! but I am 99,8% sure its aluminum !
 
Welcome from Sweden nice start to your build,looks like you are doing it right compared others I have seen.Just something I like about the dohc builds compared to the specials.
 
I'm just waiting on what to do with the wiring. Nice build glad to know that other people still like this bike. Around my house no one has even heard of them. I'm looking foward to see your build.
 
Last edited:
Today I have built the seatpan mount and spring !

I revised my idea a bit, I decided not to mess with the frame , so not to compromise the structural integrity of the frame. Instead I made a little bracket to bolt on the reforged leafspring, I also scrapped the idea with a rubber bushing as damper because with the bracket the spring came up a bit more so that I was able to fit 2 springs underneath on a mount I made , its two valve springs from a chrysler 330 V8 I belive.
They worked out great in combination with the leafspring and it actuallt got really comfy!..yayy ! and they fit the look I´m aiming for much better .

I also got started on a box to house the ignition boxes..more on that tomorrow !

Have a great day peeps !
/Erik:thumbsup:
 

Attachments

  • IMG_1441.jpg
    IMG_1441.jpg
    279.2 KB · Views: 312
  • IMG_1435.jpg
    IMG_1435.jpg
    205.3 KB · Views: 235
  • IMG_1434.jpg
    IMG_1434.jpg
    187.5 KB · Views: 263
  • IMG_1432.jpg
    IMG_1432.jpg
    192.1 KB · Views: 263
  • IMG_1437.jpg
    IMG_1437.jpg
    188.8 KB · Views: 271
In my opinion raising the seat in the back like you are doing is a great idea.Adding the springs should also make the seat more comfortable to sit on and ride also.Looking good far.
 
Yeah , it looked way better to me, since I want that old school look.
And with the two springs working together it got way more comfortable
Then I anticipated. Real happy with that! And getting the seat up a bit
made for a more relaxed position ! Can't wait until I can ride it..
 
What are you doing for an exhaust system,are you going to have the pipes to where both are on the same side?I have seen someone elses build where it was done that way.It was curved along the lines of the engine crankcase and trans then towards the rear tire.Since you dont have the down pipe tube in the front of the frame it would be easy to do.
 
Gonna Do some kind of straight pipes.. I have benen thinking of have both on the same side, I really like that look, will see
 
Today I finished up the box for the Ignitionstuff and fuses , just a plain lil thing that fits in where the airfilterbox was originally ..well on the bottom of the frame ..and ontop of that I will make a battery box , once I got new conical airfilters so I know how much clerance there will be . Thinking of doing a round batterybox . Kind of imitating an oiltank , just for the estethics .

I also started to figure out what kind of tank I will fit on it ..because that mock-up tank fitted that way would contain fuel enough for like a whopping 10 minute ride ..
I have already built a tank , but I built that with the old special frame in mind ..but I think I will fit that ontop of the HUUUUGE and wide frame I now have to work with, and just elongate the sides of it to cover up the frame , Its gonna look huge but all in all I think it will work out ..its still not gonna look as huge as the original tank.

Posting a few pics , the box for the ignition system is so tiny it hardly shows on the pics ,
and the tank Im thinking of using is just balanced on top of the frame ..but that will be sorted next week !

have a great weekend all !! :thumbsup: Sorry bout the sideways pictures ...I totaly blame Windows 8 and Iphone for that !
 

Attachments

  • IMG_1448.jpg
    IMG_1448.jpg
    234.8 KB · Views: 282
  • IMG_1443.jpg
    IMG_1443.jpg
    245 KB · Views: 282
  • IMG_1447.jpg
    IMG_1447.jpg
    239 KB · Views: 276
  • IMG_1446.jpg
    IMG_1446.jpg
    220.6 KB · Views: 259
Today I started making a new tank for my bike ,I felt the other I made was too much hassle to modify. It turned out a little to long though , so I have to cut it down a bit tomorrow ,because it really didnt fit the style I thought . and thats about it .:doh:
 

Attachments

  • IMG_1454.jpg
    IMG_1454.jpg
    205.2 KB · Views: 239
  • IMG_1461.jpg
    IMG_1461.jpg
    233.3 KB · Views: 248
Been a while since I updated , had some other stuff to do . Still wrestling with that tank , but its starting to come together, almost finished the tunnel for it , been a little tricky cus of the way the frame is built on the seca, can´t really get the tank as small as I want, if I want it to contain more gas then a lap round the gas-station..oh well , compromises is a necessarry evil .

all right .. got some pics as well ..also I started on the rear fender , its just roughly shaped as of now , just to kind of check out how I want it to look.

Also got pipe for making the handlebars so that will be happening soon ..(just because it seems like a lot of fun !!)

have a nice day peeps
 

Attachments

  • IMG_1465.jpg
    IMG_1465.jpg
    243.4 KB · Views: 261
  • IMG_1483.jpg
    IMG_1483.jpg
    282.5 KB · Views: 278
  • IMG_1484.jpg
    IMG_1484.jpg
    193.9 KB · Views: 269
  • IMG_1489.jpg
    IMG_1489.jpg
    198.6 KB · Views: 272
Back
Top