How to balance carbs?

seanowenss

XS400 New Member
Messages
3
Reaction score
0
Points
1
Location
Vancouver Island, BC
Just bought an 82 XS400J. The bike runs, but only with the choke engaged and it dies if I disengage the choke or give it any throttle. The exhaust is also uneven coming out of the mufflers. I've just removed the carbs to clean/repair them. I'll also check for other air leaks, adjust the idle air screw, and make sure the suction line is working - tips found in this forum. Thanks!


How do I "balance the carbs"? my manual says I need a "level gauge" and a "fuel level gauge adaptor" is there an at home version of these tools?

Is there anything I need to do before the "balancing"

Bonus points: Does anyone know the horse power of this bike?
 
First off clean those carbs then clean them again to resolve the choke issue. Then you sync them (another word for balance) so that the carbs pull the same vacuum. The tool to do that is called a Manometer there are plenty of thread on this forum that deal with making one for cheap like this one (http://www.xs400.com/forum/showthread.php?t=5685) I personally already had vacuum gauges lying around so I used those. Operation is very simply attach the ends to the vacuum barbs on the intake boots then try to keep the fluid level the same by turning the sync screw in between the butterflies. I think these bikes are stated to make about 36hp
 
Just curious how to do a a 'bench sync' on these carbs?
like what is the usual procedure...
I saw on page 74 of this excellent tutorial that you can use a wire gauge to do a general bench sync...
http://www.mtsac.edu/~cliff/storage/gs/Mikuni_BS-CV_Carburetor_Rebuild_Tutorial.pdf
But it doesnt give much instructions on that specific step so I kinda guessed...

and also read researching tonight: "you can also use a piece of wire as a feeler guage
open the idle screw then close it so the butterfly just touches it. then set then all the same. Done properly a bench test is usually within 1 cm on the actual sync tools and good enough."

I may need more clarification on "open the idle screw then close it so the butterfly just touches it. then set then all the same."...

I noticed one of my butterflies was a lil more open at the bottom than the other side when I used a little upward force in that middle area to open the butterflies and compare that small gap size.
So I put one wire under one carb and turned the balance/sync screw until the left side was about the same and they both completely shut at same time, and looked like both opened at same time. Is that generally correct or more correct procedure is needed to clarify (like details like maybe the throttle stop screw should be completely turned outwards beforehand to do the sync)?

EDIT: i think I kinda figured it out... you turn in the throttle stop screw so the gap slightly opens on left side carb so the wire gauge fits just underneith the left side (left side if engine side of the carb is facing you), then turn the adjuster screw to get the right side so it also can just get the wire to fit underneath the butterfly.

I guess I'd like to do a real sync test with one of those gauges (vs making one)...
Are these the supplies I need:
http://www.amazon.com/Carburetor-Synchronizer-carb-Gauge-cylinder/dp/B004MSJ7C8
http://www.amazon.com/Motion-Pro-08-0040-Carburetor-Adapter/dp/B000OO4PWG
I read somewhere you need a 6mm adapter kit for Yamaha bikes.
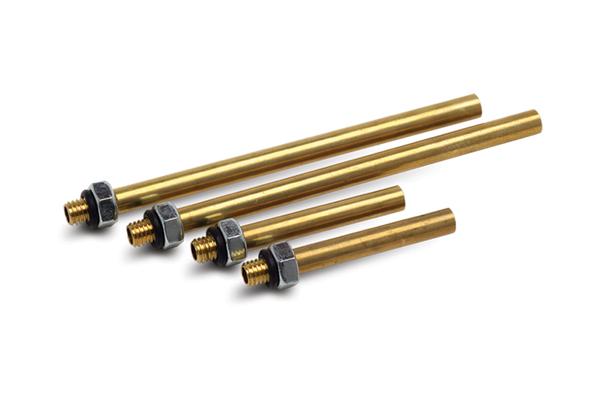
Also Mikes XS mentions "Note: Sync gauges hoses hook up to carb holder vacuum air barbs (not included).
Your bike must have these air barbs in order to use this sync tool."
Does the (1978) XS400 have these air barbs to use a sync tool with it?
 
Last edited:
Bench sync = Static sync : using two bits of equal diameter (one for each carb) place one bit in each butterfly adjust the sync screw found between the carbs. adjust until both bits pull out with the same amount of friction or pressure. Then use a vacuum gauge to fine tune the adjustment.

To do a Bench/static sync by eye will not be as close as you think. using drill bits works well because they are truly machined to the same Diameter. Wire from a roll or even electrical wire very in diameter from inch to inch.

Now if you have no vacuum gauge you can make a bottle gauge to use you can find the download at www.yamahabikersclub.com under General Downloads.
 
Last edited:
I wanted to add this earlier for the OP seanowenss but I couldn't copy the pages from the interactive CD manual I bought. So I contacted the guy I bought the manual from and he sent me these two pages. They just came in by email.

I think this will help with any carb specs that you may want to know about. these are for both the XS400 Maxim (J) and the Seca (RJ)

full


full


Thanks you to the Bingodot3 for the page pictures

If anyone is interested in getting a copy of this interactive CD I can give you the guys email just PM me. He was selling it on ebay but I can't find it anymore. But he gave me a lifetime warrantee that if I lost the file because of hard drive crash he would send me another link to download another copy. So far the help I got from this manual had well paid for the $15 I paid for it.
 
google yardstick manometer. 8 bucks max. Works like a charm. you need threaded 5mm inserts for HONDA carbs, and they have to be machined out in the middle. total pain the dick. Took me 30 minutes per piece. I made 5 (always keep a spare)

Balancing carbs will give you better performance than most mods you'll ever do. Trust me.
 
Thanks guys for all the advice.

Hey Drewcifer,
Just curious... you need the 5mm Honda inserts to test the XS400 carbs?

I thought I saw 6mm Motion Pro inserts on Amazon that are labeled as for Yamaha bikes on many sites, so just wanted to make sure (maybe those 6mm are only for new Ymaha bikes but the XS carb manifold is 5mm ?).
How do they work? i see a 2 metal things sticking out of the carb manifold of the XS400 and a tube connects the 2 right now... so there is already a metal thing in the carb manifold...
So how do these things connect to them?
08-0013.jpg


So I guess the questions I have in summary:
1. do you need 5mm or 6mm with XS400 (I have a 1978 XS400)
2. Can i just buy the Motion Pro adapters to use any carb sync tool, or are those only used specifically for Motion Pro sync tool.
3. How do i hook those up to my current carb manifold, (theres already metal things sticking out of them)?


Thanks!,
-Arian
 
I was ass grabbing when I said 6mm. Might be 5mm. I can't recall. But they are the same as those listed above. For 36 cents I got six of them and drilled them out. Took a long time.

My carb has no threaded receptors for those pieces tho, instead, you fit the manometer tubing over the carb boot nipples to sense the vaccum pressure. Works fine.
 
Cool thanks guys. I just put the CarbMate I bought onto the metal tubes that were already on the manifolds. Guess I dont need the adapter set on my bike (I got a fiberglass tank that has a manual petcock, think I read one of the tubes on the manifold is used for the stock petcock? and then you can take it off to use both for your carb sync tools).

I debated making my own manometer but just got a work bonus and decided I'd spend I'd just splurge and get the more expensive tool ... Man, that carb sync screw is hard to reach now that its under the tank. I guess you could get a long fuel line and put your tank on a higher bench so you can access it better ... I also see some expensive offset ratcheting screwdrivers (but since I bought the CarbMate, I dont want to spend too much for another tool now hehe). I guess I could make mine own tool if its quick. Any suggestions? I tried placing a small allen wrench, then tried a toothpick in the middle of the screw to see if I could get it in there and turn it. I could get it onto the screw area, but not turn it once on hehe.
 
You don't sync carbs at anything above an idle. Any faster and the vaccum at the intake drops to far to get an accurate reading.
Leo
 
Pep Boys didnt have any of those Z shaped flat heads. Only had this flexible carb adjusting tool that was worthless.

I just used the most versatile tool at my dispense ... My mom lol.
I just asked her to hold my tank for a tiny bit while i adjusted the screw from above with a screwdriver and watched the CarbMate... took a couple minutes :)

On to finetune the Idle Mixture with my Colortune :).
 
I guess one last final question on carb syncing ... Just want to make sure i did it right...
On my electronic carb device, it says to hook up the left tube coming out of the device to the carb manifold that is the "reference carburetor (the one most directly connected to the throttle)"... and the right tube to the remaining carb manifold.
I think the carb that is 'most directly connected to the throttle' is the right carb (the right side carb when facing forward/sitting on the bike).
Is this a correct assumption?
 
You can ignore this if you have integrated two in one carbs that share a throttle cable mechanism. If you have separate keihin carbs, you follow these instructions.

On most of our bikes the left cylinder fires first, and therefore is the more clear reference of the two. on my bike the petcock demand tube is attached to the right carb. Dunno why.
 
Back
Top