Seca 400 Rebuild New Member Intro

Jtoroli

XS400 Enthusiast
Messages
31
Reaction score
0
Points
6
Location
East Patchogue, NY
Hi,

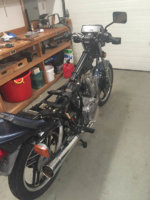
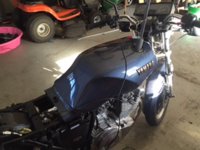
I am writing to introduce myself. I live on Long Island in East Patchogue and have recently purchased an 82 Seca 400. I actually learned many years ago on an XS400. I now have the Seca running well. I am now onto rebuilding the brakes. I hope to take some detailed photos and post. I have found it frustrating that the Seca BRake Calipers seem to be difficult to obtain as rebuilt units. The bleed nipple on mine is broken off and will require chucking in the milling machine to remove. Concequently I purchased another off of Ebay. Anyway it is a fun relaxing project.

I was surprised when I heard the DOHC twin fire up this Saturday. It sounds really GOOD for a 1982 bike.:bike: It sounds NOTHING like my XS Heritage special which I honestly never really liked (sorry guys :) )

All the best,

Joe
 
Last edited:
So far I have the carbs rebuilt and the engine running well on a test tank. I loosened the airbox and the rear fender to get enough room to install the carbs. Frustrating part is that neither the airbox nor the rear fender can be removed without the removal of the swingarm. I tried and decided not to pursue further as I got enough room to remove the carbs.

Tonight now that the engine is running well I will put the rear shock back in and get the aribox etc. buttoned up.

Next project is to rebuild the front brake. I spoke with Michael from Vintage Brake and have a 11mm Brembo master cylinder, SS line and pads on order. I should receive a front caliper from Ebay today or tomorrow. I will post pics of progress as I move along.

I think the clutch plates are probably all stuck together. I will discover more about this tonight. Hopefully there is nothign wrong with the tranny. When in first with the clutch in I cannot spin the rear wheel. Things that make you go hmmmmm.

Fun relaxing project so far.

Joe
 

Attachments

  • Seca_1_Small.jpg
    Seca_1_Small.jpg
    103.7 KB · Views: 155
So everything went back together without any big issues. Things I have found that may help others:

1. the original resistor caps looked ok but upon dis-assembly i found the ceramic piece inside the caps had broken into pieces. Replaced ignition cables and caps....perfect spark again.
2. Cotter pin holding rear sock pin in place is a TRUE PIA to install and remove. I used a thicker and longer cotter so it would be easier to remove in the future. Easy is very relative in terms of removing the cotter:)
3. The little hinge pins that secure the seat can be found at a good hardware store. .88 cents got me back in business in terms of a pivoting seat.

Discovered the steering head bearing are shot. No real surprise here given the age of the machine. Ordered Tapered rollers. If you are in Connecticut or tristate BDI Bearing Distributors in New Haven has virtually every bearing known to man in stock for same day shipment or pick up if you are local. Just a great resource.

Will post more pics as more work is done. Maybe a little boring but the goal is to have a relatively stock machine as opposed to a chop , cafe or other.
 
... Frustrating part is that neither the airbox nor the rear fender can be removed without the removal of the swingarm. I tried and decided not to pursue further as I got enough room to remove the carbs ... Joe
Welcome. If you are simply needing to service the engine, you can position a jack under the engine, remove all but the bottom mounting bolt, then lower the jack and the engine will pivot forward allowing you better access. When you're done you just raise the jack and pivot the engine back up to align the other bolt holes.

Here is a posting outlining how to take the procedure all the way to engine removal
 
Set up the rust removal electrolysis on Friday and let it run until Sunday. Good results.
Anode was just a piece of flat steel stock, foam on the end and around the neck acts as an insulator so it does not ground to the tank. Solution was water and baking soda.
Result after 2 days was lots of funky water and the tank rust gone. Sucked out the remaining grit with thin hose grafted to the shop vac.

Need to rebuild petcock. the list seems to being getting longer not shorter. Also steering head bearings and fork seals :)
 
Pics of the anode and the anode in the tank. The foam made it alot easier to place the anode as opposed to trying to support the metal from the neck without it touching any part of the inside of the tank.
 

Attachments

  • IMG_1524.JPG
    IMG_1524.JPG
    40.5 KB · Views: 143
  • IMG_1520.JPG
    IMG_1520.JPG
    18.8 KB · Views: 152
Remember to get something in the tank as soon as you can! It will flash rust in the blink of an eye if you dint
 
Stayed up late last night and got her bolted back together. Tank clean inside, new fuel filter and just tons of little stuff. The bike was neglected and poorly maintained but not maliciously abused or tinkered with so most everything was a straight forward fix. I did however drain almost 4 quarts of oil out of the engine.....YIKES. Previous owner could obviously not even read a sight glass.

Runs great and starts right up. I need to play with the idle circuit and balance the carbs.

Ordered new tires Today. Bridgestone BT45 90/90 18 front and a 110/80 18 rear. I had these on my Cagiva Alazzurra and loved them. Anything will be better than the dry cracked hockey puck that is presently standing in as a front tire :)
 
Oh and the brakes. While I await the smaller master, lines etc. I got the old master and lines cleaned and back in service.....God do the stock brakes suck. I had a heritage Special and now its coming back to me....lots of planning ahead before stopping. The new setup should help substantially though.

Anyone have some favorite pads with good initial bite and high Coefficient of friction?
 
EBC is always my go to brand. Made out of Kevlar, and in the UK. Watch out for the made in China/Indonesia/etc pads.
 
Back
Top