Electrical recommendations

Robsteeler66

XS400 Addict
Messages
417
Reaction score
1
Points
18
Location
South Jersey
If anyone would like to help a LOT of people, may I suggest component recommendations for electrical newbs like me?

Here is a website that I've looked at, but I'm not quite sure which components I should buy to make my own wiring harness. These are the type of minutia that people who know and make their own, never seem to expound upon. Well, here is the site:

http://www.cycleterminal.com/
 
buying a used harness, is in my opinion, not really a great option. You'll likely end up buying something else that is just as unreliable.. Unless your wiring is completely missing I wouldn't be that keen on buying a used one.

Building one from scratch is the only real way to be sure you have a good one. Check out drewpy's rewire thread. And that site looks like it has the right stuff :)

but honestly, I've considered doing a full rewire to make my bike more reliable but I changed my mind. It's a lot of work, and 9 out of 10 electrical issues are not related to the actual wires: they are inside switches, modules, plug caps, coils, fuse boxes and all that stuff. You'll get better results opening up all those things and giving them a good clean and protecting layer (some electrical spray or something). Also putting some vaseline on your connectors keeps the moisture out, prevents rusting. Replace old connectors, re-solder anything that looks suspicious.
 
I'm going to buy a book on electrics I reckon. The problem is I know nothing about the components, hopefully I can learn what I need.
 
the componnents on that site look fine! At the risk of stating the obvious, here a few things that are important:

1. regardless of what connectors you use (spade, round, multi connector block, whatever) they are no good unless you connect them correctly. this means buying the crimper that the connector requires, soldering, or both.

2. Make sure that the connectors you choose can handle the current being put through the connection. usualy not much of an issue because once they are big enough to get your hands on, they can handle about as much current as our bikes might use, but worth checking.

3. you only need to use connectors at points where you will want to be able to disconnect a portion of the harness for service. you could add connectors each time you branch off from the main harness, but all you are doing is adding oportunities for bad connections in the future. if you can stand to have it wired directy (i.e. it won't get in the way of serviceing your bike), don't add connectors.

3. in addition to those connectors, get some heat shrink. Adhesive lined stuff (basically a layer of hot glue) will seal around the backs of those connectors to keep water out and it is super easy to use.

4. make sure you use the correct wire. Gague and construction are both important. Gague determines how much current the wire can handle, and construction determines flexibility, wear characteristics, and such. Drepy's harness thread says specifically what types to use where.

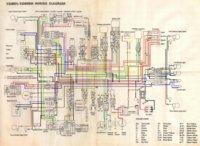
5. Use a color code! either one that you document for yourself, or (my prefernce) match the EOM diagram. it can get a little pricey to buy all the different color wires you will need, but is well worth it if you need to trace problems, make modifications or whatever in the future. Also, I have seen places where you can buy short lenghts of wire instead of whole spools... might be worth looking into if you don't plan to do more wiring in the future...:thumbsup:
 
Grab the wire diagram from the "wire diagram" thread, You can see which connector they used, and plan on which connector you might need. I ordered some from Mikesxs. then I only used on or two of them. The originals were just fine. I used Drewpys Spread sheet as a guide. as I went though an purschased wires, I used the color codes to determine what I needed. Note, I only did the stator re-wire.
 
I broke out the CTEK charger and re-charged my battery. According to the charger it get's the green light. All of the fuses are good. When I put in the key and turn the ignition on I get nothing. Not one indicator or brake light, headlight, nothing. I'm not sure where to begin checking for faults, I mean it's completely dead. Any suggestions?
 
I didn't think of it earlier, Some basics.
http://www.the12volt.com/ohm/basics.asp

This diagram shows you each connector, and if you notice, any wire color change from one side of a connector to the other side, you will notice it here. While thinking of the electricity, think its a river, On the right side of the key ignition, the current is being stopped till the key is on. Once the key is on, the current flows to the safety relays, to tail light. So you have a power to the starter. When I was trying to figure out my stuff, I was getting Google to help. So one of the resources, even thou it is for our bigger brother bike, Some of the stuff is applicable. here is the link. It helped me, but the 650 is not identical. so you have to play it for what it is, more information.

http://www.xs650.com/forum/showthread.php?t=10561
http://www.dansmc.com/electricaltesting.htm When in doubt, this is probably the better place to start. Generally we want to make sure your ground is good, and then start from the battery to the starter, Double check for the stator wires, Find the book and validate what the manual states. It seems to me you have done that. If you still can not get this figured out, YouTube has a dozen videos, so you can variety your Technic. sometimes what we can not see is what is going on. We understand what your typing, but a subtle item might be left out. I generally think no one looks at my links i provide, so I always recommend to Google the resources them selves. that way if in the eventuality that I am running off to work,I can suspect that Google still works. Other great advice I get, are from co-workers. I believe that you have checked out everything you can. I will take a fresh look at this tomorrow, see if I have missed something, perhaps I am getting 2 or 3 of you new owners mixed up???? cause the 3 white wires being shot is very prevailent, and the Voltage regulator being shot is closely associated with all that. Under my photo albums, I have what I picked up from a local vehicle place. (BWD's) from
http://www.oreillyauto.com/site/c/detail/BWD1/R296.oap?ck=Search_r296_-1_3260&keyword=r296
and the pigtail
http://www.oreillyauto.com/site/c/detail/BWD0/PT173.oap?evaritm=BWD+--+R296&rpl=1
(I feel most people will try to save 10 bucks for not buying the pigtail, but that makes the connection water proof, and saves you from creating some to connect up and all that. This more than most print hope that helps.Since my system is in more parts than I am willing to count, now is a great time for me to take pics of stuff. later
Tobie

Get a cheap 12volt test light, like what DANMC link has. you connect the alligator clip to the bike frame, or engine, and then you probe each connector looking for where the power is at.
 

Attachments

  • XS400SHWireDiagram.jpg
    XS400SHWireDiagram.jpg
    213.1 KB · Views: 67
Check the most obvious first the key switch itself pull the plug and jump the wires if that turns it all on your switch is bad if it doesn't check the wires with a pin light or volt meter if no power check the wire on the starter solenoid then the WIRES in the fuse box. Some times putting the tester on the fuse says its good but our old fuse clips can be dirty weak or both so check the wires o and don't forget grounds!!!! A loose or dirty ground can cause hell while checking wires I run a jumper to the negative side of the battery if it all checks out do it again with the negative side of the tester to the frame

Posted via Mobile
 
Start at the battery and trace the power to the key switch. Somewhere along there you may find where the power stops. This may be enough to get power to where it should be.
Often the fuse holders can go bad. Round glass fuses uses clips to hold the fuses. These clips get weak from years of holding the fuses as well as heat build up. They can break off when you pull or install the fuse. Replace with modern inline blade style fuse holders.
Often the switch it self gets bad, Switches can be taken apart and cleaned.
There are several places the wiring is connected together. Any of these can be dirty. Clean them.
Once you get power to the switch and you still get nothing continue tracing the power. You will find where it stops. Once you find it, fix it.
Leo
 
Test lights, if you haven't used one before, this is probably one of the easiest ways to trouble shoot electrical systems. I did not watch the full video. However This is one of the safe-est easiest way to double check for power getting past various switches, and all that. (Remember if you get a DC Test light, DO NOT TEST The White wires. Those are only A/C current. Advance users the multi-meter is more preferred for some of us. You know buzzers, and readings that might make sense, or maybe not.
 
Test lights are ok if you just what to know if power is there. They can't tell you how much power. They might be dim and some think this indicates a low voltage and it is, but how low.
Voltage levels are the important thing. A dirty switch will show power but it can't tell the difference between 12.7 and 12.5 volts. That can be enough voltage drop to keep a bike from running or charging right.
Leo
 
Back
Top