XS400 Brat: First Project

auhenry

XS400 Enthusiast
Messages
36
Reaction score
0
Points
6
Location
Omaha, NE
Hey,
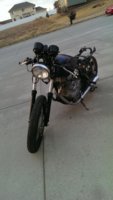
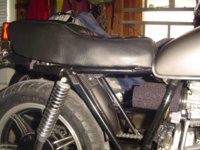
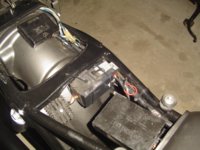
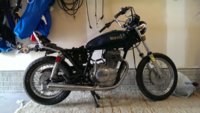
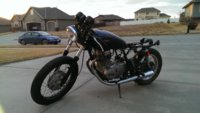
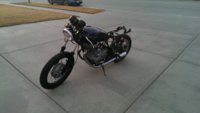
Started my first build on my first bike about a month ago on my 1980 Yamaha XS400 SII. This is going to be my first bike, project, and my introduction to the world of motorcycling.

Looking to make make this into a Bratstyle/Cafe bike. She is going to be running a bare tank, OD green seat, and kick start only with a lot of other smaller modifications as well.

So far I have Plasti-Dipped the rims, attached clip ons, cleaned and fixed front drum brake, and cleaned the carb.

Right now what I am having troubles with is trying to find the smallest/cheapest battery that I can fit into my bike with it being a kick only. Love to hear what you guys have to say about that
 

Attachments

  • IMAG0158.jpg
    IMAG0158.jpg
    164.8 KB · Views: 514
  • IMAG0207.jpg
    IMAG0207.jpg
    169.7 KB · Views: 509
  • IMAG0209.jpg
    IMAG0209.jpg
    181.2 KB · Views: 546
  • IMAG0210.jpg
    IMAG0210.jpg
    134.7 KB · Views: 526
Welcome mate, looks like your off to a good start. I think some guys may use alarm batteries? Anyway good luck with your build :)
 
Welcome to the forum. I use a 1.3ah sealed acid battery in my modded 80 kick only bike. When you look for a battery make sure it has a max charge rate of 14.5v or greater ( mine is 15v) or you will fry it.
 
It's looks ok. As for temp just make sure the battery has air flow around it (don't put it in a sealed box) You will have to change the bikes wire to fit it. On mine I run small low watt bulbs for my turn signals and a led brake light and a 35w head lamp. How much is the cost of the battery?
 
That one is about $10 I'm willing to spend more than that but all the alarm batteries at that size were in that price range.
 
How I have it in mine.
 

Attachments

  • DSC02472.jpg
    DSC02472.jpg
    257.6 KB · Views: 420
  • DSC02471.jpg
    DSC02471.jpg
    215.3 KB · Views: 500
thats pretty sweet Chris.

do I see the original fuse box there? or did you replace the insides?
 
Still stock inside:D It work just fine so why change it if it's not broken.
 
living on the edge :D

I ran the stock setup for as long as it lasted as well. In my case the fuse holders started snapping so I was forced. Pretty sure if that hadn't happened I'd be doing the same
 
Update for all of you guys out there.
So I got all my electrical worked out with a small 1.3 ah battery and after spraying some carb cleaner into the intake she fired right off. Thanks xchris! Right now I am going to finish sanding down and applying Sharkhide Metal Protectant to the tank.
Before I order pod filters for the bike I was wondering what any of you guys have done with this thing
IMAG0257.jpg
It originally ran to the intake manifold that connected the carb and the box filters but I'm not exactly sure how to get it clean air when I'm using pod filters unless I attach the pod filters to the manifold instead of the carburetor.
 
you can stick a filter on there or build a nice manifold

it's just a crankcase vent, it doesn't do much. Have a search on the forum ;)
 
So, after spring break and a solid week of working on the bike here is how she is looking. I have the tank stripped to bare metal, still debating on whether or not to throw the Yamaha badges back on or roll with the plain bare tank :bike:
IMAG0259.jpg
Once she is fully running I still gotta get the seat made, lighting hooked up, guages replaced, and do some general maintenance on her. But as of right now I'd say she is looking good.
 
Getting into the next big project now, building my seat. This is definitely uncharted territory for me so any and all advise would be appreciated.
So as of right now I have my frame chopped right behind the rear springs as shown here. I used the starter solenoid bracket to hold my new battery (works out really conveniently).
I am planning on using a wooden based seat for the bike which I would think means my best course of action to mount the seat would be wood screws. I plan on welding metal mounting plates to the frame loop and right behind the gas tank to do this.
What I have a picture of attached is what I plan to do to her, bare with me here.
IMAG0278.jpg

IMAG0279.jpg

IMAG0279_1.jpg
On the drawn one the blue represents metal to be welded on (frame loop and mounting plates). The red circles represent where the holes will be to screw the wooden seat to the frame.
Any of you guys who have mounted wooden based seats have any tips or tricks? And does anyone know a good way to weatherproof said wood seat?
 
Instead of using wood, you could use a heavy duty plastic cuttingboard (I did this myself). They're already weatherproof and can be cut using a regular jig saw. If you heat it with a hot air gun you can even bend it into shape if needed
 
Did you use screws or a nut and bolt system to fasten it down? My whole rationale is that I am glueing the seat foam directly to the base and if I used nuts and bolds I'm not sure how I could pull off securing the seat to the frame.
 
Back
Top