rectifier/regulator help

burndout

XS400 New Member
Messages
4
Reaction score
0
Points
1
Location
tulsa oklahoma
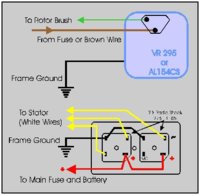
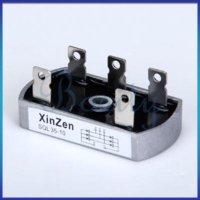
I'm needing help identifying a regulator and rectifier that will work on my 78 xs. I've read probably all of the current posts and still cannot determine what parts I need. The bike will be completely rewired with LED tail and only rear blinkers, head light, and electric start. I just really need to know what I can buy from a local parts store to make it work as I have neither of these 2 parts. I read that the vr292 is the regulator I should get but what about the rectifier? Sorry to start yet another post about this but I cannot figure out what I need to make that charging system function correctly and do not want to burn up any brand new parts. Thanks in advance!
 
Have you tested these items to prove they are faulty per the manual? regulator seems to be a more common problem, rectifier not as much.

Posted via Mobile
 
Drewpy's replaced his rectifier, otherwise I can't think of anyone else who has replaced it. I've seen the oem one for sale on eBay before
 
The Radio Shack rectifier will work on any year. The VR292 should work fine if wired right. I used one like in this pic. It shows how to wire in the reg and rec.
This set up is for the XS650 but will work fine on the Xs400. Where it says the green wire to rotor brush, the XS400 doesn't use brushes. Hook this green wire to one lead for the field coil, hook the other lead to ground.
On the rectifier hook it just as shown. The three white wires from the stator hook to the rectifier. Red to battery, black to ground.
The Radio Shack mod uses two full bridge rectifiers to make a three phase rectifier. You can shop Ebay and find three phase rectifiers starting around $5. I
l'll post a pic. you don't need a great big one, around 25 amps is plenty.
Leo
 

Attachments

  • combo3.jpg
    combo3.jpg
    25.3 KB · Views: 567
  • $(KGrHqR,!jQE5cFUs8ftBOepe(8)4!~~60_1.jpg
    $(KGrHqR,!jQE5cFUs8ftBOepe(8)4!~~60_1.jpg
    16.1 KB · Views: 488
Xsleo, thank you for the reply! this is exactly what I was trying to figure out! I thing your post should be stickied, I've searched for days trying to figure out if this setup would work, thanks again!:thumbsup:

Posted via Mobile
 
it aint pretty but beats the $50+ range ive seen other vr selling for, I dont trust all the ones for sale work, and i dont trust I would even pick the right one for my bike. I will take my chances at that rate!
 
Just got a rr38, but I'm opening it up this weekend to clean the sump screen inspect starter motor, and make sure the wires from the coil to reg are good. If there is a problem elsewhere do I run a risk of damaging the new rr?
 
To check the wires from the stator. Just use your meter on it's lowest ohm scale. On the three white wires number them 1, 2, 3. Check from 1-2, 2-3 and 1-3. They should all read the same, somewhere between .5 and 1 ohm. The exact reading isn't as important as all three being the same.
Also test from the three wires to the body of the stator, use a high ohm scale, should read infinity.
On the field coil check the ohms between the two wires and the body of the rotor. Should be around 4.7 ohms on the field coil and infinity to the body.
Leo
 
Right On. Everything checks out within your specifications. I had to account for the cheap meter itself adding between .3 and point .5ohm while doing so. I was glad to see the seals all still good condition (may be deceived) and other than the sump strainer plate scum there didn't seem to be any extreme debris. The stator and all that jazz could use a quick clean and lube before I close it off after I tackle what I believe the culprit of my woes. The only thing that did not pan out was the 2 wires from the field coil. The wires coming off of the field coil that run to the connection for the V Reg were both tested with the voltage regulator plugged in and also disconnected, same result. I tested the green wire to field coil and got 6.8ohm, tested to rotor body and got 6.8ohm again. I tested the brown wire to field coil and got a 3 ohm reading, when tested to rotor body and again got 3ohm. Could not get infinite ohm reading from either field coil wires to ground. I'm guessing I did the tests properly as I ended up with the same result for all but the field coil loom. I think its grounded out. but I am wondering should the coil be floating and not resting loosely for this test to be accurate? Im not supposed to check resistance between green and brown at the connection clip am I? Is it a safe bet to build a new harness or is it possible but less likely the whole field coil is bad all together?

Im sorry so many questions, but I think Im on to something. Thanks for the confidence boost I think we are on to something here if the nail isnt hit on the head already. Pictures to follow and progress reports...
 
Last edited:
On your field coil the power flows in on one wire and out on the other. The brown is power in, the green power out. So yes, check the ohms from wire to wire. This is where you a should get the 4.7 ohms.
If you are getting a ohm reading from either wire to the body of the rotor you have a short. It sounds like a bad field coil.
On any digital meter, on the lowest ohms scale you need to touch the probes together. This is the resistance of just the leads. You subtract this reading from the actual test reading.
I have one meter that reads .7 ohms, the expensive one, My cheapy Harbour Freight meter bounces between .1 and zero.
Leo
 
rewired the stator and field coil and ready to carefully piece back together new gaskets thread lock and all that jazz, tight fit bit it looks like I can make it all work. I went with 14 gauge wire, heat shrink each individual wire inside some new larger heat shrink tube for the bulk of wires. I took out my starter motor and rebuilt it just for the hell of it I guess. Didn't seem to be any issues except tons of excess carbon which is now cleaned up with some new oil and grease. I manages to remove my old reg and rectifier to install a new rr38 on the bottom of the battery box. noticed I need to move my female clip to the wire harness to make it work or else its male to male.

Is get the ground is common on the new rr38 between reg and rectifier. What should I do with the ground from the wire harness to the new regulator clip? Just plug it in and forget about it or would it be a good idea to run a new wire to the harness end and ground to battery or frame? Im not going to rush anything, as new gasket to go on and I want to be careful pressing the stator back into the case and make sure I have the right hardware in the right spot. Im using some gasket maker so that's likely to be the hardest part of the battle when I close it up. Would have liked to check out the starter clutch springs and so on when I was in there but without the yami rotor puller im not going to even attempt it. should be good it the sprocket with the starter motor only turns one way correct. Anyway My torque wrench is ready to go. Thanks for your help fellas and sorry for the hijack Im hoping a few fixes on one thread can help a lot more people out. I have tons of photos and always more coming so check my album and feel free to use photos if anybody is making tutorials.
 
Once again I feel I may have missed something here. It is my understanding that you can put an all encompassing reg/rec called an rr38. However where do we get this rr38. Is it a part from napa or oreily. Or is something we can find on mikes xs. I am 90% done with the fabrication of my xs and would like to fab everything so I can start on the wiring loom. Please help
 
RR38 is a British piece. If you do a search, you will find where Drewpy put an ebay link, or if you do a extensive google and ebay search, you find a bunch overseas. I wish I could remember my manufacture, but once my bike started running, I found out the vr element was shot. Use Reg/rec for a local search on our website, and you will find lots of hits. even one person who got one off of aliba web site, that says they have a min order of 50. but that person got one for a good price. good luck. I know ebay has one, but like the one I got, I had to modify the plug connectors just like a recent poster person had to do.
 
I am installing this one:

http://www.amazon.com/REGULATOR-RECTIFIER-YAMAHA-1978-1985-MOTORCYCLE/dp/B009ZWO6R2

I have not started the bike yet to see how it works, but hopefully in the next day or two. The plug it came with will not fit, but I installed the plugs off of the old regulator and rectifier. The colors all match: black to black, brown to brown, red to red, white to white...like pre-civil rights marriages.

As the original separate regulator and rectifier each have a ground (black), they have to share a ground, but that's no big deal. I have all the connections soldered and heat shrink wrapped, I just need to install it. It's going under the battery box where the original rectifier was.
 
Also just got my combo regulator rectifier in the mail today, http://www.regulatorrectifier.com/catalog/1979-Yamaha-XS400F-Regulator-Rectifier there's cheaper options around like the one houghmade posted,

had to swap one wire position in the plug other than that it matches perfectly, looks decent quality too, its got a big solid heat sink. I dont have carbs on my bike yet to check if it works but it is designed specifically for my model (79 xs400f)
 
That's what I'm talking about. Links. Thanks guys if your ever in Denver I owe you beer or joint.....it is denver
 
Back
Top