DIY/Modded Stubby H-Pipe

jthiessen

XS400 Addict
Messages
419
Reaction score
0
Points
16
Location
British Columbia, Canada
Has anyone had success modifying the stock or fabbing a new H-Pipe that pulls the filters closer to the carbs but maintains their cross-flow and the venting from the crankcase? Effectively cleaning up that 'triangle' but maintaining the function of the big stock H-Pipe.

I think Kingjetpack has made something up for his bike, I would be interested in seeing what he used, but also looking out for any other creativity!
 
Yup. I made KingJetPack's as well. The following is based on version 3 of my DOHC design. Adapt as required for SOHC. Measure twice, think about it, test fit, measure again, then proceed with drilling or cutting. Post your results when done!

What you will need:
53mm (2") ID PVC tubing (~15cm or 6" total length)
2 or 3x 5/8" 90degree barbed hose fittings
a 5/8" barbed hose T-fitting
5/8" ID hose, oil resistant (~15cm or 6" total length)
2x 5/8" ID rubber grommets
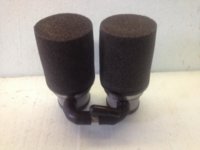
2x UNI filters, Part Number UP-4229 (2 1/4" inlet x 4" length)
UNI filter oil, or UNI Foam Air Filter Service Kit Part Number UFM-400
access to a lathe with 2 1/2"+ chuck or 2" sanding drum and drill press.

- I made the PVC stacks 60mm (2 3/8") long to match the stock DOHC carb inlet pipe length. Adjust length as required for SOHC applications. Longer is better than shorter, especially for SOHC engines.
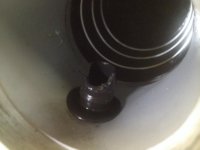
- Increase the ID of one end of each stack to 55mm x 10mm deep to fit onto carb inlets (or whatever your carb inlet diameter is). You want the stacks to be a snug fit on the carb inlets. A lathe makes this easy and precise. A sanding drum in a drill press will work, but is frustrating and messy. Trying to use a sanding drum on a hand drill will be as much fun as trying to milk a ferret, and probably just as painful!
- Drill a hole in each pipe, close to the filter mount end of stack, to fit rubber grommet. Leave room for the filter to mount (19mm or 3/4") and the grommet.
- Install grommets and mark one stack as Left, the other as Right.
- Install stacks onto carbs temporarily.
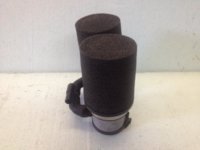
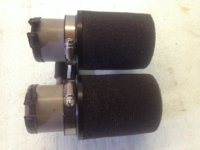
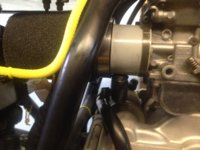
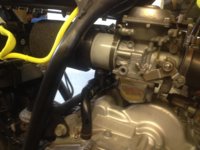
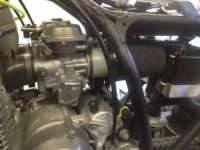
- Insert 90 degree barbed fitting into each grommet, pointing towards center, use rubber hose to connect to T-fitting, keeping the T-fitting centered between the stacks with the bottom leg of T pointing straight down.

***NOTE!***: The grommets and 90 degree fittings MUST be at the 6 o'clock position when mounted on the carbs and viewed from the filter end. The T-fitting should be centered below the stacks for balanced flow. Placing the grommets/fittings at any other position will reduce the efficiency of this design and result in poor crankcase venting! Don't even consider 9 and 3 o'clock to hide everything between the stacks. If at this point you feel the need to ask "why?", keep reading (or just do as you are instructed), a LOT of thought has gone into this design and you haven't fed me enough beer to explain it all! :D

To further improve the flow through the crankcase vent(s), the 90 degree fittings can be modified. The end of the fitting inserted into the stack can be cut at an angle. Do NOT cut down the entire fitting! The idea is to cause a siphon effect. A 45 degree angle on the side that faces the carb inlet seems to work well. Just be sure that the fitting will fully extend through the grommet once you are done cutting it down.

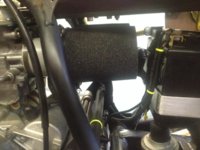
- Oil the UNI filters and install onto the stacks. They will be a stretch fit, but not that difficult. (Already have pod filters? Are they UNI or K&N? If not, put them on your lawnmower and get UNI filters for your bike!)
- Slip stock clamps onto the stacks and install stacks onto carbs. Make sure the vent tubes are at the 6 o'clock position!
- Don't over tighten the clamps, snug is all that is required. The PVC flexes more than you think.
- Connect crankcase vent tube. If required, use rubber hose to connect remaining 90 degree fitting to T-fitting.
- Check carb sync and go for a ride. Be prepared to spend hours re-jetting carbs to correct for the added/smooth air flow!

I currently don't have pictures. If pics will help you visualize this, grab a pencil and paper and start sketching! I wrote a lot of words to get to this point :) Otherwise, it will be a week or so before I get to reassembling mine. Maybe KingJetPack can post some pics of the stacks I made for him.

Good luck! I take full credit for your success, and no blame for your failure! Donations of beer or cash will gladly be accepted, PM me for details! :cheers:
 
I finally got around to taking some pictures. Don't mind the oil, I'd just oiled the filters and was waiting for it to soak in a bit before wiping it clean. Viewed from bottom, right side, carb inlet, close-up of crankcase vent, and top view.
 

Attachments

  • Photo 2014-04-26, 15 19 51.jpg
    Photo 2014-04-26, 15 19 51.jpg
    140.5 KB · Views: 871
  • Photo 2014-04-26, 15 20 07.jpg
    Photo 2014-04-26, 15 20 07.jpg
    145.7 KB · Views: 829
  • Photo 2014-04-26, 15 20 43.jpg
    Photo 2014-04-26, 15 20 43.jpg
    183.5 KB · Views: 928
  • Photo 2014-04-26, 15 23 52.jpg
    Photo 2014-04-26, 15 23 52.jpg
    196 KB · Views: 835
  • Photo 2014-04-26, 15 24 37.jpg
    Photo 2014-04-26, 15 24 37.jpg
    175.1 KB · Views: 880
Some more pics installed on bike. Viewed from left and right sides:
 

Attachments

  • Photo 2014-04-26, 15 34 24.jpg
    Photo 2014-04-26, 15 34 24.jpg
    202.1 KB · Views: 751
  • Photo 2014-04-26, 15 34 11.jpg
    Photo 2014-04-26, 15 34 11.jpg
    200.5 KB · Views: 771
  • Photo 2014-04-26, 15 33 13.jpg
    Photo 2014-04-26, 15 33 13.jpg
    225.1 KB · Views: 844
  • Photo 2014-04-26, 15 32 35.jpg
    Photo 2014-04-26, 15 32 35.jpg
    224.9 KB · Views: 824
Looks like he tooks his carb to the hardware store, and found the best fitted pvc pipe with lip (female side) then uses the clamps to make it hold tighter. You can see its a tight enough fit, cause the marring of the carb aluminum on the inside of that female lip.
 

Attachments

  • Photo.jpg
    Photo.jpg
    183.5 KB · Views: 640
Come on now folks, I wrote detailed instructions on how I make these in the second post of this thread!

@XSChris, thanks! They perform better than I hoped for and the grey PVC is a reasonably close colour match to the carb bodies. I was considering painting the stacks, but decided it wasn't worth the effort.

@Scorpio, if the PVC is a close fit on the carb inlets, it will squeeze down with the clamp to a very tight fit. I have to install them with a light coating of oil, and once the clamp is tight they are not budging.

@Arfstrom, I don't take bike parts with me. I measure carefully, take notes, and take my calipers with me when parts shopping. :) As described above, I machined the I.D. of the pipe on a lathe to the O.D. of the carb inlets. Makes for a snug, press fit and perfect seal.
 
Would silicone tubing work as well? I have access to a bunch of sizes but had never thought of using it for a new H-pipe.
 
haha haha, (imagine beavis n Buthead laughter)

If I only had a dollor for every part I have taken to the hardwares store, I will be making another trip for the o-ring for the starter soon, hahaha .... A fool and his money will be soon departed!
 
Silicone tubing might work. Just keep in mind that the stacks have to support the weight of the filters. Even though the filters are not heavy, they will want to flex the stacks. I don't know how thick silicone tubing would have to be to be rigid.

I imagine that if the filters started bouncing around, they would stress the carb holders, which could become a problem.
 
haha haha, (imagine beavis n Buthead laughter)

If I only had a dollor for every part I have taken to the hardwares store, I will be making another trip for the o-ring for the starter soon, hahaha .... A fool and his money will be soon departed!

Lol....I took some chrome risers with adaptor attached for my VTX to Tractor Supply to match up some bolts. I had couple of people stop me to ask what that's for? Pretty chrome for something in the hardware store!.... I wanted to tell them it was a bracket for my new digital satalite fertilizer attachment. LOl
 
May be some what of a hijack, but I'll ask anyways.
I am making this, but am not a fan of UNI pods (for aesthetic reasons). Would any K&N filter with 2.5" ID work as long as it physically fits in the space? I understand rejetting will be in order.
But is an air filter an air filter, or does one need to consider turbidity and flow rate etc?
 
Heck NO! Your mufflers will melt! Your headlight will dim more than normal! Your chain will stretch beyond limits. Your engine will blow up! Worst yet, your carbs will seek eternal retribution on your heathen soul for messing with my heavenly perfect design!

Or it will work just fine, despite your penchant towards aesthetics... ;)
 
May be some what of a hijack, but I'll ask anyways.
I am making this, but am not a fan of UNI pods (for aesthetic reasons). Would any K&N filter with 2.5" ID work as long as it physically fits in the space? I understand rejetting will be in order.
But is an air filter an air filter, or does one need to consider turbidity and flow rate etc?
Since you'd be rejetting anyways, different flow rates between Uni/K&N aren't an issue.

If you research pod filters you'll find comments about turbulence interfering with CV carbs like ours, however, most of the people with problems probably removed the stock H-pipe and installed the pods directly on the carbs.
By keeping the stock H-pipe or installing some alternative, like in this thread, you should counter-act the turbulence.

Go for it, show up pictures when you're done!
 
Heck NO! Your mufflers will melt! Your headlight will dim more than normal! Your chain will stretch beyond limits. Your engine will blow up! Worst yet, your carbs will seek eternal retribution on your heathen soul for messing with my heavenly perfect design!

Perhaps I will anoint and clean said K&N filters with Holy Oil...Hopefully that will balance out my cosmic desolation!
 
My pods are attached directly to the carbs. Honestly, it has taken quite some tweeking to get it right. Rejetted mains, pilots, synced, and a lot of adjusting on the air mixture screws. I finally have got the sweet spot. Cranks easily on first kick, only have to choke it for less than 10 seconds. Idles great and runs smooth through all gears. I can just ease around and runs smooth, or I can hammer down the rpm ranges and it runs just as smooth. I don't know what the top speed is on her, really don't want to push a 33 year old bike that hard, but I've broken the speedo needle on the stop past 85mph.
 
Just stumbled across an interesting video of a trick carb in operation.


You will note the fog of fuel that is spraying back out of the carb, and that not all of it is getting back into the carb. The stock H-pipe (or the stacks I built) will keep this fuel spray contained and able to be drawn back into the carb. Pod filters directly on the carbs would be absorbing and getting wet from all that fuel, altering the fueling. No stacks or filters obviously aren't even worth considering.

I wish that there was a conversion kit available for our carbs to utilize the Multiple Jet Nozzles (MJN's) as they appear to be quite an improvement over the needle and jet arrangement. :shrug: You can read the story behind their design and operation here:

http://www.bikebros.co.jp/vb/sports/sfeat/yoshimura-carburetor-en/
 
I wish that there was a conversion kit available for our carbs to utilize the Multiple Jet Nozzles (MJN's) as they appear to be quite an improvement over the needle and jet arrangement. :shrug: You can read the story behind their design and operation here:
That looks pretty awesome.
I wonder what a BS34 conversion would involve.
Good picture of the MJN component itself here:
http://www.yoshimura-jp.com/en/products/engine/yd-mjn.php
Looks like the MJN is essentially a perforated steel tube. Looks like the holes get smaller the higher up the tube they go, so inversely the bigger holes are exposed the higher the slide moves up.

Might be able to buy the MJN tube on its own. The stock emulsion tube would almost definitely not work....
 
Back
Top