Candlepower conversion is a no-go

JPaganel

XS400 Addict
Top Contributor
Messages
439
Reaction score
117
Points
43
Location
MINNEAPOLIS
After reading the forums I ordered a 6 3/8 halogen conversion from Candlepower. This was to go into my 1978 XS400.

Today I emailed them about returning it.

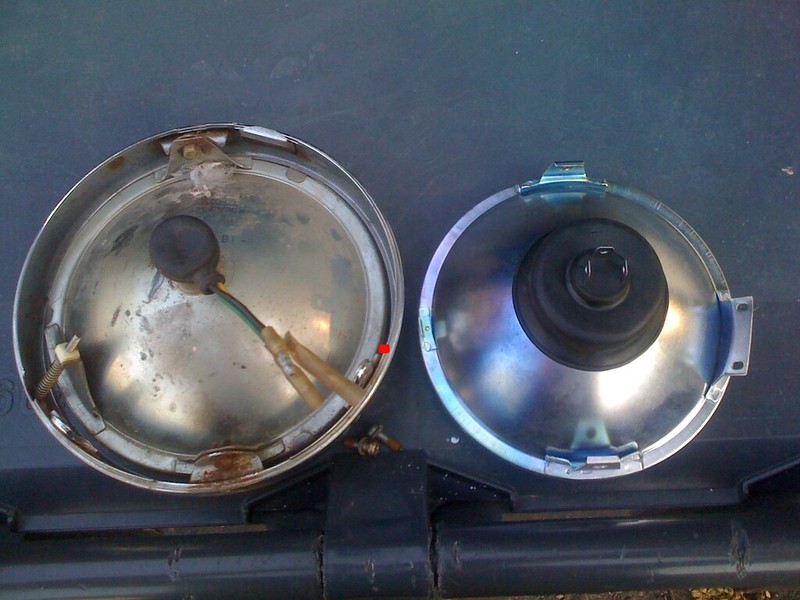
The light itself fits into the ring, the mounting ears bolt up. It's a little smaller than the original sealed beam, but that isn't a big deal. What is a big deal is the third mounting point, the tab where the adjuster screw is supposed to go. The tab has holes at 1 and 2 o'clock, while the screw is on the other side at 10 or 11.

I could probably cut off the tab and try to relocate it, but I am not going to. I don't want to mess up a $50 part to wind up with some sort of a cludge.

I am undecided what to do. I could try using a much cheaper 7" conversion and rig it, or I could spend a couple of bucks more and get a whole replacement light. Maybe a streetfighter-style twin set, I like the looks of those.


I don't know why this didn't work. Maybe early XS is different from late XS?
 
Can you take a picture so I can see exactly what you mean? Maybe we can come up with a creative solution.
 
Drewpy, I bet US and Euro lamps are not the same. I have a sealed beam with tabs attached to it. Yamaha lists it as part 1L9-84320-61-00.
 
OK, here is an actual picture of the original light and the conversion side by side.

Both lights are oriented with the TOP marking on, well, top. As you can see the top and bottom mounting ears match, but the adjuster brackets are on opposite sides.

Brackets are spot-welded to the reflector. The sealed beam isn't a true sealed beam, there is a bulb inside there, too.
 

Attachments

  • IMG_0366[1].jpg
    IMG_0366[1].jpg
    185 KB · Views: 462
I took the tab off the original light and epoxied it on. You find a cheaper solution that allows the used of an H4 bulb, let us know.
 
I can also find round H4 headlights complete with buckets on ebay for under $40 shipped. They are a little smaller, Harley-style, but they should fit with a little bracket bending.
 
I think you could solder it in place after grinding the metal or using sandpaper, then be sure to flux the surface for good adhesion.

Good luck.
 
On our 80 xs400 I upgraded to an H4 halogen. The original wasn't really a sealed beam but the bulb was "permanently" installed with a metal ring around the base that was tabbed onto the reflector. I bent up the tabs and had to break the original bulb from the rear since it was too big to be removed through the base hole at the rear of the reflector in one piece. I then trimmed the base ring of the new 65W H4 bulb ($26 at the local big box auto store) to match the base of the original bulb and installed it thru the rear and tabbed it over in place. It took maybe an hour from start to finish.
 
I took the tab off the original light and epoxied it on. You find a cheaper solution that allows the used of an H4 bulb, let us know.

Hey HoughMade,
Just curious, I'm in the same boat and following your and OliverB's lead on this.
I'm in the same boat as you with a 1978E so the adjustment tab is off like this pic in someone's post shows (http://www.xs400.com/forum/showpost.php?p=87118&postcount=8). I was curious instead of relocating the tab like you did (I saw someone crack the Candlepower's front glass trying to cut off that back adjustment tab with a Dremel which is what I'd be doing. Guess just the vibrations broke it?)...
Anyway, can't you just drill a hole in the outer bracket where the hole on the Candlepower headlamp reflector currently is?

Basically drill a hole in the outer headlight bracket where i drew this red dot:
14401683925_d202e3680c_c.jpg

Is it harder to drill into that metal than it looks?

and if so, would you definitely need two holes to match the Candlepower's 2 holes or just the one hole is enough?
Heck, why cut at all... and just use high-temp electrical tape to keep it in place?
 
I guess I realized looking at the headlight just now, that the headlight outer trim has a little knotch/flattened area for that adjustment screw so would be maybe hard to re-create that just by drilling a hole on other side.

Oh well, guess I'll do the Dremel/epoxy solution. Any pointers so the glass doesn't crack while Dremeling like this guy mentioned ( http://www.xs400.com/forum/showpost.php?p=58114&postcount=7 )?
 
I guess I realized looking at the headlight just now, that the headlight outer trim has a little knotch/flattened area for that adjustment screw so would be maybe hard to re-create that just by drilling a hole on other side...

And that, wanting an original look and not wanting an empty hole is why I cut the adjusting bracket off of the old headlight and epoxied it on the Candlepower unit.

I didn't cut anything on the Candlepower, I believe I may have bent the bracket a little is it needed to be out of the way for clearance, don't remember, but I know I didn't cut it off.

Epoxy, silicone and high temp electrical tape were all involved in my installation of the headlight and it's holding just fine years later. I believe a 3 prong plug either came with my Candlepower unit or I bought one. I just tested to see what was high, low and ground and soldered up the connections to the plug.
 
I converted our 1980 unit to halogen using a $15 (IIRC) halogen bulb from the local Pep Boys auto store. I drilled a small hole into the base of the sealed beam bulb thru the actual bulb base and inserted a small screw driver thu the hole to break the actual interior bulb. I then pried the tabs out holding the interior bulb base to the glass reflector and removed the remnants of the interior bulb from the glass reflector and cleaned out the broken glass fron the interior of the reflector. I then used a pair of tin snips to trim the metal base of the new halogen bulb to the same size as the original interior bulb base, inserted the halogen bulb thru the hole in the glass reflector, and pried over the tabs I had originally pried up to remove the original bulb so that the tabs would secure the new halogen bulb to the glasss reflector. The original electrical connector plugged right into the new halogen bulb. I took all of about 2 hours to complete the conversion from original to high powered halogen. Its been working great for 2 years.
 
Hey jmd_forest,
that sounds like another great solution, Im just more comfortable with a simple Dremel cut and JB-Weld/Epoxy vs trying to cut around the orig headlight and making it look good (just have a feeling I'll mess it up).

Thanks HoughMade, I understand now. I'll give it a shot soon when the unit arrives.

Might have a question for OliverB, as he mentioned to replace your tailight? bulbs so the accompanying 55W/60 bulb doesnt dimm when braking. Here are his comments for other's reference:

"To go along with this, install a pair of 1157 LED stop/tail bulbs. These are very low amp draw and balance out the increased amp draw of your new 55/60 watt headlight bulb. When you install LED stop/tail bulbs, your headlight will no longer dim when you apply brakes...

Your original 3-prong plug will connect directly to the 3 prongs of the H4 bulb. Install two good LED stop/tail bulbs and you cancel out the increased amp draw of the H4 55/60W new headlight bulb. The reflector install is the same as installing a new sealed beam old style headlight.

You do not need to change the brake light housing, just the bulbs in it. Look on ebay, amazon or www.superbrightleds.com to find replacement led bulbs to fit your housing."

Now I dont have the stock taillight, so not sure what i need to do...
Here is the light
The light seems to be labeled 12V10/5W:


14409135244_f070b99e5e.jpg

14223668410_46fede55fb.jpg


Possible to put 1 LED light in that unit (not sure if I need to change just the bulb or the unit itself to accept LED light bulbs)? and if I can just throw an LED into that unit, I'm assuming it would be 12V. But what specs should I get since its only 1 light (a certain Amperage/Wattage light?).
 
Back
Top