My build progress so far......

This build is bad ass yes I too love the grips :D are you planning on running the flex tube or are you just figuring out what bends to use? I like the look just wondering if you will have to put supports in to hold it in place o and where did you get it and is it pricy it would be a great tool to help solidify designs without welding a bunch of crap together to find you don't like it:thumbsup:

Posted via Mobile

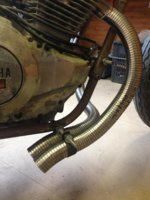
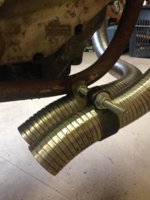
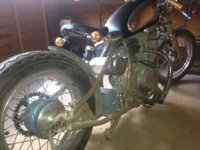
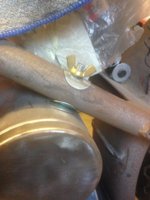
Cheers mate......gonna run the flexi tube,as its quite stable once bent.The pipes are gonna be finished with bronze wrap anyway,but i think the tubing looks pretty cool in itself :D

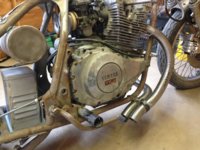
Am gonna bend it again round to the brake side,then run the other pipe almost straight down and keep like a short shotgun,maybe side by side?
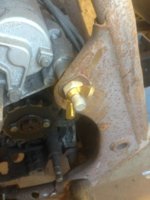
Am gonna TRY and mount them to the bottom frame tube,using the standard exhaust clamp,with a rod running through the clamp and into/onto the frame.
If not,il'll make a custom hangar.
Will post pics as I get it done.
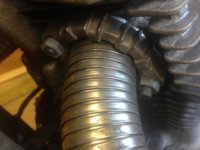
Got the tubing on good 'ol ebay.....was £17GBP inc. shipping for a 500mm length.The ID was 38.5mm.
It's called POLYLOCK FLEXIBLE S/S EXHAUST TUBING.
Look out for it on your local site.:cheers:
 
Exhaust dry build done....gotta take them all apart again,paste them up and wrap 'em :D
 

Attachments

  • IMG_3309.jpg
    IMG_3309.jpg
    214.1 KB · Views: 279
  • IMG_3308.jpg
    IMG_3308.jpg
    161.3 KB · Views: 272
  • IMG_3307.jpg
    IMG_3307.jpg
    199.5 KB · Views: 273
  • IMG_3313.jpg
    IMG_3313.jpg
    285.2 KB · Views: 302
  • IMG_3312.jpg
    IMG_3312.jpg
    231.6 KB · Views: 304
how are you gonna connect them to the header bolts? are you using the original header ends and welding these onto them? Or creating new ones?
 
how are you gonna connect them to the header bolts? are you using the original header ends and welding these onto them? Or creating new ones?

Yes....I have cut the original header ends short,and will weld them into the flexi tube.I have made some new flange plates to bolt them to the cylinders,as the original collars are to thick to allow the exhaust to bend enough to sneak past the downtubes....needed to cheat as much space as possible!!:wink2:
 
is that a mini spring for the mono shock system under the seat ive been looking for a way to get that hard tail angle with out the hard tail?
 
is that a mini spring for the mono shock system under the seat ive been looking for a way to get that hard tail angle with out the hard tail?

Hey......
It's an MTB enclosed,adjustable shock I got off EBay.It gives me just enough suspension in the seat,as it's a hard tail!!...
Picked it up for about £15...I liked the fact that the spring is enclosed,keeps it clean and tidy looking.
I'm 6' and about 15 stone,and it works well for me!:thumbsup:
HTH?
 
ANOTHER change of the tank design!!!!:banghead:
Saw the tank panels on ebay and couldnt resist them!:doh:
They're from a JAWA 250,and I got 'em from Lithuania for a tenner plus shipping!!
I filled the embossed Jawa logo,pressed out most of the dents,and shaped them on my thigh to fit my xs400 tank.
Next job,makes some tabs to fit them to the tank,then fit and mould in the sides where necessary.
Once fitted,and moulded,and prepped,I masked the steel,painted the filled in logo and the whole tank(AGAIN!!) IN MATT BLACK.
once done,I applied the gold Rising Sun decal both sides,and trimmed to fit.
I'm really pleased with the results,and I think it looks cool on the bike.
Probably gonna do most of the bike in matt black with a couple of gold 'highlights',to pick up on the gold in the decal,although I can't decide whether to do the frame gloss black....:shrug:
Also thinkin' of fitting a SHINKO Vintage Replica Twin Whitewall to the rear,like the one in the picture,but have been told by a couple of people they're not that great....
Let me know what you think??:thumbsup:
 

Attachments

  • IMG_3442 (1).jpg
    IMG_3442 (1).jpg
    229.8 KB · Views: 261
  • IMG_3443 (1).jpg
    IMG_3443 (1).jpg
    236.2 KB · Views: 236
  • IMG_3444 (1).jpg
    IMG_3444 (1).jpg
    229.3 KB · Views: 273
  • IMG_3445 (1).jpg
    IMG_3445 (1).jpg
    131.7 KB · Views: 254
  • IMG_3446 (1).jpg
    IMG_3446 (1).jpg
    199.6 KB · Views: 227
  • IMG_3447 (1).jpg
    IMG_3447 (1).jpg
    189.1 KB · Views: 237
  • shinko 130 90 16 rear tyre.JPG
    shinko 130 90 16 rear tyre.JPG
    9.7 KB · Views: 225
  • $(KGrHqJHJEEFIjPD)BEsBSNwybnhEw~~60_12.JPG
    $(KGrHqJHJEEFIjPD)BEsBSNwybnhEw~~60_12.JPG
    32.9 KB · Views: 224
  • $(KGrHqJHJFMFIlFYWr1YBSNwyENWcQ~~60_57.jpg
    $(KGrHqJHJFMFIlFYWr1YBSNwyENWcQ~~60_57.jpg
    204.5 KB · Views: 207
I dig those side thingsr the tank,polish the heck out of them and the tank will look nice.I wouldn't mind doing something like that with mine that's great inspiraration:thumbsup:
 
ANOTHER change of the tank design!!!!:banghead:
Saw the tank panels on ebay and couldnt resist them!:doh:
They're from a JAWA 250,and I got 'em from Lithuania for a tenner plus shipping!!
I filled the embossed Jawa logo,pressed out most of the dents,and shaped them on my thigh to fit my xs400 tank.
Next job,makes some tabs to fit them to the tank,then fit and mould in the sides where necessary.
Once fitted,and moulded,and prepped,I masked the steel,painted the filled in logo and the whole tank(AGAIN!!) IN MATT BLACK.
once done,I applied the gold Rising Sun decal both sides,and trimmed to fit.
I'm really pleased with the results,and I think it looks cool on the bike.
Probably gonna do most of the bike in matt black with a couple of gold 'highlights',to pick up on the gold in the decal,although I can't decide whether to do the frame gloss black....:shrug:
Also thinkin' of fitting a SHINKO Vintage Replica Twin Whitewall to the rear,like the one in the picture,but have been told by a couple of people they're not that great....
Let me know what you think??:thumbsup:

Hey guys.....

So now i'm thinking of doing the frame RED OXIDE,tank and rear 'guard matt black,wheels matt black.......

Any thoughts on the Red Oxide as opposed to black frame??

Am also thinking of going with brass wingnuts as a little detail item also :thumbsup:
 
i like anything with the name Matt in it....:D

i think the dark red and matte black would look cool. if you know anyone decent at photoshop buy them a holiday 5 pack and have them render up the color scheme.
 
I managed to find a bit of time today to attend to something that's been buggin' me since I got the frame..........putting some shape into the lower rear frame gusset's!!!....
An hour or two with the jigsaw/grinder and i'm much happier:D
Will give the cut's a proper clean-up when I strip the bike for prep/paint.:thumbsup:

And I've decided to go matt black on the frame,and dark red/red oxide on the rims/spokes :thumbsup:
 

Attachments

  • IMG_3442 (1).jpg
    IMG_3442 (1).jpg
    229.8 KB · Views: 293
  • IMG_3717.jpg
    IMG_3717.jpg
    236.3 KB · Views: 202
Progress Update......
Today I split my exhaust collars in half with the grinder,then sanded them flat and smooth to give myself as much room as possible for the pipes coming out of the heads.They also have a homemade alluminium gasket behind them.:)
Then I hand made some brass fork caps to compliment the brass wingnuts I am using throughout.
I cut them from two solid brass stop end caps!!:wink2:
I found that a 2pence piece fit perfectly,so used it as a template to hand file the brass for a good fit.
Then I flatted them of by hand on some 120g paper,then fitted them with a small bead of clear silicone round the edge.:D
I should be able to just flick them out with the point of a knife if I need to for maintenance.:thumbsup:
 

Attachments

  • IMG_3813.jpg
    IMG_3813.jpg
    187.4 KB · Views: 237
  • IMG_3810.jpg
    IMG_3810.jpg
    160.5 KB · Views: 209
  • IMG_3804.jpg
    IMG_3804.jpg
    202.7 KB · Views: 228
  • IMG_3805.jpg
    IMG_3805.jpg
    198.2 KB · Views: 219
  • IMG_3812.jpg
    IMG_3812.jpg
    169.7 KB · Views: 237
  • IMG_3811.jpg
    IMG_3811.jpg
    184.4 KB · Views: 242
  • IMG_3814.jpg
    IMG_3814.jpg
    173.7 KB · Views: 198
  • IMG_3806.jpg
    IMG_3806.jpg
    187 KB · Views: 221
  • IMG_3808.jpg
    IMG_3808.jpg
    224.4 KB · Views: 212
  • IMG_3807.jpg
    IMG_3807.jpg
    212.8 KB · Views: 190
  • IMG_3809.jpg
    IMG_3809.jpg
    132.7 KB · Views: 196
Back
Top